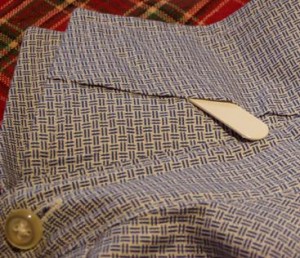
 (WARNING: PICTURE HEAVY) In the DH’s closet, there are two basic types of shirts: button-down shirts and what he refers to as ‘dress shirts’. Now, I only learned this recently, but the ‘button-down’ shirt (which really refers to there being a collar whose points are secured to the shirt itself with buttons) is actually not a US invention. One of the members of the Brooks Brothers family, on a European trip in the late 1800s, saw how polo players there did this to prevent their shirt collars from flying up into their faces during play; he obviously thought it was a neat idea because he brought it back and convinced the family company to start producing what they called ‘polo(tm) button-down’ dress shirts in 1896. These shirts were always seen as something rather sporty and casual until college boys started wearing them in the 1950s, after which they took off and became a staple of men’s wardrobes. Now they are seen by most men as ‘dress’ shirts, nice enough to wear with suits. Certainly men’s clothing suppliers have literally made their business on the backs of the button-down shirt and we get catalogs all the time from them at Chez Siberia.
But, I digress (as usual). This is NOT about the button-down shirt.
Men’s shirts that are considered dressy (i.e., not a button-down collar) and nicely made today usually come with that item that you see sticking out of the pocket on the undercollar in that shot above. It’s called a collar stay. In the UK, they are referred to as ‘collar stiffeners’. Some men refer to them as knuckles, bones, collar sticks or collar tabs. I noticed recently the DH had a shirt from what used to be considered a very high end shirt manufacturer which had them built right into the collar and you could not take them out, which means that this particular shirt can never be taken to the commercial laundry or dry cleaners because the heat of the commercial pressing machines would ruin them. That is another point: Shirts with removeable stays should have the stays …removed… before you take them into a dry cleaner or laundry (or, for that matter, if you wash them yourself at home since those little celluloid buggers will shimmy out of the pockets faster than you can say “Where’s my…”). Just take them out, put them someplace where you will remember where they are (always the challenge – but putting them in the box where you throw your change on your dresser would work), and when the shirts ‘come back’ or are finished drying, put them back in the collar to shape it up properly.
Now, there are all sorts of stores and sites out there that will sell you replacement stays in everything from celluloid to very nice engraved metals, which is a rather unique gift for someone if you can’t think of a thing to get for the guy in your life (or yourself, goodness knows) who wears non-button-down shirts. Just do a search on ‘replacement collar stays”.
But enough of the digression. The point here is that I am laboring over the nice wool challis shirt for the DH, inspired by Gary Cooper, and one of the options in the pattern, strangely enough, is a collar with a pocket for collar stays. This is something I’ve never seen in a commercial pattern and is probably seen as being too fiddly for a home sewer to do. Is it fiddly? Yes. Beyond the skills of a home sewer? Nyet. No special equipment is needed and actually, it was sort of neat to do up the example for you. The one thing you’ll want to have on hand is a collar stay(and you or the guy in your life might already have some of these laying around that got taken out of shirts already). If you don’t, take a firm piece of card stock, a 3×5 card or a business card and cut a piece that is 3/8″ wide by 2 3/4″ long and make one end cut into a point. That’s your test stay.
This collar requires THREE different pattern pieces (and I’m not even talking about the stand which we discussed the last time): The upper collar, an under collar and something they are referring to in the pattern as ‘under collar 2″ but which I’ll call ‘the pocket’.
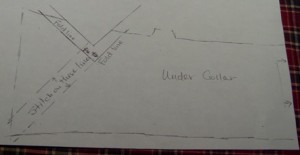 This is the under collar pattern – I redrew it for you on white paper to make the markings easier to see. As you can see from the photo, there are markings for folds and stitching.
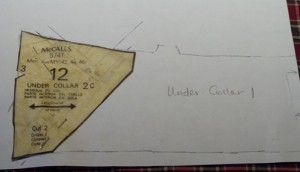 This is the pattern for ‘the pocket’, which basically covers the end of the collar. I have the feeling in commercial shirt making, they don’t use the same fabric as the collar itself and probably use something lightweight but strong or even a type of non-woven interfacing.
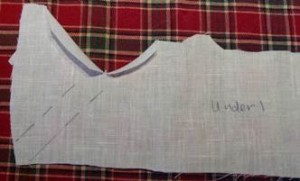 Step 1: Cut out your under collar piece and mark the folding and stitching lines. Cut straight down at the ‘v’ and press down both edges on the undercollar.
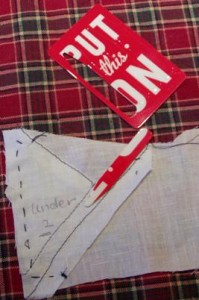 Step 2: Apply ‘the pocket’ piece and baste on or just pin onto the undercollar. Stitch down one of the lines and using either a collar stay or your ‘test stay’ (see photo), line it up against the stitching line you just did and make sure that the markings for the other stitching line are on the other side of the stay so that when you are all done, you can actually get the stays into the collar. Trust me on this one because I had to rip out my stitches and do this twice. Once you’ve tested and corrected any markings for the other stitching line, do the second stitching line. TRUTH IN ADVERTISING: The collar stays I’m using came to me through Put This On(which is a site I adore and which I feel does a great job in educating guys on clothing and style) as a ‘thank you’ for supporting their video program. They are not available for sale. Sorry.
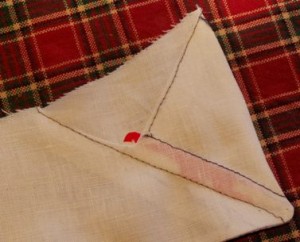 Step 3: Put together the now two-piece undercollar/pocket and the upper collar, right side to right side (and ‘the pocket’ is on the WRONG SIDE, ok?), sew the outer edges with the appropriate seam allowances, trim the corners and edges down to a really narrow allowance. Turn right side out, steam press, and see! Voila! a pocket, with stitching, and you can put a collar stay in it. And take the stay out! Genius.
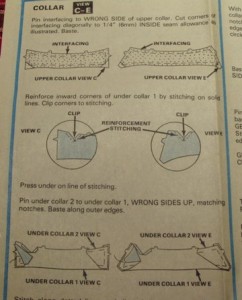 These are the directions from the pattern with the diagrams to help you also. The next step will be to attach the collar to the stand, which we’ll take up in the next episode.

Good for you, Toby! I have never seen one of those in a men’s shirt pattern, nor have I bothered to draft one myself. I guess I’m not rigid collar type…or just lazy.
Peter – This is the very first time I have ever seen it in a men’s shirt pattern and the reason probably is because it was from the 1970s. It was just mind-boggling to me.
I have sewn for over 40 years and have to say, that is the first time I’ve seen something like that! Guess you learn something new every day! I’ve made shirts for my husband for years and have the opposite problems you do. He’s a large man–54 in chest and a long body–so finding a good pattern was tough. I had one that completely wore out and never thought about making one out of interfacing before it did. I’ve actually found a replacement now so that will be the first thing I do. He’s tougher about fabric choices and I have a hard time finding things he likes to wear. Thank goodness he doesn’t work in an office anymore! Are you using a pattern that has the two-piece back? The top is two pieces and the shirt body is sewn into it? I always liked those since they reinforced the collar better and seemed to hang better to me.
According to men’s style writers like GQ’s “The Style Guy” and Alan Flusser, the button-down collar shirt is worn with a sports coat (tie is fine) but never with a suit. Yes, you see it, and I also see young bucks wearing spread-collar dress shirts with no tie, and a suit, or even with jeans.
But my dashing husband would have none of that. A button-down is a sports shirt, to him, though he wears a blue linen Brooks one with a seersucker suit on hot summer days; he says the suit is so casual it demands it.
Anyway, collar stays! You are very skilled, and hats off!