 One of the things about making men’s shirts is that generally speaking, you must count on observers seeing only about 25% of the shirt unless the shirt is being worn alone, without a jacket or a vest or a sweater. Then, all of it except for the portion tucked into the person’s slacks can be seen. But generally, with a shirt such as this one, it would be worn with a sweater or a sport coat, so at the most, the center 5-6″ of the front, the collar, and the cuffs are going to be seen.
The rest of it could, one might presume, look like the proverbial ‘hot mess’ and no one would be the wiser. But it also means that those items – the collar, the center front with it’s button band (whether it is integrated into the front pattern piece or a separate and applied band), the cuffs and the placket where the cuffs open on the sleeve all have to be perfection. And not only technical perfection, in that the sewer has performed all the steps to produce a perfect looking product; but they have to fit smoothly and perfectly to the person wearing it. A collar band (aka ‘the collar stand’) that is too big, or too small, cuffs that swamp the wrists (or get caught on a large wrist watch), and messy buttonholes on the front band just ruin the look of a man’s shirt. There is no way out of this. It is not the same as with women’s clothing where design details (fancy collars, ruffles, pin tucks, seaming and so on) can distract the eye from an imperfection. With men’s shirts, the item itself is so spare, the design itself so boiled down to its essence, that what is seen must be perfect, which is daunting to say the least.
Aunt Toby is very aware that commercial patterns have issues. One of the major problems is that as the grading on the sizes goes up, everything gets graded up. At some point in the deep, dark past, it was decided that as people got taller, everything got bigger and as people got larger, everything got bigger, which ignores the fact that the distance between a person’s shoulders and their chin does not necessarily get longer. It is not as if people who are 6’2″ tall have more bones in their necks than people who are 5’8″ (everyone has 7 bones in their necks by the way). But obviously no one listens to me because the neck band in this particular pattern (which covered three sizes) just kept getting bigger in the width and bigger in length. What to do? What to do?
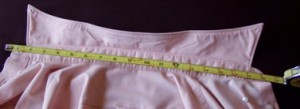
Well, I’m a big believer in going with what works, that is, I took out one of the DH’s shirts and, as you can see from above, I measured the neckband on the collar in both the width and in the length. It was 18 1/4″ long and 1 5/8″ wide. And that is without seam allowances. I’d already cut out the neckband in fabric and backed it with my super-duper sew-in interfacing and I measured that.
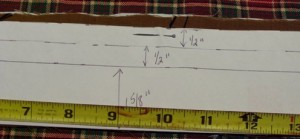
As you can see, I have marked not only 1 5/8″ width on the paper I placed on top of the neckband, I also marked the two seam allowances of 1/2″ each and we still see a whole lot of challis real estate hanging out there at the top – it’s almost 1/2″, which might not seem a lot but on a man’s shirt, all of these little items just keep adding up. The collar would be attached to the top of the stand (I have not even measured that yet; I’m sure that will be swimming out there as well) and that would add even more extra fabric. Not a good look.
Gary Cooper didn’t have extra fabric hanging around his neck. 
The length of the band was out there as well. Even if I used 5/8″ seam allowances (which are the standard in commercial home sewing patterns), I would need a band of only 19 1/2″ which would sew up to one that would be 18 1/4″. This band is 20 1/4″; if I sewed it up with 5/8″ seams, it would be 19″ – 3/4″ too big which would hang around my husband’s neck like some sort of clown costume.
Whole lotta trimmin’ going on…

