 I don’t know where I read this but someone wrote that only the rich can afford to buy cheap shoes. This makes perfect sense to me, since a good, well-made pair of shoes is something that can be repaired, resoled, shined up and used for a very long time, whereas cheaply made shoes can’t be repaired and end up in the trash. The corollary to this homey rule is that women’s shoes, because they are all (I repeat: A double hockey sticks) made cheaply with glue, spit, and goodness knows what else, can only be cosmetically repaired and end up in the trash anyway. The day I can find a pair of women’s dress shoes with sewn on leather soles with a welt so that I can take them to the shoemaker to have them repaired is the day I buy them in brown, blue, black and tan or cream and get rid of everything else in the closet. That will also be the day that I personally win the Kentucky Derby, the big lottery, and magically lose 50 pounds off my hips.
Aunt Toby believes in magic, oh yes she does.
But, as usual, I digress, but not much. One of the truly annoying things of retail life is the absolutely shoddy way that knitwear is put together, gloves, mittens and hats especially. In this case, I am concentrating on the bitter end of the whole deal and it is the same whether we are talking about the end of knit hats, gloves or mittens. What is done at least 95% of the time is that the manufacturer has the operators take an end of the yarn, thread it with a needle through the stitches, take a couple of hand stitches (maybe), and then snip the end off close.
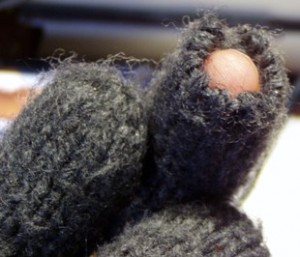
Nice, neat and tidy, but the end just won’t stay inside; it’s not anchored TO anything and the stitches at the end of the finger top, the top of the hat or the mitten end are just hanging there, like beads on a string. If the yarn end somehow works its way out, or gets caught on something, or a child or a pet finds it and plays with it and pulls it, voila! The string for the beads comes out and there you are with, as you see in the top photo, live stitches just hanging there in the wind…waiting to slip down, down, down, unraveling as they go. Oh the horror!
And a complete waste of money for the consumer because then you have one glove or mitten that is ruined (or a ruined hat), and the other half of the pair is still ok but it won’t match anything and there you are. Both of them end up in the trash. Waste. Aunt Toby hates waste. I still have, and wear, a pair of leather palmed wool knit gloves of my departed Pop, who darned them numerous times. They are still better than 90% of what I could find on the market today.
The glove was brought to me by our elder daughter. The annoying thing is that I will probably be brought these gloves again – what I should do is undo and perform the operation I am going to demonstrate here on the other 9 fingers to avoid this but I wanted to get this up in a post for readers today. The one finger took about 5 minutes, tops and most of that was hunting through my yarn collection to find something that was close to the main color of the gloves. If I had not been concerned with that, I could have done the deed in probably a couple of minutes. It is worth doing – saved a pair of gloves for ED at a time in the winter season when we still have at least 8 weeks of cold weather.
Tools:
Set of double pointed needles (I’m using US size 2’s here; it depends on the size of the yarn in the item and the yarn you will be using to do the repair)
Darning needle with a big eye
Material:
In this case, I’m using DK weight yarn in the closest grey color I have to the gloves.
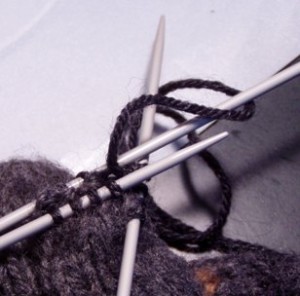
 Step 1: Pick up the stitches on the double pointed needles. I found 12 stitches, so, I put 4 stitches on the first needle, then 4 on the next and 4 stitches on the last one.
Step 2: Find the end of the yarn the manufacturer used to string the stitches and keep track of that. Making a slip knot in the end of the yarn you have found that matches, grab hold of the manufacturer’s yarn and holding the two together, do whatever stitch is opposite to the stitches on the outside of the item you are repairing. In this case, this is standard ‘knit one row; purl the next one – that’s the wrong side’, so I’m purling as I go. I’m weaving in the manufacturer’s yarn end and my yarn end for a couple of stitches while I go. Do a couple of rounds.
 Step 3: Cast off. If you do not know how to do casting off, go here:Casting off
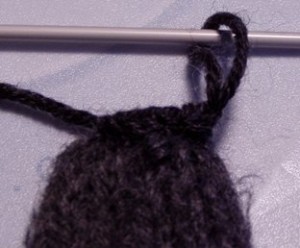
Otherwise, do a standard cast off (slip the first stitch, knit or purl the next, pull the slipped stitch over; knit or purl the next, pull the stitch before over the new one and so on) until you come to the end. You will have what I have here – a row of cast off stitches (the line that looks like a braid) and one ‘live’ stitch left on the needle with a longish end of yarn. Take the end of the yarn and pull it through the live stitch, and pull the whole deal off the last needle.
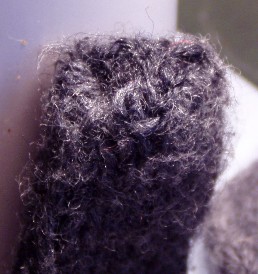
 Step 4: Neatening off. Turn the finger inside out and pull the yarn end through the hole. Thread that through the darning needle. Put the pointy end of the darning needle through the cast off stitches one by one and pull up tightly; sew a couple of times through the end and make a knot.
Done. Neat, tidy and it will not come out – even if the end somehow works it’s way loose, because you put the end through the last ‘live stitch’ (see Step 3), the cast off stitches will stay cast off.
And why bother to do this? Because you CAN and it’s worth doing, if for no other reason than it took a little bit of time and you did it yourself. Always a good reason to do things.

J.M. Weston, Fratelli Rosetti (among other excellent makers) and a little bespoke Toronto shoemaker: you need superior shoes to start with, so they have something to work with. Many of my shoes have been successfully cobbled. Like jewellers, there are levels of skill and interest in shoe repair, but in a small town or city one is unlikely to find them anymore. Even in my Little Italy the trade is dying out. But when you find one, they can keep a pair of shoes on your feet for decades.
Darning is a lost art; I have the technique passed on from my mother, and an old wooden daring egg in my sewing box.