Kitchen Counter Economics Rotating Header Image

Making It

Buttons and zippers will break you

shirtWhen my Great Aunt Lily died, I inherited a suitcase filled with trims and notions from her. Inside it were bundles carefully done up with ribbon of metal-toothed zippers, and little bags of buttons. All sorts of buttons. It was also obvious from the condition of everything that these are not brand new stock that she’d bought and hoarded.

She’d removed them all from clothing that she and her sister had worn out.

This was a real head-scratcher for me until I asked my dad about it. Why would anyone save used zippers and buttons? He explained to me that all of those notions were expensive – and replacing broken zippers or lost buttons got expensive.

Do you remove zippers or buttons before you send clothing to the rag bag? Good question.

But buttons and zippers, for us home sewers, get expensive. So, one of the ways to reduce the expense of sewing your own is: sew clothing that doesn’t require a zipper or buttons to close.

Now, if you sew knits, depending on the pattern, you can definitely get away with no buttons or zippers, unless you are making a jacket.

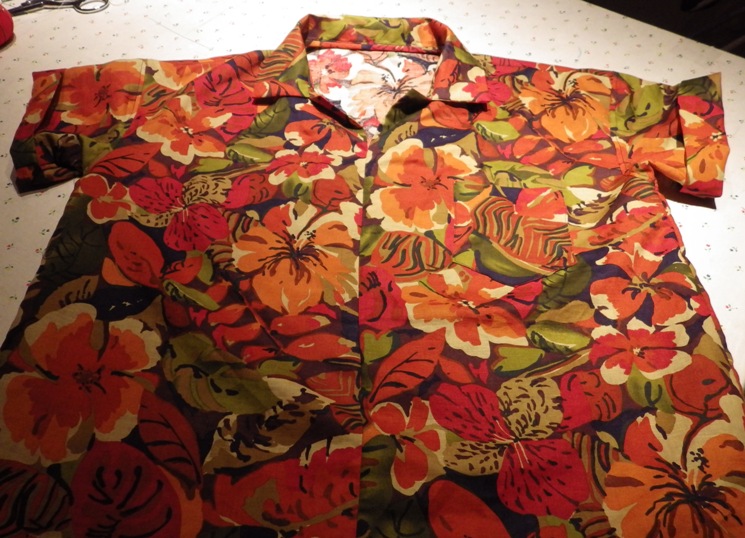
But if you want a shirt. A woven fabric shirt. This can get dicey. So, I’m always on the look-out for patterns for woven fabric items which basically pull over the head. I got one last year when we were in London at the Victoria and Albert Museum, but I think you can find this company’s patterns in the US and other countries as well.

Here’s the pattern, called ‘The Factory Dress’: Merchant and Mills Its’ a multi-sized pattern (it’s in UK sizing, which for US sewers, means that if you take a US 12, then you need to use the size 14 lines). The thing that makes this dress really useful is that it has a separate bodice and skirt. (cue triumphant music here)

That means that I could take the bodice part, do a bit of magic on it and make a ‘pull-over my head shirt’.

Now, this pattern only has bust darts, so I had to do a little ‘split and add tissue’ in the front to deal with my rather luxuriant boobage, but other than that and lengthening the pattern to 27″ from shoulder to hem so that I’d be able to tuck it in once I was finished, that is all the change I had to do.

One other item, and this is my own particular bias: This pattern calls for a back neck facing, something which I hate. I hate them. If every grain of sand in the Sahara Desert had the word ‘hate’ printed on them, it would not equal 1/5th the amount of hate I have for back neck facings, which flip out, look yucky and are a pain in the neck. So, on the necks and collars of woven tops, I do a Hong Kong finish. Neat, tidy and.. no back neck facing. It ends up looking like this:
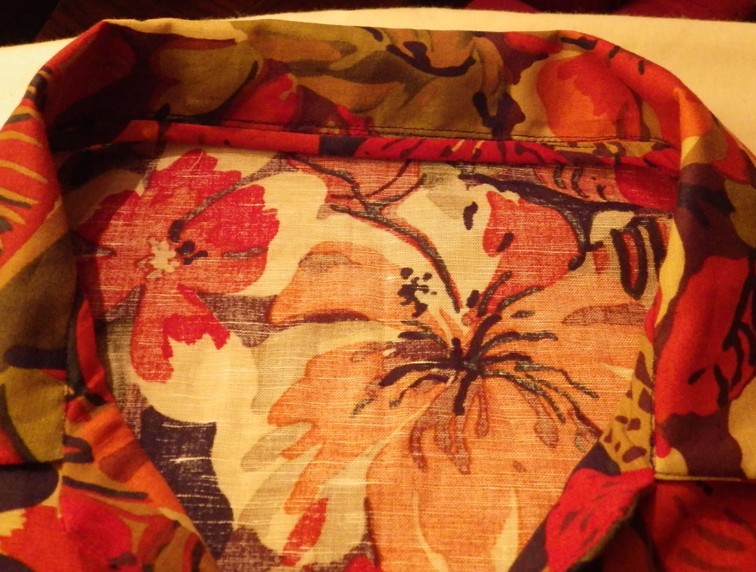
 shirtneck What I do is:
1) Make the collar and turn it right side out. Poke out the corners (and these are usually just little collars – not the righteous collar and neck band variety)
2) Zigzag across the bottom of the collar and pin it to the neck edge. Match all the notches and dots and what have you.
3) Baste the collar to the neck edge, pretty close (I use a 1/4″ seam)
4) Either use bias binding or self-fabric bias (1″ wide) as long as the collar edge is, plus 1″
5) Putting right side to right side, sew the boas along the collar edge/neck edge.
6) Fold down the unsewn edge and roll that over the collar edge/neck edge to completely encase it. Pin that down and sew it down. You can do this by hand or with machine.
7) Follow the directions for any front facings extending to the shoulder seam. Once you are done, you will see, Voila!, that the ends of your Hong Kong finished collar seam is neatly and tidily covered by the front facing. No back facing.

Anyone else have any tricks to save money on sewing clothing?

2014 – a year in review

Yoohoo, everybody!! Since today appears to be ‘International Gotta Review 2014 Day” for bloggers, I guess I have to woman up and work my way through the good, the bad and the did..not…work for 2014. Organization, I realize, is everything here, so we will go by topic sub-group so that for those readers who are only interested in one topic, just scroll down until you hit that. (more…)

Make a Muslin: Fixing the back

This is going to be a very short post (holiday weekends and all that). OK, let’s hop to this, going from top to bottom:
1. The shoulder seam is too long; that needs to be shortened.
2. There is too much fabric between the shoulders and the waist; that length needs to be shortened as well.
3. We’ve got the same straining across the hip area.

Shortening the shoulder seam (done at the shoulder edge, not the neck edge) is easy enough. Feeling for the knobby sort of bone in the shoulder, I marked that spot and left myself about a half an inch for a seam allowance and cut away the rest. This is a fix that needs to be both on the bodice front and on the back, and needs to be graded into the armscye.

The too much fabric length, in this case, is a simple fix. In this case, I took a half-inch tuck (which takes down the length an inch) from the armscye on the left all the way to the armscye on the right. Now, of course this not only reduces the length of the back bodice from the shoulders all the way to the waistline, it also reduces the size of the armscye circumference in the back as well. which pulls that up a little bit in the back.

Now the next step is to get the sleeve into the new armscye and see how that looks and feels.

Make a muslin month: Fixing the front

Now, to refresh our memories, here is the photo of the first round on the muslin for the jacket. There are a number of issues here and, starting from the top, we’ll review:
Shoulders: The shoulder seam is too long; it’s hanging out over the shoulder joint. That needs to be shortened.
Armscye: There are two issues here – one which we can see in this photo and one which we can’t (you’ll have to take my word on this one). The first one, which you can see, is the flap of fabric hanging out there. This is caused because a) I’m short, so the distance between my shoulders and my bust point is shorter than it would be if I were the height of an ‘average’ woman wearing this particular size. This is a problem I have…every…single…time. Just part of the game and has to be dealt with. If the amount of extra stuff there was less than 1″ (that is, if I pinched the extra together and it was like a dart that was 1/2″ on each side), then what I’d do is I’d frankly…cheat. I’d ease-stitch around the entire length of the front part of the armscye and ‘eat up’ the extra that way. This, however, is NOT 1″. This is like 2″, so (sigh), I can’t cheat. I have to find a way to reduce that distance. There are multiple ways to doing this, and in my case, I’m going to do a combination of things. (more…)

New top pattern and a sew-along!!!

Yes, Yes, I know, your Aunty is in the midst of doing a muslin for a jacket, but sometimes you also need something that is easy, simple and will clean the brain. Yes, I do more than one project at a time; it actually helps when I am doing something more complex like the jacket and am having some frustrations to do something as something to keep ‘the mojo’ up there.

And this is IT — a brand new knit top pattern from Hot Patterns. Very clever, with a neat and tidy tee-top in the front, with a nice, loose yoke-blouse look in the back, for light weight knit fabrics. Love it. Great for the hot and steamy summer. PLUS – and I love this part – a sew-along. What’s not to like?

If you’ve never tried a Hot Patterns product, now is the time to do it – there will be the fabulous Trudy there to hold your electronic hand through the entire thing. When the sew-along is over, you will have your top completely done — no UFOs!! Make new friends! Learn new skills! Plus videos and all sorts of help from Trudy herself.

Home sewing can be a very isolating experience – most of us have to snatch little bits of sewing time for ourselves and many times we get behind and end up feeling defeated. Commit to the project. I’ll be doing it too!

The sew-along starts on May 21st (plenty of time to get your pattern and get fabric or search the stash for those great knits you’ve been, like me, hoarding), so here you go! Getcher pattern right here!! Blouse-back tee and sew-along!

Make a muslin – jacket first try

I always feel like one of those pictures in my junior high health textbook when I do these shots; all that is missing is the black bar across my eyes.

So, going from top to bottom, what are my issues here? And I say it that way because they are MY issues, not the pattern issues. The muslin went together smooth as silk; everything matched up. I know a lot of folks do changes on a tissue first before they cut out the muslin, but I don’t because I want to get a complete view of how the thing comes together. Once I start ‘slicing and dicing,’ all sorts of things can happen so I want to know how the garment came together before I do that. So, from that perspective, the pattern works really well. When I laid the whole thing out on the table after I’d sewn it together and ironed it, it literally looked exactly like the diagram on the envelop. (more…)

I hereby declare this month to be “MAMM”

OK, so this month out there is everything from “Me Made May” to “International Business Image Improvement Month” (which could use it, I admit) and I am going to totally avoid the entire thing and declare my own celebration: MAMM, which stands for:

MAKE A MUSLIN MONTH

I know there are folks out there who have been sewing since we were slapping laundry on rocks down by the old mill stream and avoid making a muslin of a new garment like the plague (and I suspect that most of them either have a sloper/block/tried and true pattern that they use religiously, OR they are perfect size whatever and have figured out which size in the Big Three fits them). I am not one of those people. I have physical issues that preclude whipping the tissue out of the envelop and just cutting out. I’m short, stocky, stout, short-waisted, broad in the back, have a tummy, big upper arms, and a rear-end you could set a potted-palm on. I also have arms like a T-rex (as in even petite size stuff is several inches too long in the sleeves) and low knees. I don’t like making ‘wearable muslins’ because by and large, this does not work for me; I end up with things that are too big in the shoulders with the waist in the wrong place, the armscye is way too low and the sleeves do not fit. And I will have ruined a piece of fabric; I’d rather work out all the issues on muslin first. (more…)

Frida Kahlo and her skirt

And, we move ahead to the next piece of traditional clothing: The skirt.

Now, we should probably set our parameters right from the start: A ‘skirt’ is any piece of clothing that starts somewhere in the vicinity of the waistline and ends somewhere within reach of the knees and the feet. I realize this is a rather broad region, but if we are going to take in everything from a 1960s mini to today’s maxi, that’s what we’ve got to work with. Also, a ‘skirt’ can take in anything as simple as a sarong/lavalava (that is, a piece of fabric that is wrapped around the waist and held up either by itself or some sort of tie) all the way through 18th Century ‘structures’ which require wood, wire, padding, hoops, and probably a birdcage, and probably weighs somewhere in the vicinity of 30-50 pounds. “Skirts’ can include every sort of fabric manipulation known — pleating, gathering, ruching, gores, embroidery, slits, you name it. (more…)

Huipil-style, final thoughts

Now, usually, your Aunt Toby is one to say, “In sewing, fit is everything,” but in a case where there is no ‘fit’ per se, fabric is everything. OK, in these two cases, it is not only fabric that determines the look, but also one other thing: One inch. Literally one inch in the width measurement makes a huge difference in the look. I did not think it would make that much of a difference, but it did.

First up – the top above, made of quilting cotton. The fabric was washed before I made it and I followed my formula from the last post – biggest measurement, divided by 2, plus 5″. This is also actually a couple of inches shorter, but no bother. I actually like the look better in this incarnation than in the next one, but I’m good with both, actually. Again, this top and this style top is going to have some action in my wardrobe this summer. Certainly the easiest thing to sew, EVER. No buttons, no zips. Each one of these (minus the time for washing, drying and ironing the fabrics and cutting the contrasting strips out) took a couple of hours and most of that was placing, pinning and sewing on the contrasting strips. Perfect ‘fiddle around in the evening’ project.

Second up. This on literally is one inch bigger on the width measurement and a little longer. It is also made of cotton voile. Boy, what a difference that fabric makes, doesn’t it? On the other hand, it’s literally ‘light as a feather’ and will be great for wearing when it gets hot and sticky later. But I think I will take it in a bit at the sides for a little bit less ‘blousy’ look on me.

A couple of thoughts:
In doing a bit more research on Frida Kahlo and her huipils, I found out that most of the decoration on these is actually very dense embroidery, which means that these were a real ‘economic development’ project for her – she bought the fabrics themselves but paid indigenous artisans to make them for her. These were not items which she just picked up in a shop or off a stall in Mexico City. I’m also fairly sure (though again, I’ve never seen one of these in person and so have not held one in my hands) that these weigh a good bit; all of that dense embroidery would require a fairly solid fabric to support it and between that and the embroidery itself, these were not lightweight tops.

Another thought is this: Am I, by using this concept and basic design, indulging in what is referred to today as, ‘cultural appropriation’? That’s a good question and one I continue to go over in my head as I go through these exercises on traditional clothing. I’m not trying to pass off what I’m doing here as a real huipil from the Tehuana region in Mexico; no one looking at them can be in any doubt of that. I feel also a tremendous amount of respect and honor for the artisans who produced the garments for Frida Kahlo to wear and who continue to produce them today. These garments, from skills and time they take in the weaving, embroidery and sewing, are worth every penny of the hundreds of dollars that are being asked for them (though I sometimes wonder if the artisans themselves are being paid that much for all their time and skill). But, from the viewpoint of ‘if I want to make a garment which is simple and sparing of fabric and resources’ standpoint, I think the huipil is an excellent basic traditional garment to use as a model.

Where huipils meet the muslin

In our last episode, we discussed Frida Kahlo, zero-waste clothing and her wearing of indigenous, traditional clothing, as an introduction to making clothing which is less wasteful of fabric, less wasteful of resources, with the first example being what has almost become (besides Kahlo’s crown of braids with flowers woven in) the icon for Kahlo: the Huipil, her seemingly favorite form of blouse. Even in photographs where she is (gasp) wearing pants, she is still wearing one of these colorful, simple tops. (more…)

Blog Widget by LinkWithin

Bad Behavior has blocked 478 access attempts in the last 7 days.