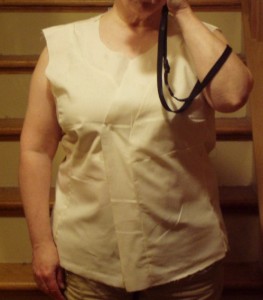
 Now, to refresh our memories, here is the photo of the first round on the muslin for the jacket. There are a number of issues here and, starting from the top, we’ll review:
Shoulders: The shoulder seam is too long; it’s hanging out over the shoulder joint. That needs to be shortened.
Armscye: There are two issues here – one which we can see in this photo and one which we can’t (you’ll have to take my word on this one). The first one, which you can see, is the flap of fabric hanging out there. This is caused because a) I’m short, so the distance between my shoulders and my bust point is shorter than it would be if I were the height of an ‘average’ woman wearing this particular size. This is a problem I have…every…single…time. Just part of the game and has to be dealt with. If the amount of extra stuff there was less than 1″ (that is, if I pinched the extra together and it was like a dart that was 1/2″ on each side), then what I’d do is I’d frankly…cheat. I’d ease-stitch around the entire length of the front part of the armscye and ‘eat up’ the extra that way. This, however, is NOT 1″. This is like 2″, so (sigh), I can’t cheat. I have to find a way to reduce that distance. There are multiple ways to doing this, and in my case, I’m going to do a combination of things.
I could make another dart (if you recall the diagram, there is a bust dart there already which goes right to the bust point). This would be a really big dart and perhaps that won’t look so terrific. Or, I can combine that dart (a smaller dart) with a move that will help to deal with the second issue, which is that the bottom of the armscye is tooooo low. Like, “I’m showing most of the side of my bra” low (that’s the issue that you can’t see from this photo). I’ve got to raise the bottom of that armscye. Now, from a “what the heck” standpoint, I could just pull up the shoulder seam until the bottom goes to the right place, right? Well, except if I do that, then the bust point gets raised too and then it’s in the wrong place, so I’ve created ANOTHER problem. Or, I can pull up the shoulder seam a little bit AND do a smaller dart to take up the 2″ and pull in the extra fabric toward my armpit (which is actually something you want in any case so that the sleeves fit better).
But, what do I do then about the too-low armscye? It will still be too low. Well, it will be less low on my body than it used to be AND I’ll do something to raise it (that is, make the armscye hole itself smaller) which will cure another issue that is in the same spot.
And that issue is this: When you have an armscye that does not fit properly (that is, the bottom of it is lower than about 1″ or so down from the inside of your armpit), a couple of things happen. First, the sleeves will not fit properly on you (that is, they will strain against the bodice) and second (and this annoys the heck out of me and is probably the number one reason why I sew for myself because socalled ‘ready to wear’ or ‘off the peg’ clothing does this to me all…the…time), I can’t raise my arms. Now, I realize that most of us are not exactly doing ‘the wave’ or ‘YMCA” in every day clothing or clothing we wear to work. I get that. But, there is nothing so incredibly frustrating to me about trying to reach for something and finding out that either I can’t raise my arms over my head to get it, or, if I can, when I do reach, the whole bottom of what I’m wearing – dress, blouse, jacket – pulls up. Waaay up. Sometimes to an embarrassing point.
And it’s totally unnecessary if designers and manufacturers would design the armscyes properly. But, frankly, most of them use computer generated patterns and don’t want to have to deal with the issue. Ever wonder why it is that the vast majority of dresses and tops out there are sleeveless? Now you know. Yes, putting in a sleeve is more cost (not that much more, believe me, but a little bit more), but the problem really is that a set-in sleeve is technically more challenging than a kimono, cap or dolman sleeve and if the pattern for that and the armscye is not designed well, then it is frankly a pain in the neck for the sewing machine operators and…time is money and all of that. (rant over)
So, as an example, take out a ruler, take off your blouse or top and go the mirror. Put the ruler snugly under your armpit as far as it will go and then lower it a little bit. Put your arm down so that you are holding the ruler under your armpit. See where the bottom of the ruler is located on your body? THAT’s where the bottom of the armscye seam/bottom of the sleeve should be coming together. If you have it there, you can raise your arms over your head all you want and there will be no issues.
So, here we go. First, I made the shoulder seam (at the shoulder edge; not all the way across) about 1/2″ deeper. And that effects both the front of the bodice and the back of the bodice.
Second: The dart at the armscye. First, I pinched in the extra fabric and pinned it. I marked it with red marker where the pinches come together so that I know how much and where the issue is.
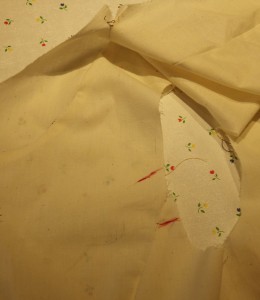 The trick here is to make this dart point to the same vicinity as the other bust dart is going (because that one is pointing right toward the bust point and that’s where we want this dart to point to also).
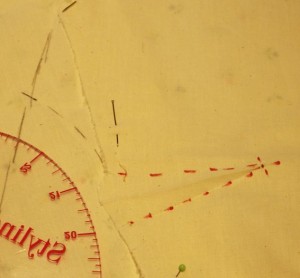 I’ve indicated here the new dart (the dotted red line). Also, I’m sure you have noticed that when you have a dart, you also have some extra fabric there sticking out of the garment edge – this is so when you actually make the dart, the edge of the garment is maintained. So I need to put extra fabric there as well. I’ve laid in a new piece of muslin at the side and I’ve used my curve ruler to create that – those are the black lines.
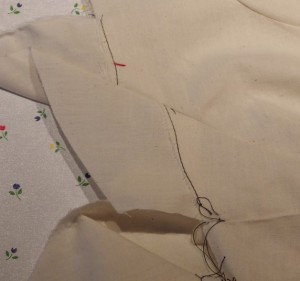 As you can see from this photo, even once I sew the dart, the original side of the garment is no longer lining up, so I need to take my ruler again and ‘true up’ that side. Getting closer…getting closer.
Here is how I do that – I take my ruler and laying it along one of the gentle curves, I recreate the side of the garment and bring it out to the new edge formed by the extra muslin for the dart. 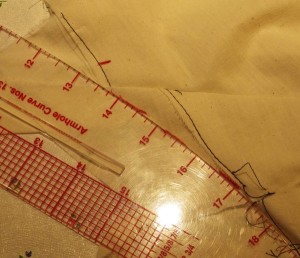 Yes, I realize this looks like a pain in the neck and more work, but having the fit be correct is important and the jacket will look a lot better. I mark the true-up and trim that. That becomes my new garment edge in that area. I will transfer those markings to the paper pattern at the end.
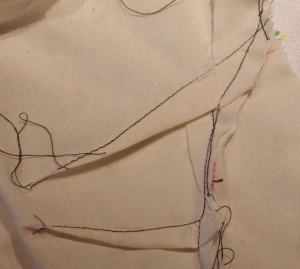 Now here is the inside of the area with the new dart. At the bottom, you see the original, small bust dart. Above it is the new, larger and longer dart which takes up all that fabric, which is pointing toward the bust point. I actually had to do this twice because I did not make it long enough the first time and ended up with a ‘poof’ of fabric down toward the bust. Don’t want any poofs.
So, let’s review what we’ve done so far:
We’ve shorted the length of the armscye opening a little bit by pulling up the shoulder seam by about 1/2″
We’ve snugged in and reduced the amount of fabric at the front of the armscye with a second dart going from the armscye itself toward the bust point.
What is left? The bottom of the armscye that is too deep. Now, we’ve pulled that up a bit with the shoulder seam reduction, but not enough. Again, I went back to my measurements of the jacket that fit and realized just how much deeper this hole really is. I need to fill in the hole.
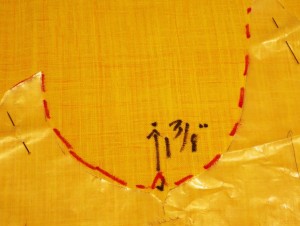 To demonstrate just how deep a hole we’ve dug for ourselves here, I’ve pinned the paper pattern (yes, I use waxed paper..)to contrasting fabric to make things stand out for ourselves better here and I’ve marked the original pattern edge with red marker. I’ve also marked where I need the armscye to be and I’ve marked the measurement. That dot is the the very bottom of where I need the seam to be and now I need to make an armhole to get to the original edge.
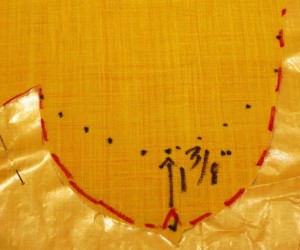 Using my curve ruler (and if you don’t have one of these, treat yourself to one – they really are very helpful both in drafting and in modifying patterns), I recreated the under-arm curve for this piece – this is the underarm side piece of the jacket. Those black dots indicate the seam line itself; when I cut out this piece to add to the muslin, I added seam allowances. Then I sewed the patch ( and that is really what it is at this point) in, sewed the pieces of the muslin back together and tried it on again. The front now fits fine (except for the pulling at the bottom, which is a separate issue and will be taken care of separately).
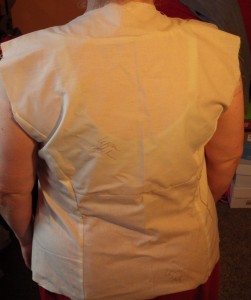
Let’s check the back.
Oh, Bay-bee, we’ve got some issues here which will need to be taken care of next. As a short introduction and again starting at the top:
We have too much fabric between the shoulders and the waist (those are those flaps around the armholes) and then we have wrinkles down toward the waist (ditto as above but again, I’m short and short-waisted and expect this). And then we have our old friend the straining between the waist and the hips (which is probably causing the straining in the front – no such thing as a garment where there is connection between the problems in the front and the back). So, our job at this point with the back is the reduce the length between the shoulders and the waist and release some of the strain across the hips.

Oh Thank You! I have been muslined out on a shirt for my husband – the armhole and front gaposis are the same as yours! You have done such a great service! Your instructions and photos make it so clear;) Good luck with the rest of your jacket.
Gaposis – I love it. Thank you, Hillary – if anything I do here is helpful, then it is so worth the doing. And men’s shirts have their own set is issues – when I make shirts for the DH, I have neck and hip issues to deal with. 🙂