Kitchen Counter Economics Rotating Header Image

make a muslin

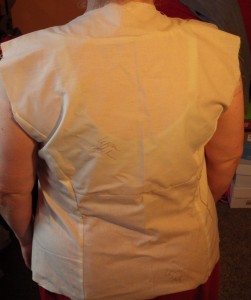
Make a Muslin: Fixing the back

This is going to be a very short post (holiday weekends and all that). OK, let’s hop to this, going from top to bottom:
1. The shoulder seam is too long; that needs to be shortened.
2. There is too much fabric between the shoulders and the waist; that length needs to be shortened as well.
3. We’ve got the same straining across the hip area.

Shortening the shoulder seam (done at the shoulder edge, not the neck edge) is easy enough. Feeling for the knobby sort of bone in the shoulder, I marked that spot and left myself about a half an inch for a seam allowance and cut away the rest. This is a fix that needs to be both on the bodice front and on the back, and needs to be graded into the armscye.

The too much fabric length, in this case, is a simple fix. In this case, I took a half-inch tuck (which takes down the length an inch) from the armscye on the left all the way to the armscye on the right. Now, of course this not only reduces the length of the back bodice from the shoulders all the way to the waistline, it also reduces the size of the armscye circumference in the back as well. which pulls that up a little bit in the back.

Now the next step is to get the sleeve into the new armscye and see how that looks and feels.
Make a muslin month: Fixing the front

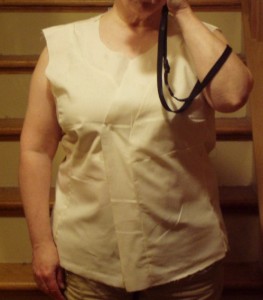
Now, to refresh our memories, here is the photo of the first round on the muslin for the jacket. There are a number of issues here and, starting from the top, we’ll review:
Shoulders: The shoulder seam is too long; it’s hanging out over the shoulder joint. That needs to be shortened.
Armscye: There are two issues here – one which we can see in this photo and one which we can’t (you’ll have to take my word on this one). The first one, which you can see, is the flap of fabric hanging out there. This is caused because a) I’m short, so the distance between my shoulders and my bust point is shorter than it would be if I were the height of an ‘average’ woman wearing this particular size. This is a problem I have…every…single…time. Just part of the game and has to be dealt with. If the amount of extra stuff there was less than 1″ (that is, if I pinched the extra together and it was like a dart that was 1/2″ on each side), then what I’d do is I’d frankly…cheat. I’d ease-stitch around the entire length of the front part of the armscye and ‘eat up’ the extra that way. This, however, is NOT 1″. This is like 2″, so (sigh), I can’t cheat. I have to find a way to reduce that distance. There are multiple ways to doing this, and in my case, I’m going to do a combination of things. (more…)

Make a muslin – jacket first try

I always feel like one of those pictures in my junior high health textbook when I do these shots; all that is missing is the black bar across my eyes.

So, going from top to bottom, what are my issues here? And I say it that way because they are MY issues, not the pattern issues. The muslin went together smooth as silk; everything matched up. I know a lot of folks do changes on a tissue first before they cut out the muslin, but I don’t because I want to get a complete view of how the thing comes together. Once I start ‘slicing and dicing,’ all sorts of things can happen so I want to know how the garment came together before I do that. So, from that perspective, the pattern works really well. When I laid the whole thing out on the table after I’d sewn it together and ironed it, it literally looked exactly like the diagram on the envelop. (more…)

Blog Widget by LinkWithin

Bad Behavior has blocked 495 access attempts in the last 7 days.