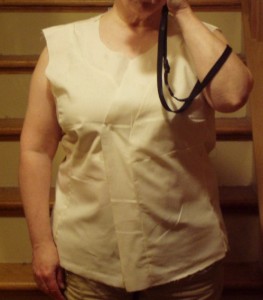
 I always feel like one of those pictures in my junior high health textbook when I do these shots; all that is missing is the black bar across my eyes.
So, going from top to bottom, what are my issues here? And I say it that way because they are MY issues, not the pattern issues. The muslin went together smooth as silk; everything matched up. I know a lot of folks do changes on a tissue first before they cut out the muslin, but I don’t because I want to get a complete view of how the thing comes together. Once I start ‘slicing and dicing,’ all sorts of things can happen so I want to know how the garment came together before I do that. So, from that perspective, the pattern works really well. When I laid the whole thing out on the table after I’d sewn it together and ironed it, it literally looked exactly like the diagram on the envelop.
But, sigh, we all have issues and I certainly have some here (although I was pleased to see that the bust dart was in the right spot for how my bust hangs these days. Oh, I forgot to say this: When you do all your try-ons and when you wear the final garment, DO wear the same foundation, ok?).
Going top to bottom:
Shoulders – as usual for me, the shoulder seam is too long. That is always a given. I’m 5’2″ tall and have sloping shoulders anyway (boy, can you see that in this photo). So, I need to shorten the shoulder seam at the shoulder edge.
Shoulders to bust area – again, as usual for me, because I’m short and have a large bust, I have this combo effect going here — the bust is pulling the fabric out in the front (and there is enough there to cover those; plus one for the pattern there), but because the pattern is drafted for someone who has more size across the upper chest (or, the high bust as some call this area), I’ve got this extra fabric flapping around at the armscye there. You can see the fold. Again, this is a me issue – I have never sewn a pattern since I stopped being a 34B that I did not have this issue. If the bust dart was in the wrong area, I could shorten the whole area, but since it is not, I’ll be looking at another cure for this.
Bust to hips area — Well, I’ve got an interesting issue here. As you can see from the picture above, the front sections meet where they are supposed to at the bust, and then pull away to the side at the bottom. So, the question is this: Is this a tummy issue or is this a hip issue. Looking at the photo, since I’m not seeing any strain between the bust and the bottom and it’s just pulling to the side, I’m going with a hip issue (no news there given the size of my rearend, heh). This is an easy fix – but also notice the length of the garment. This jacket is supposed to end at the high hip (which given the fact that I’m short AND short-waisted means that the distance between my waist and my high hip area is pretty short). I could just add fabric at the seams toward the bottom, but I’m thinking that if I take a tuck in the pattern between the horizontal seam and the bottom, not only will it solve the length issue, it will also cure the strain across the bottom issue as well. Nothing like a ‘twofer’.
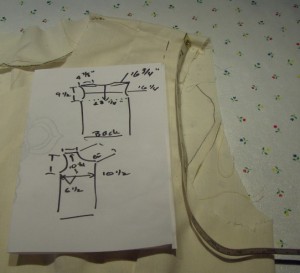
 Armscye — This is a perpetual issue for me and goes along with that flap of fabric hanging out there. I’ve never worked with a pattern that did not have not only the extra fabric at the front of the armscye that did not have the accompanying issue of the armscye being way too long as well. And it makes sense. This pattern is made for someone who is at least 5’5″ tall – that person’s torso is longer than mine certainly is and so everything, including the distance around the armpit where the arm meets the body is longer and wider also. Remember in the first post where I talked about measuring a garment that actually fits you well? Well, in this picture you see my rather unartistic diagram of the front and back of the jacket I measured. See the measurements around the armscye? On the jacket that fits ME, it’s 9.5″ around the armscye in the front and 9.75″ in the back (which makes sense). On the muslin, it’s 11″ in the front and 11.5″ in the back. An armscye that much lower on my body that I need will produce a situation where once I get the sleeves in, I won’t even be able to raise my arms. Now, again, if the bust dart was too low, all I’d need to do would be to take a tuck in the area between the bust and the shoulders and make the entire area there shorter, thus raising the bottom of the armscye. But the bust dart is in the right place. I’m going to do two things – take up the shoulders a little bit at the same time I’m making them shorter AND I’m going to fill in that bottom area of the armscye with a curved piece of fabric to make the armscye smaller (that is, raise the bottom up to where it needs to be on ME).
Once I get these changes made, I’ll do another try-on and photograph to see how the front looks. And then we’ll move to the back.
