 In our last episode, we discussed Frida Kahlo, zero-waste clothing and her wearing of indigenous, traditional clothing, as an introduction to making clothing which is less wasteful of fabric, less wasteful of resources, with the first example being what has almost become (besides Kahlo’s crown of braids with flowers woven in) the icon for Kahlo: the Huipil, her seemingly favorite form of blouse. Even in photographs where she is (gasp) wearing pants, she is still wearing one of these colorful, simple tops.
Now, to be blunt, a huipil, as a traditional piece of clothing, is as simple as it gets. When we look at them, even in current incarnations (there are photos all over the internet, on Flicker and so on), several things become obvious. First, this is a garment which can be considered ‘off the loom’ – that is, the fabric is woven and very little is done to it in terms of making clothing. However wide the weaver made the fabric, that’s how wide the garment is. If the wearer is wider than that, the sewer will have to have more fabric and piece it to make a wider huipil. In many cases, whatever ‘decoration’ there is has been provided by the weavers’ creativity and color sense; many of these have no additional decorations, braids, trims put on them. Frida Kahlo’s, however, were richly decorated with embroidery, trims and narrow pieces of contrasting fabric and we can see from the recent exhibition of her clothing that the decorations were put on both front and the back. Frida Kahlo’s Clothing They also look to have been made of commercial fabrics, probably cotton.
So, we begin.
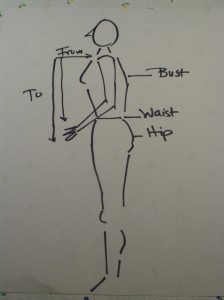 To do this, we need (as we always do when starting a sewing project) some measurements, but since this garment is not fitted in any sort of way, we only need to know two things: What is my widest part? Bust? Waist? Hips? Measure around yourself at that part and divide that number by 2. My widest part is my hips, which are 43″. Divided by 2, that is 21.5. Add 5″ to that number: 26.5 and round up to the nearest whole number, or 27″. That’s how wide the fabric needs to be. It can be wider, certainly, and will provide a more loose silhouette, but at the very least, 27″ for me. The second measure is how long this is going to be on me – so, where do I want it to end? High hip length is a comfortable length for me, so the second measurement (as I show in the little diagram here) I need to take is from my shoulders, over my bust, down to that point. On me, that’s 24″, so add 1″ for a rolled hem for 25″ and multiply by 2 for a total length of 50″. So I need a piece of fabric that is 27″ wide by 50″ long. Already, we can start to appreciate the amount of work the weaver has to put into this – that is more than 4 feet of fabric, which would take hours and hours of work at the loom. No wonder these garments are so simple.
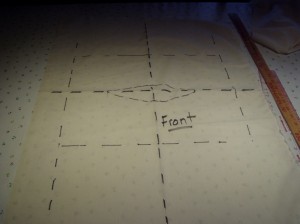
 Now, as an example, I have cut a smaller piece of muslin and drawn markers on it to lead us through this. It’s obvious that this piece of fabric is NOT 27″ x 50″, but everything we need to get us through is marked on it. First thing, take your piece of fabric and wash it – a lot of cottons have dye that runs like the devil, so wash it well to get any extra dye out. Then dry it and iron it. Fold it in half vertically and iron a crease down the center. Then fold it horizontally and iron a crease in that. You have now established the center front and back and the shoulders. I’ve marked those in pen on the muslin in the picture so that they are easier to see. The next thing to do is put in the neckline. Measure around your head, divide that number in half and with your fabric folded on the shoulder crease, we’ll mark out a neckline. My head is 22″ around. Half of that is 11. Half of that is 5.5″ So, starting at the point where the center front crease meets the crease for the shoulders, I mark 5.5″ on either side of that. Take a ruler or tape measure and mark 2″ down the center front crease and using something like a curve ruler (or you can eyeball it), run a curve through the marks on either side of the center front and the mark you made down from the center front to create the front neckline. Flip the fabric to the other side and do the same thing, but this time, make the mark down the back front 1.5″ rather than 2″. Voila – neckline. Cut that out and try it over your head; if it needs to be a bit bigger, carefully cut it around, a little bit at a time until it goes over your reasonably easily.
Now for the fun part.
Now, Frieda Kahlo’s huipils were decorated with heavy embroidery, strips of fabric and trims, and you can do that, appliqueing them on top of the flat piece of fabric (I don’t encourage that you put in the side seams and then try to do this. It’s a lot easier to do before you put in those seams). The tehuana embroideries take tremendous skill and a lot of time, and since I have neither (ahem), I’ll stick to fabric. Create the strips of fabric, iron down narrow hems and place them where you want on the flat piece of fabric. Pin and sew then on. You’ll end up with something which would look like this: 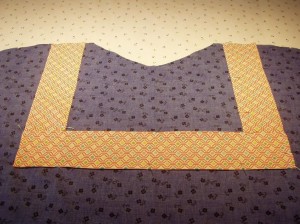
Or, here’s another method which might be easier and would give a different effect. 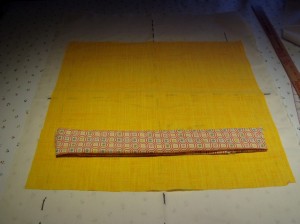 Take a larger piece of fabric, hem that all around, and place on the flat piece of fabric. Add other trims, embroidery, or appliques on top of that, avoiding the neckline. Then, flip it over and trim away the extra fabric that is across the neckline. I have not had an opportunity to see the inside of a huipil; I don’t know how the neckline is finished off. It might be as simple as a rolled hem but we can certainly use bias binding of some sort.
The next thing to do is to establish the armholes – or rather, the length of the side seams. Put the flat piece of fabric (front side to the front)over your head and start pinning it closed at the sides. Check yourself in the mirror – there will be a point where you will decide that yes, this size of armhole is comfortable and work for me. Mark that. Take off the flat fabric and pin it right side to right side at the sides. Sew up the side seams. If you want to finish the seams in some way or iron them down and sew them again at the outside, then do this now.
You now have a top with slightly capped sleeves. Finish off the edges of these with a rolled hem or bias binding. 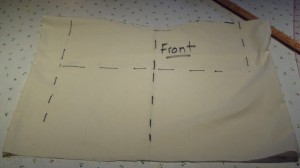
There you go! Huipil!
