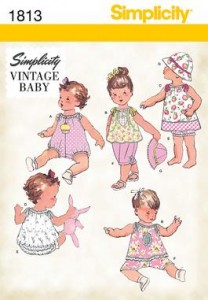
 Now, when you have major ‘fabric and craft’ retailers literally offering, brand by brand, patterns at 5 for $5.00 on a monthly basis, it might seem a bit of a formal exercise to talk about all the different styles that you can get out of one pattern in order to limit the number of patterns you need to have in the stash, but bear with me here. Once you get the feel for doing this, not only do you start to recognize the ‘bones’ in the patterns (and the fact that there really are not that many different styles out there), but also realize what you can do with the patterns you’ve already made (and worked out all the fitting issues with). This is a big time-saver versus buying a new pattern, making and tweaking a muslin and so on. (more…)
Clothing
Sustainability: Ringing the Changes in Sewing
Building a wardrobe from the ground up
So, the last time I looked at this, wardrobe thingy I was analyzing how one ready-to-wear designer put together a wardrobe of separates. What they did was they had two prints and a number of single color items which matched some of the colors in the prints. Now, what they did in particular might not meet your needs (I mean now really – print pants are not my thing, but they might be yours).
Having flogged my black-white-red wardrobe into the ground over the past 5 years, I had to decide whether to stick with those colors and replace items as they bagged, sagged, and got long in the tooth. I’ve gotten a lot of wear out of all of them but a couple of items just don’t stand up and say ‘hey there’ much any longer, which is one of the problems with prints. It’s easy to get tired of them. The other thing is that your dear Aunty is getting to any age when black is not, shall we say, kind to me anymore in terms of my complexion, so I wanted to weed things out, spruce things up, and get a bit of color in my wardrobe. What I need on a daily basis is also changing – I no longer have to go into an office on a daily basis and I have a lot more casual and different activities to do. I also like to wear skirts and tops rather than dresses. So I need to think about that.
In terms of colors, I’ve got a couple of really hard and fast rules about color:
— If you don’t already love a color, adding it to the wardrobe because Pantone(tm) or someone else in the clothing industry says it’s ‘in’ is not going to be a good investment. People wear colors that they actually LIKE. Pantone(tm) says that emerald green is this year’s color (I think last year’s color was tangerine orange), but I think that’s not a color that will be kind to me, either. I like all sorts of greens, but the ones I like the best and which look best on ME are colors that have a bit of blue in them (just like the reds that look the best … are those that have a bit of blue in them). So, I’m basing my wardrobe work on teal and raspberry, two very jazzy colors but both of which have some blue.
— Over a certain age, black is draining. If you want to go in that direction, try midnight blue, which is my favorite for formalwear which usually would be black. It’s classy, unusual and it’s not black.
— Yellows are hard to wear for anyone over the age about about 15, especially yellow-greens.
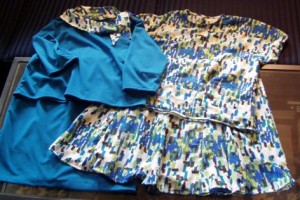 My first ‘put together’ for the wardrobe is a two-piece dress made out of ponte knit, and a blouse and skirt made out of a coordinating print. With that, I get four outfits:
— Teal top and teal skirt
— Print top and print skirt together, making a dress-like look
— Teal top and print skirt
— Print top and teal skirt
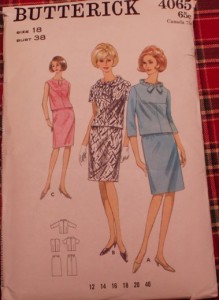 This is the pattern I used for the teal top and skirt – it’s an early 60s pattern. I made the top with a plain neckline, but as you can see from the photo above, I made a scarf out of the print fabric too. I sewed on snaps on the scarf and inside the corresponding spots around the neckline of the teal top. That way, when I wear the teal top and the print skirt, I have something that ties both halves together.
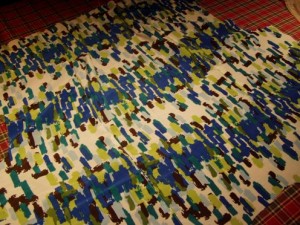
Now, my next step ordinarily would be to go to the pants end of the spectrum, but I am still mulling that: teal pants or one of the coordinating colors in the print? That print has the following colors in it:
Teal
Royal Blue
Olive
Lime Green
Brown
Baby Blue
Now, I’m definitely not going to go with a print pair of pants – I don’t have any more of the fabric in any case and print pants are really not ‘me’ (well, at least I don’t think they are). My ‘matchy-matchy’ side wants me to go to teal pants, but the pragmatist in me wants to go with brown.
How do you vote?
Don’t Say I Never Warned You
 I’ve been sewing for (drum roll and cymbal crash, please) about 50 years. That’s a lot of time and you’d think your dear Aunty would have learned some lessons along the way. Which I have.
But I can still get snagged. I still buy fabric the same way I did when I started: Grab the bolt, take it to the cutting counter, tell the cutter how much and off I go. And it hit me today when I was working on a very simple blouse that I really do need to change this, at least with places I actually walk into.
I really need to make the cutter open the fabric up so that I see the stuff I’m buying.
How many times have we started to pin and cut fabric, only to find a flaw…or a stain…or a misprint?
And there you are (cue music from “Psycho”).
Well, there are more organized methods to deal with the procedure: Open up the fabric before you even pre-treat it so that you can, maybe, get more or take it back. But most of the time we buy for the stash and then it’s all gone at the store, right? I’ve never had the luck of finding more just sitting there waiting for me.
So, here I was with the front all cut out and I went to do the back of the blouse and there’s a misprint, right where, if I kept on cutting the back pattern piece the same way, it would locate itself right in dangerous territory. How about a cartoon sign next to it with a giant arrow, right? Jeeze.
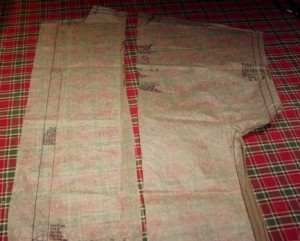 OK. So here’s the fix. The trick is to make more smaller pieces of the pattern that you can space around the fabric, so that you can miss the stain, flaw, misprint, etc. In my case, what I did was I folded the pattern vertically, matching the center ‘cut on the fold’ line to the side seam line. I cut the pattern apart where I folded it and then I marked ‘add 1/2″ here’ on both pieces where I’d cut it (because otherwise, I’ll never remember and then the back would have been too small). I also did some judicious pattern matching so that the pattern matched horizontally as well.
So, lessons for tonight: Make the cutter at the fabric store unfold the fabric so that you get a good look before they cut it. If you buy on-line, open the package immediately and do the same thing at home so that if you have to send it back for replacement, you’ve got a fighting chance the merchant still has some of that fabric. And second – if you’ve got a small ‘woops’ perhaps with some clever new style-lines cut into your pattern, you can still get what you want out of your not-so-perfect fabric.
Aunt Toby explains the wardrobe thingy
If you are the sort of person who has a closet full of stuff that you don’t wear and the feeling that you don’t have anything to wear, then this is for you. Please watch the video – it’s 5-6 minutes long. keep an open mind (don’t get all bound up with the rack, table and shoe display, ok?).
Now, a really good exercise is to take out a piece of paper and analyze what the stylist is doing here, so you might want to watch the video again. And this time, boil it down. (more…)
Pattern Review: Simplicity 1692 — Vintage Blouses
 Readers who visit regularly will note that your Aunt Toby doesn’t do sewing pattern reviews often. I’m not sure why I don’t but when I come upon a pattern that did not cause me fits in terms of fitting or sewing, I feel I have to pass along the good news. I figure that if a) I don’t have to make huge changes in something in order for it to fit my admittedly older, plumper body with a big bust and an expanding waistline, and b) it comes out reasonably flattering, then it’s a keeper.
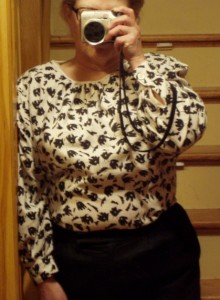
This, ladies, is a keeper. I made the long sleeved version and I have to say that I will make this several more times. It is a very nice blouse with some pretty details and is actually quite easy:
1) It doesn’t have a zillion buttons in the front. Hurray! It had one button at the back of the neck and buttons at the cuffs. They also want you to put in a zipper in the side seam but believe me, you can just eliminate that.
2) It has some extra breathing room in the front, achieved with that gathered bit at the neck line. Since I have a very large bust, I actually gave myself a little bit more room by pulling the center line slightly away from the center fold and then I made the tucks at the waistline slightly larger. Could not have been easier.
 Things I will change for next time:
1) The sleeve cap. If you look at the artwork, the sleeve looks as if there are no tucks or gathers whatsoever at the top of the sleeve. There is actually no way not to end up with a gathered top to the sleeve, which I did not like, so to put a big tuck at the center top of the sleeve. The next time, I will re-draw the sleeve cap to bring down that height somewhat. No gathers for me.
2) The shoulder. This is actually set up for shoulder pads (it is a fashion of the 1940s after all), which with my narrow shoulders, actually is a good thing but in this case is just a little bit too wide. The next time, I’ll take those shoulder edges in by about 3/8″ and I think that will do better. One small note – I realize that when I put on the blouse, I did not fasten the button at the back of the neck. The blouse really does button up reasonably close to the neck, as in the photo on the front of the pattern.
Taking the Fear Out of Sewing Clothes: Vest 1-c and Done!
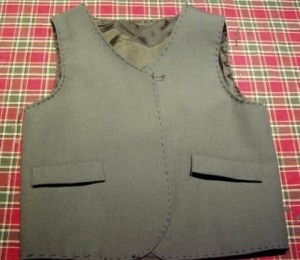 If you have been following along with this, you know that what I’ve got at this point is basically a put together, lined vest. It’s sort of baggy and saggy but it IS put together. And frankly, this is a place in the making of things (I should trademark that or something) where I think people who are either scared of sewing clothing back off and stick whatever they’ve done back in the bag (to magically turn into the notorious UFO – the unfinished object), or they muddle through and end up with something they hate and which glares at them and they end up feeling unsuccessful and THEN they throw it back into the bag.
The end result is the same: Someone who probably would have enjoyed making clothing but who is now convinced that they can’t or that everything they touch turns to …well, we all know what they think it turns into. And that person either never sews anything again, feels bad, or the only thing they sew again (if they sew anything) is home dec or something like that. (more…)
Taking the Fear Out of Sewing Clothing: Vest 1-B
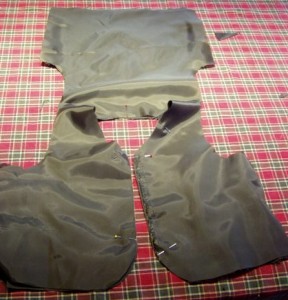 So, if you have been following this (if not, go to Vest 1-A), what I have at this point is a back and two fronts of vest fabric sewn together at the shoulders and the fake pocket flaps sewn onto the front. I also have sewn the back and two fronts, which were cut out of lining fabric, together at the shoulders also. At this point, we are now entering (cue scary music) “The Tricky Part”. If you need to go make a cup of tea and go lie down for a bit with a cold cloth on your forehead, please do so now. It really is ok. (more…)
Taking the Fear Out of Sewing Clothing: Vest1-A
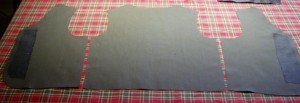 Now, I know there are all sorts of beginning sewing curricula out there. Some people start with an apron; others go straight for a knit tee-shirt. I have really strong feelings about starting folks on crafts – I don’t like to start people with stuff that they are not going to use. My very first project in home ec in the 7th grade was the most horrible pull-over-your-head blouse ever. It fit no one; no one wanted to wear them either and I’m going to bet all sorts of money that every single one of those that got made ended up in the trash or in a bag stuffed at the back of the closet. When I learned how to knit, the very nice lady who taught me said, “What do you want to make?” I told her mittens and that’s what I got to make. Challenging, yes – but I wore them. How many of those eyelash scarves do you think got worn? How many beginning knitters ever got beyond the scarves?
But a vest – everyone likes vests. (more…)
Sewing Jurassic Park(tm) #2: baby suit out of sweater
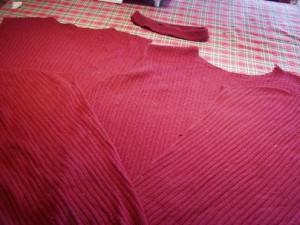 If you ever saw Jurassic Park, you will remember the whole basis of the (oh, the horror!) story was that scientists extracted DNA from the blood found inside mosquitoes trapped in amber and then did some kitchen magic with some frogs and voila – instant dinosaurs. Now, we won’t get into the whole ethical and just plain nutty arguments on this, but suffice it to say, the scientists took building blocks and created something else.
Now, in our last episode, what I resurrected was something ‘out of whole cloth’ (so to speak) from the past. This time, I am doing what the scientists did in JP and taking a building block and creating something else, in this case, a set of baby clothing out of an old acrylic sweater.
Other than the ‘gee whiz’ aspect of this, why both to do it?
Well, finding exactly what you want in baby clothing (and at the price you wish to pay) is not always possible. I find that in general, winter baby things are created with American homes with thermostats set at 75 degrees are pretty much the norm. Chez Siberia is just not that. Even on days when we are feeling the need to be tropical, the thermostat only gets set at 65 and there are spots in the house where 60 degrees is as good as it gets. For little teeny babies, this is Arctic. I’ve created some pretty specific clothing for the grand-kinder to wear while here (wool sweaters, overalls lined in wool flannel or fleece and so on), and wanted a nice little cuddly sweater suit for when the latest addition comes to stay with us.
So, here’s the drill: Aunt Toby had an old, much loved but no longer fitting acrylic sweater, long sleeved, with ribbing around the neck. It was a little bit saggy-baggy but the ribbing at the bottoms of the sleeves and the sweater body was still good, as was the ribbing at the neck. So, as you see at the top, I took it apart and ended up with two sleeves, a front, a back and the neck ribbing. I chose a pattern from one of the Ottobre magazines that I have (the patterns are from Finland and if anyone knows how to make warm kids clothing, it’s the Scandinavians). What I was able to eke out of the pieces of sweater surprised even me.
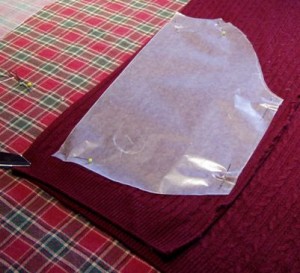 First step – cut out your pattern and start folding your sweater body pieces to see the best placement. i knew that the sleeves would probably be best used for the leggings. One of the things I want to note (and the scissors in the photo are pointing to that), if you have ribbing at the bottoms of sleeves and the sweater body, take advantage of that. That ribbing is knitting right into the fabric, so just use that for the bottom of your sweater, or skirt or dress or leggings. Your pieces will then be all pre-finished for you, which is a real time-saver.
Once you’ve cut out all your pieces, sew them together with either a coverstitch machine or a stretch stitch on your sewing machine. Be aware that cutting knitted fabric throws off a huge amount of fiber and fluff and you might want to stop every once in a while and brush out your mechanism and so on so that you don’t jam up the machine.
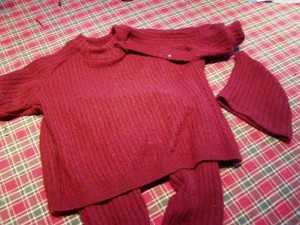 And here you have it, a complete baby set, including a hat (made from what was left of the top of one of the sleeves). I had a piece of ribbing left over which I inserted into one of the raglan sleeve seams; I’m going to sew on snap tape there for the neck opening (the original pattern wanted invisible zippers in both sleeves, which I definitely thought was overkill). What you are not seeing is the little handful of scraps that were left over.
So, this is just a reminder – just think creatively about things if you want to make something and that fabric per se, doesn’t seem to be out there. Cutting up an adult-sized garment into its component parts can yield actually a lot of fabric with which you can make a whole something for a child.
Sewing Jurassic Park(tm)
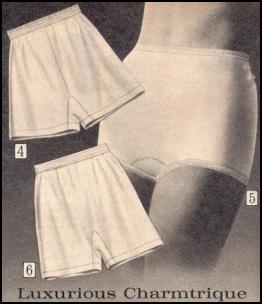 Guys – you can go out to the kitchen and pour yourselves a beer or something. This is strictly distaff, ok?
Are they gone? OK, your Aunt Toby is going to jump right into this. It’s been cold the past week. Really cold. And if you like to wear a skirt for school or work, it can get pretty air-conditioned down there. Mighty chilly.
When your dear Aunty was just a young sprout, we did wear skirts and dresses to school (shoot, girls in New York State did not get the right to wear slacks to school until my senior year in high school, which was 19..well, it was before Watergate, ok?). And a lot of us walked to school or work and at that time, the style was sheer hose. As in Kate Middleton sheer hose.
And that is mighty chilly, especially if you were wearing miniskirts. (more…)
