 Now, I know there are all sorts of beginning sewing curricula out there. Some people start with an apron; others go straight for a knit tee-shirt. I have really strong feelings about starting folks on crafts – I don’t like to start people with stuff that they are not going to use. My very first project in home ec in the 7th grade was the most horrible pull-over-your-head blouse ever. It fit no one; no one wanted to wear them either and I’m going to bet all sorts of money that every single one of those that got made ended up in the trash or in a bag stuffed at the back of the closet. When I learned how to knit, the very nice lady who taught me said, “What do you want to make?” I told her mittens and that’s what I got to make. Challenging, yes – but I wore them. How many of those eyelash scarves do you think got worn? How many beginning knitters ever got beyond the scarves?
But a vest – everyone likes vests. No matter who you make them for, everyone likes them, thinks they are cool, and will wear them. And, you can learn all sorts of really useful sewing skills with them. There is one thing you won’t learn by making a vest: How to put in a sleeve. If fear of sleeves has been your barrier to learning how to sew clothing, then this is your moment. I’ve divided this up into three posts because there are so many photos.
Here is what you will do to make THIS vest (there will be another couple of vests to learn other things):
Cut out fabric
Iron on interfacing
Sew straight and curved seams
Line a vest (which once you get it will stay with you forever)
Press with steam
Baste
Mark and put in buttonholes
Make flaps and sew those on
Sew on the buttons
Equipment you will need to do this:
Steam iron
Ironing board of some sort (though in a pinch, you can pad a table with an old blanket and put a sheet on top of that and iron there or pad the floor or the living room carpet and do it there)
Pins and needles
Scissors
Thread to match the fabric you are using (if your buttons are not the same color as the fabric, you will also need thread that matches the buttons)
Sewing machine with a bobbin filled with the thread that matches the fabric, and basically know how to use it and how to make a buttonhole with it.
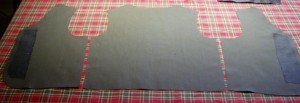
Now, this particular vest is a good one for a first vest because it is for a very small boy, so it takes very little fabric. As you can see from the top photograph, the entire outside of the vest is three pieces: A back and a front divided into two pieces. The lining consists of the same thing.
Notes on fabric: I’m using wool blend twill and polyester lining. I washed the wool fabric in hot water, allowed it to air-dry and then steam pressed it to shrink out any wiggles. If you are just starting out, ask the folks at your fabric store for care instructions – then do that to the fabric before you start. That way, once the vest is done, you can care for it the same way you pre-treated it and everything will go fine. The interfacing I’m using for this is dark-colored interfacing (as you can see from the top photo). Why not just use white interfacing? Well, I can tell you that one of the things that makes home-sewn clothing look tacky is white fibers from interfacing coming out of the buttonholes after they are cut when they contrast with dark fabric. Interfacing comes in white, various shades of grey all the way down to black. The darker the color of your fabric is, the darker the interfacing should be.
Step One: Cut out the pattern you are going to use, pin it to the fabric according to the directions on the pattern pieces and cut it out. Do the same for the lining. I traced my pattern from an Ottobre magazine Tom Sawyer. Cut two pieces of interfacing that is compatible with the weight and type of the fabric you are using for the front edges. You want the pieces of interfacing to be strips about 2″ wide and just long enough to cover the long straight edges of the centers of the vest (see the photo above), just stopping short of the seam lines. Iron those pieces of interfacing on the wrong sides of the fabric using the appropriate temperature on your iron (the directions for how to apply the iron-on interfacing will be on the packaging of the interfacing).
Step Two: Lay the back piece of the vest with the right side (that is, the outside) facing you. Take the two pieces of the vest fronts and put them right side down (that is, the inside of those will face you) ON TOP of the back piece. This is referred to as ‘right side to right side’. Match up the shoulder areas and pin together the vest front shoulder to the corresponding back piece shoulders. Sew at the appropriate seam line according to the instructions that came with your pattern. Then, press the shoulder seams open on the inside. Do the same thing with the fabric you have cut out for the lining.
A Note On Pressing: If you are using fabric that contains wool, you will want to use the steam setting on your iron. When you do that, you will want to have a dishtowel or a tea towel or a press cloth to use between the iron and the seam you are pressing to prevent the iron from making a mark on the fabric. Lay your fabric pieces on the ironing board, with the seam facing up. Using the fingers of your left hand, spread open the seam and place the towel on top; then carefully, with the point on the front of the iron, use that to hold the seam open and slowly run the iron over the cloth. The steam will go through the cloth and will relax the seam and the weight of the iron with press it down.
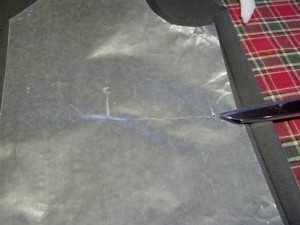 Step Three: Flaps. On this pattern, they don’t have pockets – they’ve put on flaps, which is a nice little cosmetic detail. First thing we need to make sure of is that we’ve marked on the fronts of the vest the line where the flap is going to be sewn. Now, you can mark it with a chalk pencil on the wrong side, or with pins or using a tracing wheel and tracing paper, but you need to do that. Take out your measuring tape and measure each end from the bottom edge of the vest front to make sure that on both sides of the vest, the lines are in the same spots.
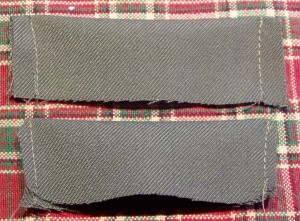 Sew the Flaps: Fold each flap piece in half lengthwise and pin at the outer edges. Sew on the seam lines and then trim. See in the photograph that the one on the top is not trimmed and the one underneath IS trimmed pretty closely. In the beginning, it is easy for people just learning to sew to be a little bit shy about getting aggressive with scissors. Be brave – especially at the corners. This is how you get nice sharp corners. Once you’ve trimmed the flap pieces, turn them inside out. Then steam press them with the press cloth to get your edges and corners nice and sharp. Finally, zigzag or use another overcast type stitch on the unsewn edge.
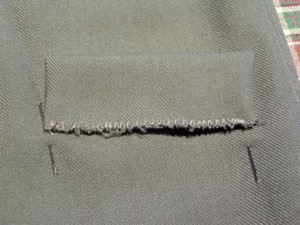 Pin the Flaps: On the outside of the vest fronts, line up the corners of the flaps with the ends of the line for the flaps. If you marked the line on the inside of the vest, put a pin through each end of the line to the outside and use those pins as your marks on the outside to line up the flap. Pin to the vest piece and sew along with seam line on the flap to secure the flap to the vest front. Do the same with the other side of the front of the vest and the other flap.
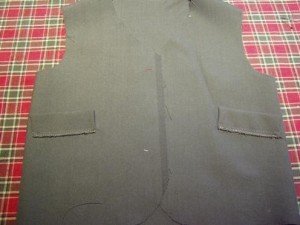 When you do that, the fronts of your vest will look like this. Now, we need to make the flaps flip downward. Back to the ironing board – carefully, with your fingers, flip the flaps down and with the press cloth and the steam iron, press them down. Let them rest and dry and bit and then pin them down. We’ll be sewing the edges down later but for the moment just pin them. Don’t pin them down and then press them – that will leave marks which are frankly almost impossible to get out.
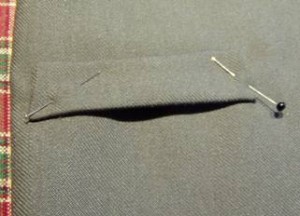 When you are done, each flap will look like this.
In the next part, we will perform the ‘slight of hand’ which puts the lining into the vest and finishes the edges. And in the final part, we will twitch everything into place, put in the buttonholes and sew on the buttons!
