 So, if you have been following this (if not, go to Vest 1-A), what I have at this point is a back and two fronts of vest fabric sewn together at the shoulders and the fake pocket flaps sewn onto the front. I also have sewn the back and two fronts, which were cut out of lining fabric, together at the shoulders also. At this point, we are now entering (cue scary music) “The Tricky Part”. If you need to go make a cup of tea and go lie down for a bit with a cold cloth on your forehead, please do so now. It really is ok.
Ready?
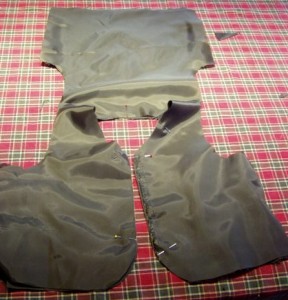
On a big flat surface (the floor, the kitchen table, whatever you have), lay out the outside of the vest with the fronts of the vest, on the right side, facing you, with the bottom of the fronts closest to you. At this point, you’ll have the front right side facing you and stretching away from you will be the vest back, right side up, facing away from you. Then take the vest made out of lining fabric and lay that exactly the same way, right on top of the vest. Right side to right side (see the photo at the top), with the shoulder seams matched. One way to do that is to put a pin through the seam of one and then put it through the seam of the vest and line them up and put pins in on either side.
Now, what you are seeing in that photo above is this. Starting on the left-hand side:
The side of the vest is on your left hand, going vertically. Start pinning at the bottom left-hand corner. Go to the inside curve and keep pinning up the center front, go around the neck, and down the other side. Continue pinning down the right-hand side center front, down to the curve, across the bottom of the vest and when you come to the lower right hand corner… STOP.
Let’s go back to the side of the vest on your left-hand side. You’ll see that part of the vest goes vertically and where that stops, it starts going in a curve that goes to the vest back. There is one on the right-hand side too. These are what will eventually be turned into armholes. Pin these curves all the way around on the left-hand side and the right-hand side – just like in the picture. The only bits that will not have pins in them are the vertical bits at the sides on both the back and the vest fronts. Sew where you have pinned and then trim.
Take a deep breath. This is the tricky bit and once you get this, you will feel extremely proud of yourself. Go back to your table of the floor or wherever you laid this all out before and lay it all out again, with the BACK facing you and the fronts away from you. You will notice that the only open seams that there are on the vertical bits (what will become the side seams later) on your left and right hands.
Take your left hand and put it in the left-hand opening closest to you – that will be in the vest BACK facing you.
Work your fingers up into the shoulders.
Take your other hand and pick up the bottom of the vest FRONT on the left hand side and pull that toward your fingers sticking through the shoulders so that you can grab the bottom of the vest FRONT.
Pull that bottom through the shoulders and out the side opening where you put your hand.
Now you will have something that looks like this.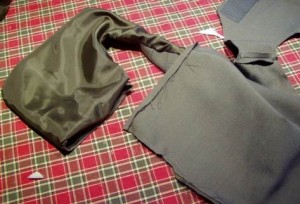 Now, take your right hand and put that through the right hand opening, and do the exact same thing with the right-hand vest front.
You will then have something that looks like this photograph below: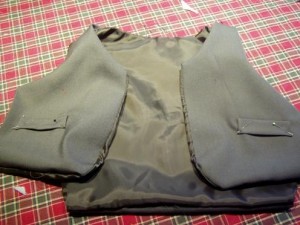
Now, Aunt Toby knows that what is going through your mind at this point is something on the order of ‘Oh, piffle – how do I get side seams?” Trust your Aunty – this is another bit of sewing magic and a great technique.
Taking the back, right side up, flip the corresponding vest front toward you. what will be facing you now is the lining of the vest front, ok? Push away the lining on the back and the vest front and find the two vertical edges of the back and the vest front and pin those together. Make sure not to catch any of the lining in the pins. You should end up with something that looks like this. 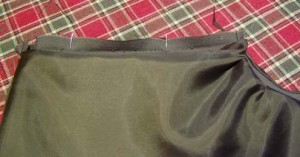 Now, you don’t want any of the lining to catch while you sew this, so if you need to pin the lining away from the sewing area you can do that; I find it works just as well for me to use my fingers. Sew the side seam. Then do the exact same thing on the other side of the back and the corresponding vest front.
You will then having something on the inside that looks like this:
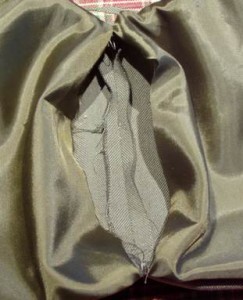 As you can see, you have a sewn side seam in the middle of that opening and loose lining pieces on either side. Your job at this point is to neaten this up. Take your iron and carefully iron down the sewn seam. Then fold down each edge of the lining and iron that. Pin the lining pieces down so that the edges meet or one folds over the other (your choice here).
You now need to sew these down. I know there are people who hate hand sewing. I am not one of them. Here is my technique for putting two edges of lining pieces together. With thread (matching the fabric is best) in a nice sharp needle, secure one end where the piece of fabric meet and take a small stitch, making sure that the needle does not go to the outside. You only want to be sewing the lining. 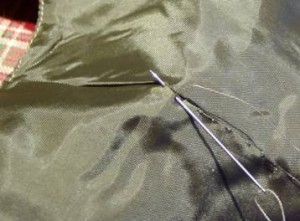 Taking tiny stitches and catching both edges as you go, sew up the seams of the lining on both sides.
Take a moment and feel very proud of yourself. Great stuff.
