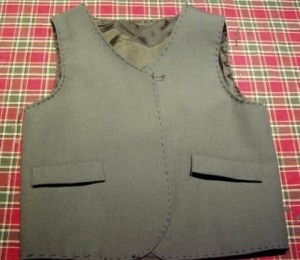
 If you have been following along with this, you know that what I’ve got at this point is basically a put together, lined vest. It’s sort of baggy and saggy but it IS put together. And frankly, this is a place in the making of things (I should trademark that or something) where I think people who are either scared of sewing clothing back off and stick whatever they’ve done back in the bag (to magically turn into the notorious UFO – the unfinished object), or they muddle through and end up with something they hate and which glares at them and they end up feeling unsuccessful and THEN they throw it back into the bag.
The end result is the same: Someone who probably would have enjoyed making clothing but who is now convinced that they can’t or that everything they touch turns to …well, we all know what they think it turns into. And that person either never sews anything again, feels bad, or the only thing they sew again (if they sew anything) is home dec or something like that.
People, if sewing were such a difficult thing, beyond our physical and mental capacities, human beings would have frozen to death tens of thousands of years ago, when they wandered into Europe and encountered winter. We get all wound up about our stuff and whether or not it looks as if it came on a hanger with a tag from the store and when it doesn’t, we feel depressed.
My friends, let me tell you something that your Aunty learned long ago. Print it out and put it on the wall next to your sewing machine and read it once a day and smile:
There is no way that what you sew will look as BAD as what is sold in stores. Whatever you make will be more clever, better made, and have more value built into it than anything hanging on a hanger in a store.
What differentiates the UFO in the bag (or the ‘wadder’ in the garbage) is one thing and one thing only: details. That wily devil, details. If you can get the details right, then all else flows from that. And in a vest the details are few and far between:
Pressing as we sewed (which we did – you did that, right?)
Basting
Buttonholes
Buttons
This is our adventure tonight: The details. This is what will finish off this little vest and make us all happy.
Step One: Basting
Again, I know there are folks out there who sew a lot and who never baste a stitch. As an old friend from the South always says, “Well, bless your heart.” I found out a LONG time ago (and this goes for woodworking too, by the way) that I can get into worse trouble FASTER with a piece of powered equipment than I can doing something by hand. I hate undoing machine stitches, so I tend to baste things a lot, especially if I have to do fittings. So, if you are someone who has strong political feelings about basting, you might want to go out to the kitchen and pour yourself a cuppa or something stronger.
Still here? OK. I’m going to go at this as if there is some reader out there who has never done this. If you have, please don’t be offended. This is how I do this. What we are going to do is prepare this vest for a good steam pressing. Oh yes, I realize that we could just pin down the edges and steam press the heck out of it but I have to tell you another detail secret: if you run a hot steamy iron (even using a press cloth) over this little vest, those pins would leave a mark and I have had no luck whatsoever in terms of getting those out. So forget the pins. We’re going to baste around all of the edges (see the photo at the top). And THEN, we are going to, with the press cloth, steam press this baby and let it cool off and dry. And THEN, we are going to mark the front for the buttonholes and make those.
OK? Anyone who now is hyperventilating can go get a cold cloth for their foreheads.
So here we go. Take a nice sharp needle and thread it with a long piece of thread, bring both ends together and make a big messy knot in the end so that you can find it later when you want to take all the basting out. Hold the needle and thread in your dominant hand and the vest in the other. Pick an edge – any edge at all – the armhole, the neck..doesn’t matter. And with the hand that does not have the needle, with your thumb and pointer finger, squeeze the seam edge so that you don’t see any lining – just the outside vest fabric. You might have to roll your pointer finger a teeny bit toward the lining side to make this happen but you will get the hang of it. Start sewing as close to that edge as you feel comfortable doing, making stitches as small as you can stand to do. Do that all around the neck, front, bottom edges, all the way around. Also do the arm holes as well. You should feel very proud of yourself, truly – this is a skill. Now, if you feel you need ‘training wheels’ with this, yes you can pin down all the edges all the way around before you baste stitch them, but you’ll then have to take all the pins out. But either way, you end up with a vest with all the edges based, just like in that photo at the top.
Go to the ironing board, cover the edges of the vest with your press cloth and press the edges with the appropriate level of heat and steam. When you are done, let the poor thing lay there to dry. Don’t get impatient – you need to go practice your buttonholes anyway.
Step Two: Buttonholes
Believe it or not, buttons are actually quite a modern invention and were originally meant as a form of jewelry because only rich people could afford them. Everyone else used lacing up the back, little bits and pieces of cloth to tie things together and so on. So, the concept of a button and a hole for a button to go into, is actually rather recent – just a couple of hundred years, actually. Not that knowing this fact will make those folks out there who have refused to make anything with buttonholes feel any better. I used to feel that way until I started making blouses and shirts. There is only one way to break through this barrier and that is to practice. You can call it ‘testing’ or ‘evaluating interfacing’ or whatever you want, but to make nice buttonholes (regular machine ones, hand-made ones, or bound buttonholes), you need to practice and you need to practice on the fabric you are using. So, don’t throw away scraps because you’ll need them to practice, practice, practice. On a garment like a vest, which many times is all covered up with a coat or jacket, the only detail that is seen ARE the buttonholes so you need to make sure that they come out nicely.
How to practice making buttonholes. If you have a sewing book (and if you don’t, I recommend that you make the investment in a good general knowledge sewing book), read over the section on making buttonholes. Take out a fairly large scrap of cloth and with the grain going in the same direction as the front of your vest, fold it in half along the grain and iron that down. Then, on the inside of one side of that fold, iron on a strip of the same interfacing that you are using on your vest. You now have a test front. Take your vest front pattern piece and put it, at the edge, over this test front and mark the buttonhole placements. They will be marked on the pattern piece. Use pins or a tracing wheel and paper, but mark them. Then take the pattern piece off the fabric and give it a good look. Take out your measuring tape and measure the distance between all of them to make sure they are all evenly spaced apart. Then also measure how far from your ironed edge the end-point of each one of the buttonholes is. They should be exactly the same distance from the edge – if they are not, make any adjustments you need to do. Then take out the buttonhole foot that came with your machine (or take out the manual in case your machine, uses a different system for making buttonholes – you might have cams that screw into the throatplate or a special attachment or something else). Once you are set up however your machine makes buttonholes, then, using your test front, make a bunch of buttonholes that are the same size as the buttons you got for your project. How many is ‘a bunch”? Well, I’ve been sewing … well, let’s put it this way, I’ve been sewing since mini-skirts made their first appearance, and for each new project, I need to do at least three or four buttonholes before I feel I’ve worked all the bugs out of things. So, 6-8 buttonholes would be a good practice session. Once you’ve finished your practice. Put that piece of test front aside and go collect your vest from the ironing board.
Then, come back and take a good look at that test front. Take a fridge magnet and stick it up on the fridge and stand back (because that’s how people see buttonholes) to see how they look. Even? straight horizontally or vertically (depending on what the pattern calls for?)? Feels good, right? Now, take a pair of small extremely sharp scissors (or a seam ripper, though I hate using them for this) and carefully snip the buttonhole open, from end to end. Then take one of your buttons and test it out to make sure the button goes through the hole (trust me, you would not be the first person to make the wrong size buttonhole – but it’s better to do this on a test front than make them on the garment, slice those babies open and then find out the buttons are too big).
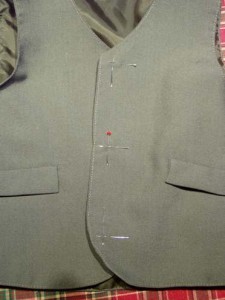 Now you are ready to do the real thing. First question: boy or girl? This is one of those “OMG, I ruined the project” details if you get it wrong. Male clothing buttons left over right; female is right over left. So, laying the finished piece on a table in front of you, if this is for a guy, stick your right hand out and touch the side of the vest that corresponds to your right hand. That is the side for the buttonholes. If this is for a girl, then stick your left hand out and touch the side of the vest that corresponds to your left hand for the buttonhole side. Taking out your vest front pattern, line that up with the edges and mark those buttonholes. Take out your measuring tape and go through the same routine that you did before in terms of making sure they all line up vertically and horizontally. I’m using pins here. Sew your buttonholes, trim off the end threads and slice them open. Take a moment, again, to do a little bit of back patting because you did a great job and probably something you were scared to do. Good show!
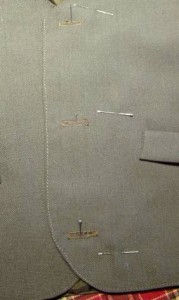 Buttons: The trick here is to get everything lined up. Putting the vest in front of you on a table, make sure the vest bottoms line up horizontally with the bottom of the vest back. Then put the buttonhole side over (as if you were going to button it) the other side. You should have about an inch of the vest edge under the buttonhole side. Pin the two layers of vest front together so that they don’t wiggle (see the vertical pins in the photo). Then take other pins and slide them into the buttonhole, in the center of the buttonhole (see photo). Carefully peel the vest edge away, leaving the pins that you just put in. Those are the spots where you need to sew your buttons so that they line up with the buttonholes. If you want to put a dot of chalk or something else where the pins go in, that’s a good idea also, just in case you lose the pins out. Then, sew on your buttons.
 Notes on buttons:
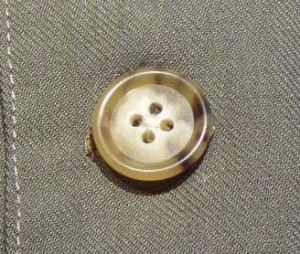
Choosing thread color for buttons is one of those details that changes the look of a garment tremendously. I’m not sure why but it does. As you can see from the photo, I matched the thread to the buttons, so it disappears. This is actually a rather formal look. If I’d matched the thread to the fabric, it would have been contrasting, which is a very sporty and casual look which sometimes works really well… and sometimes doesn’t. So, I always try to match the thread to the button color.
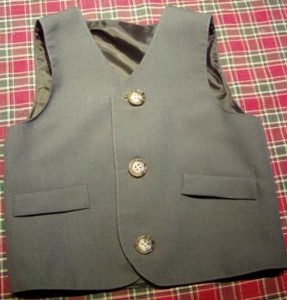 Finis: We are done with this vest. I’m pleased with this vest. As a matter of fact, I’m going to make a pair of pants to go with it to make an outfit for the young man who will wear it. I think he will look very spiffy.

You vest is lovely, and the series very interesting. I never knew of basting before ironing (other than that my grandma used to re-bast her girls’ pleated skirts before each pressing; that was the 1940’s and pure wool I guess). Much better than my fumbling-with-a-side-of-scorched-fingers method!