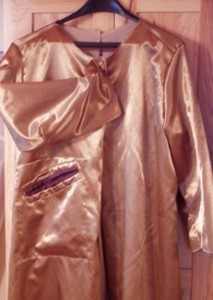
 There’s a certain point in making a coat where you can switch gears and work on something else with the garment, an entirely separate part of the project. That is the lining. And I think in general, sewists view making the lining in a sort of ‘ho-hum, let’s get this over with, after thought’ sort of way.
Which Aunt Toby feels is a real mistake. This is the same sort of thinking that manufacturers use when they make linings out of the sleaziest, cheapest junk that splits at the seams, frays out and cheapens the product immensely. Linings perform several functions, most of them very important and so making a lining for anything deserves some real thought and attention.
Linings Do The Following:
Make the garment warmer
Protect the garment from body sweat and other, ahem, things
Provide more structure for the garment
Help keep the garment in good shape for a longer life
The other thing that a lining can do, if you think about it, is that it provides an entirely separate version of the outer garment and this allows the sewist to think about doing things that the outer garment might not be able to do. My favorite thing to do with a lining is to build one or more pockets into it. Now, sometimes, this is for sheer convenience as in an evening skirt or jacket when I don’t want to have to lug around a purse with me. Aunt Toby hates trying to juggle a glass of wine in one hand, a small plate of something in the other hand and a purse underneath my arm when I’m at a cocktail party or reception. I will not count the number of disastrous events where I ended up wearing what was on that plate instead of eating it. With an inner pocket in the skirt or jacket, I can slip in my cell phone, the electronic thingy for the car, and a charge card and I’m good to go. I’m not one for hauling out a bag of cosmetics mid-event to redo “ma maquillage”, so a pocket like this is really helpful. Another helpful pocket in a jacket or coat is one that you can zip closed to keep something like a passport in. I hate scrabbling around in my purse for my passport – men’s jackets always have inner breast pockets for handy things like that but women’s jackets never do, so I put something in every time.
In the case of the coat, I made the conscious decision NOT to put pockets into the outer garment. The fabric is so spongy and soft and stretchy that my fear was that if I tried to do anything other than a ‘sew on the outside’ patch pocket (which I felt stylistically would really be disastrous), I would end up with a pocket that once I put my hand into it once, or stuffed a pair of gloves into it, it would stretch out, gape, and make the whole coat look awful. And since this is a dressy coat, I don’t want it to ever look that way. So, my resolution to the problem was to accept the fact that I won’t be able to jam my hands into my pockets (no great sacrifice there – just another excuse to wear a nice pair of leather gloves) and build a pocket into the lining so that once I took off my coat, I could slip the gloves and/or hat in there and they’d be safe, wouldn’t end up on the floor and so on.
Here’s how I did it. If you get nothing more out of this than remembering that you need to make the decision of ‘What do I want to do with the lining?” before you actually put the lining into the coat, then I’ll have done my job here. You can perform this bit of magic right up to the point where you install the lining, though if you do it right from the get-go as I’m doing, it will go a lot easier.
Materials and tools:
Fabric for the welt and the pocket. In my case, I used the same fabric that I’m using to make the bound buttonholes in the outside of the coat, which is a brown poly shantung. It’s heavier than lining fabric but not as heavy as my super-duper Haberman Fabrics flannelized coat lining. For the welt, you’ll need a piece of fabric 8.5” long by 5” wide. For the pocket, you’ll need a piece about 9” by 11”. Cut both on the straight grain of the fabric.
Tools: small straight edge ruler, pencil, sharp pointed scissors, pins, iron and ironing surface of some sort.
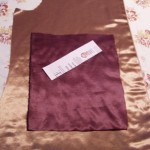 Step one – decide which side of the coat you want to put the pocket (or decide you want them on both sides). Hold up that piece of the lining against you, right side TOWARD you (because that’s what will happen at the end when the lining is installed into the garment). Put a pin where you’d like the opening to be. Lay the fabric piece flat and put a little scrap of paper where you’d like the opening and play around a bit in terms of the angle on the fabric. Mark the ends of what will be the opening with two pins in the lining piece – the opening should be something in the 6″-7″ range so that you can get your whole hand in there.
Step two – What I’m doing with this is making a version of a welted pocket. Instructions for doing that are here Buttonhole and Welt.
I’m doing my own rather ham-fisted version of this. Please take note – it is worth while making practice versions of this a bunch of times and in different sizes because this technique also makes, if you make a much smaller version, bound buttonholes. Being able to do this is a very nice skills addition to one’s sewing lexicon because bound buttonholes make anything look lovely, expensive and elegant. OK..back to step two. Take the smaller piece of fabric and center that over the marking pins and pin down all around. You should have an inch of fabric between the edge of the fabric and the pins. Pin all around the edges of this piece. Flip the lining piece over and eyeball the center of the little pinned down piece of fabric and draw a straight line through that, stopping just short of the original marking pins. Using your basting stitch (machine or hand), stitch on that line.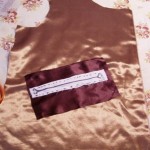
Step three – Using your straight edge and the pencil, draw a line with the basted stitched in the center, that is about ½ inch across the top and bottom (so that stitching will be at the ¼” point). See the box in the photograph. 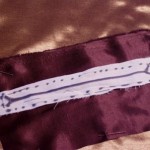 Then line up the ends to make a box. Pin through those lines and using a small straight stitch, go around the box. Take out the pins and using your sharp scissors, cut straight up the stitching, stopping just short of either of the short ends. Cut into the corners. Take out all the pins. Go to the iron. Taking the long stitched sides of either side of the box, pull up the fabric and pull against the stitching, ironing it down against the stitching until there is a crisp crease there. Do the same with the short ends of the box. Don’t leave the iron – you need it for step four also.
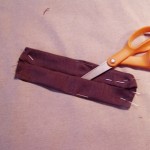 Step four – Pull the fabric through the cut you made and flip to the other side. Pin down against the cut edges and iron again, both sides . Then, fold under the edges of the fabric all around, pin and iron again. Baste around the edges. Remove all the pins. With the sewing machine, sew down close to the basting stitches around the edges. Remove the basting stitches.
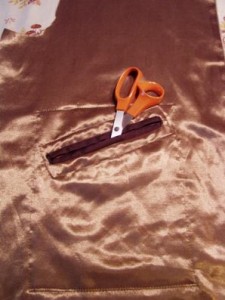 Step five – Take the larger piece of pocket fabric and iron down ½” all the way around and sew down. Pin on the back of the lining piece, arranging it in such a way that the bound opening (the welt you just made) is close to the top. Mark the edges with pins (and baste down too if you like) and sew all around. Voila – pocket with a welted opening. If you want an welted opening with a zipper, then you will need to make the welt and center the zip underneath it and then sew around the zipper tape from the front. It is not the most elegant technique but it does work. Then, you put the pocket on the back.
Now that I’ve managed to use a morning to avoid putting in all the bound buttonholes in the coat, I’ll have to get back to that.
Until the next time.

I couldn’t agree more about the lining. I find it almost offensive as a consumer at some of the fabric choices that are made about coat linings specifically. It’s a huge factor in my decision to purchase.
“Almost offensive”? Not almost at all – VERY. In any manufacturing process, the vast majority of the cost going into the garment (even in China) is the labor cost. Not the fabric for the coat and not the lining. I will not enumerate the number of times I have looked in what are considered ‘good’ coats (ok, I’ve never been to Barneys, so I’ve never gotten to look into coats at that price point but I’m going to bet that their linings are not much better for what people are paying for the coat) and found sleazy acetate lining. That stuff will not last a season and does nothing for the coat itself.
Great post! I read somewhere that you should always make the lining first, so you don’t get bored when doing it, and so you can double check the fit of the garment. The lining is my favorite part, because in most garments, that is where the personality is. (especially coats, because there are so many options!)