
 Sometimes, you’ve got to just get creative.
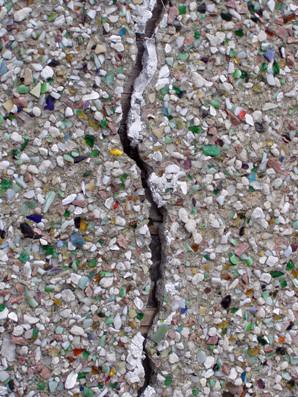
One of the things that we found very unique and intriguing when we bought Chez Siberia, lo these many years ago, was the stucco treatment on the house. It was…sparkly. We found out later that the way this was done was that after the final surface coat of the stucco was put on, the plasterers would take scoops of broken up shells, dishware, glass, etc. and throw it into the surface. It would stick there and provide surface interest, a little color and yes, it was sparkly. It was a popular stucco treatment in our area for about 10 years, from the mid-30s on and it disappeared – it was too labor intensive. But it made the house unique.
So unique as a matter of fact that over the years, the former owners had done some..mmm..shall we say…repair work to it when they had issues. Stucco is an ancient building surface – it has multiple layers and frankly, requires a solid base surface to support all the weight because most of what we’re talking about here is various grades and colors of cement.
It literally weighs a ton. Any movement or settling in the house, any infiltration of moisture that freezes and you are going to get cracks.
 Big honkin’ cracks.
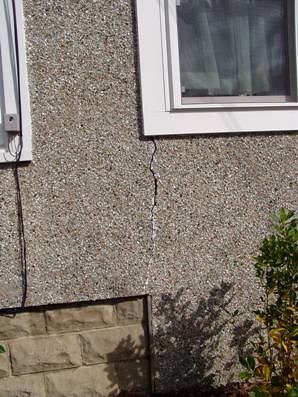
The former owners had used various sorts of white caulk, probably butyl, which contrasted mightily with the grey cement background (we won’t even talk about the broken up shells, dishware, glass etc.). The repairs looked awful. With all the work we were doing inside the house and the window replacement and the landscaping and so on, we were still faced with big cracks and horrible filled in cracks. We asked our contractor if he knew of any ancient plaster guys in the area who might know what to do – he reminded us that even if we could find someone who knew how to do the treatment, what is available NOW to do stucco work is totally different. We’d spend a lot of money to get a repair that would end up looking totally different than what we had.
Then we brainstormed. One of the projects in the house was that with all the new beams in the basement and first floor (and the four two-ton jacks and the cement pads, can’t forget those), we’d hoisted the center of the house 4”. And destabilized the southeast corner where the front porch rested on some pretty poor supports. The cracks there had opened up big enough to put your hand inside and we knew that we needed to get under the porch, put down some cement piers and hoist that up also, and hopefully close those cracks. At the same time, the last owner of the house had done some..mm..creative window work which frankly looked like one of those ‘Hey, I got a great deal on some odd sized windows” and we wanted to open up the porch, put in some energy efficient windows, insulate and so on.
The opening up part was the answer to our problem because it required the contractor to use a cement saw (the porch was an outside porch, so there was stucco inside AND out) to square up the holes for the windows. We had all sorts of chunks of the stucco available to us.
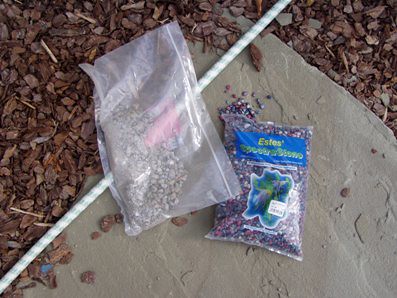 The DH took a sledge hammer and broke up the chunks into little chunks and cement dust and we combined that with some pretty aquarium gravel. We figured the ‘fill’ part of the job would be done with clear caulk and then we’d press the combination of cement chunks, dust and pretty colored gravel into it and on top. We knew it would not be a perfect repair, but we hoped it would do two things:
First, we were going to squeeze so much caulk into the cracks that no more moisture could get in there to make the cracks worse.
Second, the surface treatment would be enough and would match enough that to the casual drive or walk-by observer, it would not be glaring.
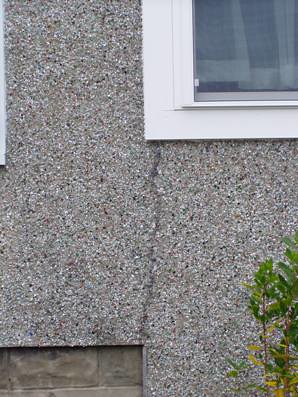 We could not be happier with the results.

Great job! The crack line is barely noticable, and what a creative fix! Good for you!