
 For folks in warmer places such as the US South and Southwest, this is rather late for you folks – I’m sure you have already gotten your seeds into the ground. But, in general, you can hold this information aside for this fall.
Where I live, our ‘frost-free growing season’ is pretty short: from Mid-May (and that is risky) through the end of September (and again, the last week in September will find a lot of us, 8 years out of 10, covering the tomatoes and peppers at night against frost). That’s less than 150 days and to get actual ripe veggies such as tomatoes and peppers, we can’t just throw seeds in the ground. That will not work. We need actual plants which will start flowering when the nights are warm (putting plants in the ground in May or early June which already have flowers open on them is really a waste – the plants will not ‘set’ fruit. For that, we need night-time temperatures that are at least 55 degrees F. So, we need to time the whole thing (as the Wicked Witch of the West in “The Wizard of Oz” put it) ‘very carefully’. We want the plants big enough to put into the ground (and the ground warm enough that they don’t get set back) but not so big that they already have flower buds on them. Dicey stuff.
So, for me here, at Chez Siberia, producing plants of the right size takes about 8-10 weeks (because what happens in the greenhouse is not necessarily a given, either. But for anyone who is just starting out (and hurray for you!!), here is my ‘this works every time” plan for starting tomatoes and peppers. Starting cool weather things like broccoli, cabbage, kale, chard, lettuce and so on is a little bit different because they can handle ‘cool feet’ whereas tomatoes and peppers absolutely need soil temperatures in the 70s to germinate and grow.
You will need:
Potting Mix
Vermiculite
Something with a clear plastic lid to sow the seeds in. I used the big plastic bins that salad mix comes in from the grocery store. Clear shoe boxes work as well.
Seeds
Warm water
Something to make a long furrow in the potting mix to sow the seeds. I use a wooden stick from frozen treats; bamboo throw-away chopsticks from take-away Asian food works well also.
A source of bottom heat
And, depending on what the air temperatures are where you put the seeds, you might want some sort of insulating wrap, like a big clear plastic bag. I’m using a big sheet of left-over bubblewrap.
First things first – and I always have to remind myself to do that because invariably, I don’t and then I’m trying to stick labels on the sides of containers already full of potting soil and it all ends up on the floor and in a huge mess. So. 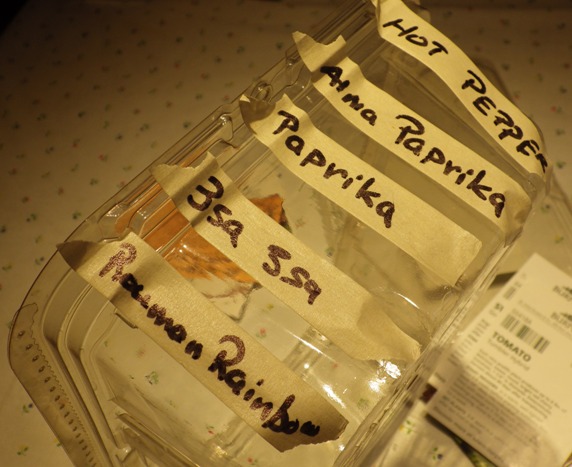 Take your seeds and figure out what the best arrangement is going to be in your containers. This year, we are growing a rather large number of different varieties of peppers. Hot peppers, sweet peppers and peppers specifically bred to be used in drying to make paprika. I’ve got other peppers which I’m growing along with some specialty tomatoes for growing in hanging baskets. So, I segregated those with the other tomatoes in another container and this container is just for the peppers. Before I even mix up the potting soil, I take masking tape and a permanent marker and put labels on the end of the container, corresponding to the furrows I’m going to put into the potting soil. That way, once they start coming up, I know which peppers are which. I’ll do the same thing with the otherseeds in another container.
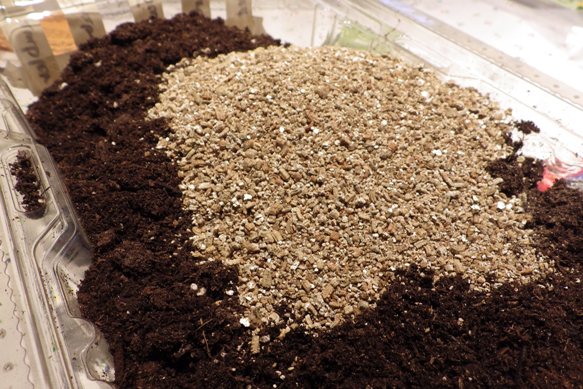 Let’s talk about potting mix. To be blunt, your Aunty, in the deep dark past has tried to sterilize compost. It did not end (or smell) well, so I just use a commercial potting mix. The one problem I find with them, though, is that they have too high a proportion of peat moss in them, so they dry out quickly and shrink up. I hate that. So I add Vermiculite(tm), which actually, for the curious, is heat-treated mica. This stuff holds more water in the mix. It’s also really good to use if you are germinating seeds which require light to germinate (these are usually flowers and are teeny – you can sow those right on top of a layer of Vermiculite and it’s loose enough that they will fall into the layer but still have light AND moisture. My formula, such as it is, is to use 1/3 Vermiculite to 2/3 potting soil. Mix that up, put it into the sowing container and wet down well with warm water.
Take your finger or a whatever tool you are going to use and make the furrows into the moist potting mix that correspond to the labels at the ends of the container. Then start sewing the seeds of the appropriate vegetables in the furrows. Pull in some of the moist potting mix to cover the seeds and press down firmly.
 The next consideration is a source of bottom heat.
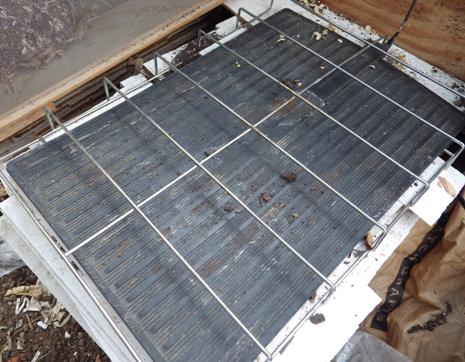
I use what’s called a growing mat – it’s basically an electric line that’s sandwiched into a thick rubber mat. These can raise the soil temperatures into the 70 degree range quite easily, but if you have an area with a lot of sun as well, you could end up literally ‘cooking’ the seeds, so this mat also comes with a metal frame to rest on top of the warm mat. I’ll put the germination containers on top of that. Now, what can you use if you don’t have a grow mat?
Well, in the early days of our marriage, we had a gas stove with pilot lights — this kept the top of the stove quite warm and I used to germinate seeds on top of that very successfully as long as the containers were in a plastic bag to not dry out. Another way is to use an electric heating pad – but again, you don’t have as much control, so wrap the heating pad in a towel or something like that to prevent cooking the seeds. Do you have one of those oil-filled heaters? Those can get quite hot, so set the temperatures on it in such a way that it feels warm to your touch. Then put the seed germination containers on something like a metal or silicone cookie sheet and lay that on top of the heater.
What about window sills? Well, what ABOUT window sills?
Well, the problem with doing this is that unless you have some sort of grow mat that fits the window sill (and they do exist – just search on ‘window sill heating mats”), AND you have a way to insulate it against the cold of the window sill (I read in one comment about someone actually cutting up cork trivets to do this), you are basically losing all your heat to the cold surface of the window sill. Window sills are cold; even if your walls are insulated, the window sill itself can be a direct link to the window frame both inside and outside. So, although the idea of germinating seeds on a window sill seems great, I’ve never found it to be a really good solution since tomatoes and peppers especially need warm feet. And they don’t actually need sun to germinate. So, as long as you can get them to germinate someplace, once you get them to the second-leaf stage and can transplant them to larger quarters in a sunny and relatively not cold spot, I wouldn’t bother.
But what if you have heat but it’s not exactly warm? That is, you have an unheated porch (or, in my case, an unheated greenhouse)? Right now, the temperatures in my unheated greenhouse is not even 50. How do I keep my seeds nice and warm, even with the heating mat?
I need to capture that heat and hold it around the plastic boxes. 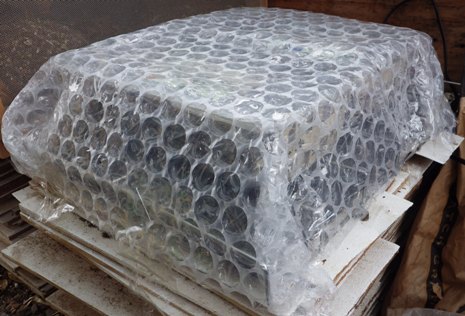 If it were warmer (or sunnier, which would make the greenhouse warmer), I’d put the germination boxes inside a closed up big clear plastic bag and put that on top of the grid on top of the heating mat.
But it’s cloudy and very chilly, so I need something more like it’s own insulating blanket. One of the things we always collect and save (and one place to get this is through asking the IT folks at work since computer equipment and supplies are shipped wrapped in this stuff all the time)are the big sheets of bubblewrap. The best one to use are the ones with the biggest bubbles – this is the thickest and toughest and will hold the most heat. Some people in the commercial greenhouse business actually buy huge rolls of this stuff and attach it to the inside of the glass roofs of their greenhouses for insulation. What I’ve done here is put the germination boxes on top of the grid of the heating mat and I’ve wrapped the bubble wrap around them so that the edges extend down beyond the grid and I’ve taped the corners down and the edges down to form a chamber. It’s not air-tight – that is for sure, but it’s certainly going to help hold the heat in the germination containers.
Tomatoes and peppers, under these conditions usually take about a week to ten days to germinate. So we’ll keep an eye on what’s going on there.
Enjoy.

Love your post – I’m starting 100s of heirloom tomatoes for my Grandmothers 2 Grandmothers group – and here’s my embellishment on your ideas:
Labels! Plastic ones are expensive, and masking tape is, well, masking tape.
I buy tongue depressors in packs of 60-100 for $1. They’re mobile, moving from starting flat to greenhouse or garden, and they will rot (compost) by next year.
I used to use popsicle sticks the same way, but I had issues with damp-off and overgrowth from them (too much moisture perhaps?), so I switched to the tape method. But, again, whatever works. 🙂