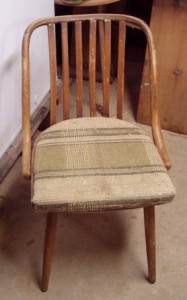
 One of Aunt Toby’s goals for writing this blog is to definitely get the point across that besides actual surgery or self-performed dentistry, there is nothing out there that any of us should say, “Nah…I could never do that.” Now, I also have to admit that I’m a big believer in starting something at the most basic level I can find and then working up to more complicated things, but the point is made.
Once you find out just how basic some things are to do, you will want to do them yourself. Truly.
If you have ever wanted to reupholster a couch (and your dear Aunty knows that this thought flutters through the brains of at least 20% of the world’s population at any time), but did not know how or where to start, this series of posts on redoing a kitchen chair will give you a pretty good idea of how much work doing a really basic reupholstery and repair job is. Once you’ve read through these and perhaps tried it yourself on one of your own kitchen chairs (or heck, do the whole set – you deserve it), you just might say, “I’ll find an upholstery shop to do this” or you might want to work your way up to something a little bit more difficult to learn some more complex techniques, using different tools.
Now, to redo a kitchen (or diningroom set – these are fancier but much the same) chair, there are two basic operations:
1) Taking the seat off the chair so that you can then take off the cover and reupholster it.
2) Repairing any loose joints and if necessary (or wanted), painting or sanding and refinishing the chair.
What tools you will need to do the first operation:
Screwdriver (probably a slot head, but you should check the tops of the screws to make sure – the cover literally might be put on with staples)
Pliers
Large piece of heavy paper to make a pattern (a paper grocery bag that has been sliced down the sides will do very nicely)
A pencil
A staple gun and staples
Wide tape: double sided carpet tape is best, but anything with is really sticky will work.
Order of business:
1) Turn the chair upside down and place it, seat down, onto another surface so that you can see the bottom and how everything is attached. Use an old table around or even use the staircase.
2) Look in the corners and sides of the chair. You should see metal braces or some other support for the seat and there will be screws holding the seat on. Unscrew all the screws (if the chair is old or has been stored in a non-optimal environment, you might need a bit of WD-40 or some other lubricant to get things loosened up) and put the screws into an old envelop and label it with something enlightening or clever such as “screws from kitchen chair”.
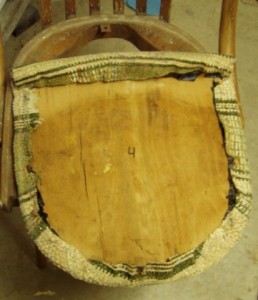 3)Lift up the seat and give it a good look to see what was done. As you can see from this photo, there is a fairly square piece of plywood with a rounded back edge and a lip that is about 2″ wide at the front. The upholstery material covers all edges and was wrapped around to the undersides and fasted into the wood with a staple gun. This is actually a pretty standard seat conformation. This chair comes from a set that we inherited from my great aunties when they passed on, so I’m going to figure that from the style, etc. this chair is from the mid-1960s. What we have to do is get the upholstery material and anything else under it off the seat. If it’s held on with little screws, then undo the screws (put those in the envelope also) and take off the layers. If it’s held on with staples, then use the screw driver and pliers to remove all of the staples holding on the materials and take off the layers.
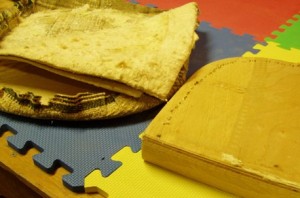 3) Peel the cover off the wood seat to see what you’ve got to work with, and what you want to throw away. In this photo, you see the wooden seat on the right. On the left are two pieces of material: The one of the bottom is the upholstery material, which has a rubberized base to stiffen it. On the top is the original padding, which is a sort of thick felt. That looks in pretty decent shape, and we can use this again, but I also remember how comfortable those chairs actually were NOT, so I bought some thin foam to put in there as well to give the seats a bit more squish.
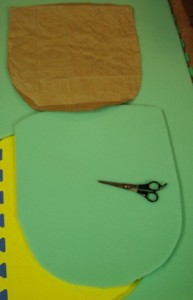 4) Now you need a pattern for the upholstery material for the seat – and you can use what you just took off the chair seat for that. And you also need a pattern for the foam that goes on the seat – and that is a little bit trickier because as i can see from the felt that was used, that not only covers the seat itself, it also wraps around the lip in the front so that the sitter is not chopped off at the back of the knees. So, I can either use the felt as my pattern for the foam, or I can make an actual pattern by laying out the felt on the grocery bag, drawing around it, and cutting it out. Then I used it to cut out the foam as in this picture here.
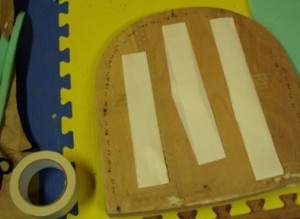 5) One of the things I noticed on the top of the seat was that originally, they had used what was probably some sort of double-sided tape to hold on the felt before they upholstered the seat itself. A very clever idea since you don’t want the layers shifting around while you are pulling the fabric and foam over to the underside to staple it neatly. Now, the best sort of tape to use for this is double-sided carpet tape. But, who has that? I never have things like that at the house and to go to the hardware store to buy a whole roll of it when I’m not going to need a whole roll is wasteful. Any really sticky tape will do: Pull off a piece almost twice as long as the seat is, and putting sticky end to sticky end, tape the ends together so that the sticky side is out. Firmly put this tape on the seat, stretching out the ends so that it lays flat, as in the picture. Three of these bands on the top of the seat should do the trick. Then, put the piece of foam on the top of the seat, matching up the back edge with the edge of the foam so that the front of the foam will extend over the front of the seat. Turn over the seat and the foam and stand on it or put a heavy book on it.
Next time, we will cover the upholstery itself: The fabric, the pattern, the putting on and securing.
