 Victory belongs to the most persevering.
Napoleon Bonaparte
The Little Corporal may never have picked up a pair of scissors and a needle in his career (actually, I’ll bet he did – everyone knew how to sew a seam and darn a sock in those days), but he did know about always moving forward.
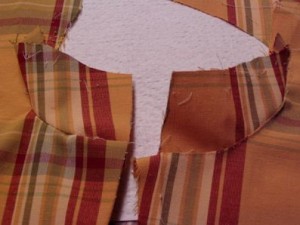
And moving forward I needed to do because a) it’s getting colder all the time (isn’t that a Beatles song?) and b) that brown basketweave wool was just sitting there, glaring at me, filling me with despair. I had a new pattern, the Vogue 8626 and had been clutched by ‘fear of doing another muslin’. What if it didn’t work? What if this one looked as bad as the last one? What if it looked (gasp) worse? But desperation is a rather pointy master, so I took my measurements, made the basic changes, cut out the pattern top in some left over curtain material I had, sewed it up, realized, as usual I had the ‘armscye too low – what the heck’ issue and did my traditional ‘eye-shaped gusset’.
Ah…..veddy niiize….
 And then Aunt Toby Realized that I never showed you what I have to do once the lightbulb goes on, all the stars align and I dance a little jig in front of the mirror (that’s the clue that ‘by George, she’s got it!” in terms of the pattern actually making it to the final garment stage).
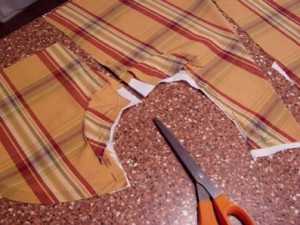
First, I oh-so-carefully cut the shoulder seam and take out the basting on the sleeve from the center top down both sides to where the corners of the gusset are and laying it out flat, I cut straight across the gusset.
Second, I take apart the side seam up to where the gusset is attached. I draw a line straight up the middle, matching the edges of the side pieces and cut along that line.
Third, I take apart the underarm seam from the sleeve up to where the gusset is attached THERE, draw a line straight up the middle, matching the edges and cut along that line.
I iron these out flat and survey the damage. The little gusset pieces, as you can see from the photograph, don’t come to the edges and are rather, ahem, herky-jerky in terms of meeting the curves, so I need to ‘true these up, which I do by attaching pieces of paper (in this case, paper towels because they are white and it shows up better), redrawing the straight or curved lines.
 Then I take these new trued-up pieces, put the pattern pieces on top of them and make the changes there.
Ready to rock and roll with the basketweave fabric, except first, I have to fuse it.
Now, when Aunt Toby was a much younger Munchkin, back during the days when high school girls could not wear slacks to school, shop and mechanical drawing were for boys and girls got — Home Ec, we did not ‘fuse’. Fusing, per se, did not exist for home sewers. Iron-on interfacing had only recently been invented; they were still working out the bugs in terms of the adhesives – did you wash it? Didn’t you wash it? Sew-in interfacings were the norm, and actually until ‘speed tailoring’ and Georgio Armani came on the scene in the 80s, clothing such as jackets and coats were made with sewn-in interfacings and this wonderful archaic product called ‘hair canvas’ because, interestingly enough, it has goat hair in it. It is the gold standard of ‘stand up by itself’ interfacings and when Aunt Toby took ‘more sewing’ in high school (after a complete failure in the 7th grade), she made her very first jacket with assistance of the rather formidable Cornell-trained Home Economics teacher and hair canvas, which was attached to the underside of the front of the jacket in several different places, in different conformations, with something referred to as ‘pad stitching’. All terribly British, uptight, and formal.
That was a jacket I wore for a long time, though not as long as I could have if I’d chosen a different color than baby blue. But, I digress. Home sewing has gotten a lot more sophisticated in the past 30 years — people not only want things that look like what they could get in the store (and a store such as Barneys if they could afford it), they want something that actually looks better. When I was young, no sewing adult I ever met went to workshops, bought books, took classes in sewing. Now they are everywhere and the internet and sewing blogs are just filled with useful and inspiring information from sewers who produce clothing that frankly makes you gasp with delight. Aunt Toby started sewing when she was 10 and believe me, I’m a better and more clever maker of clothing today than I ever was 30 years ago..or even 10 years ago. Learning all the damn time.
And one of the very clever techniques I’ve come upon is this thing called ‘fusing’, which is basically taking a very light weight iron-on interfacing and with heat, fusing or gluing if you will, this to the entire back of the pieces of fabric. What this does (and this is an entirely separate operation from actually putting interfacing into their requisite areas on a garment) is provide some stability and support for the fabric. Now, there are all sorts of wool fabrics that can be used for winter coats, such as melton and heavy weight flannels and so on. The basketweave wool I got was heavy – but also loosely woven – so I knew that I needed to a) stabilize it and b)try to make it a bit more wind-proof.
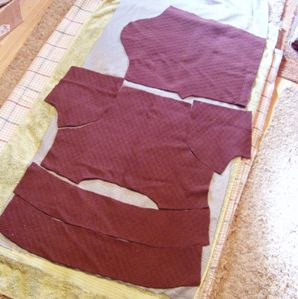
 Some sewists do what is referred to as ‘block fusing’, where basically either they take it to a service, which uses huge heated presses to lay interfacing on the back of the cloth and fuse the two layers together with heat and/or steam. At home, this can be done on an ironing board but I prefer something a little bit more labor intensive. I cut out the pieces of the coat and fuse each piece separately, using a wool blanket, a bath towel and my home iron. I felt that if I draped the fabric over the ironing board, it might stretch out of shape, so I put the blanket and the towel on the carpet and worked there on the floor.
It’s not always easy to know what temperature to put the iron on, in order to get a good attachment from the adhesive – many of these lightweight fusible interfacings are really made for knits and so doing a test with a scrap of your interfacing and a scrap of your fabric is really necessary. I was surprised at how high a temperature I needed in order to get any adhesion at all, but in order to prevent the backer of the fusible from melting, I had to keep my iron moving constantly. I laid down the fusible on the towel, adhesive side up (and you can tell that by feel) and laid the pieces of the coat right side up. I first tried to get the fusible to adhere by putting down a linen towel and steam ironing through that but that did not work, so I cut around each piece of the coat through the fusible, flipped the sandwich over and ironed straight through the fusible by pressing down and moving my iron. This worked really well and I got great adhesion of the fusible on the back side of the wool while at the same time, because the right side of the coat pieces were on top of the towel which was on top of a wool blanket, the wool fabric did not get mushed down.
My next step is interlining the pieces. Right now, I’m thinking seriously of using cotton flannel (though, I’m goign to have to wash and dry it in a hot dryer first to pre-shrink it). What I’ll be doing is cutting out each piece of the coat, again (this is a serious project, believe me), attaching each piece of cut flannel to its corresponding piece of fused wool and then when I sew up the coat, treating this sandwich as one piece.
Until the next time….

I really enjoy your coat-making saga, and I also appreciate your taking us through all the steps. Not sure whether it makes me more or less scared of making a coat, though!