
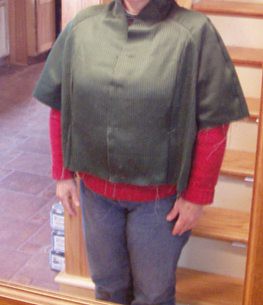
 So, here we are with the first muslin on the coat. Now, because my big fit ‘issues’ are between my bust/shoulders/arms and this is not a tightly fitted coat, I did not bother making a full length muslin. I also chose a fabric that is heavier than muslin per se (though there are different weights of muslin and there is one which is usually used for jackets and coats and is quite heavy – I cannot buy it where I live. The only source I know of is in the Garment District in New York City) so that I get the view of the drape. As you can see from this picture (even as un-sharp as it is) is:
The good news: It fits nicely across the front; the neckline lays pretty well and with shoulder pads in it, it looks as if it will be very nice.
Bad news – the first bit: If you look at the right hand side of the picture (my left arm), you will see this really annoying piece of fabric there with a drag line that goes alllll the way up to the sleeve seam. Even though this is a ‘swing coat’ this means to me that there is too much fabric there. It’s just hanging there. Not a good look for me.
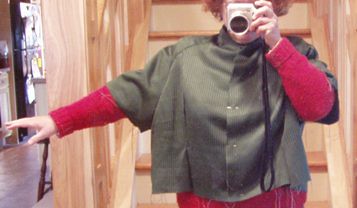 Bad news – the second bit: If you look at this picture (and I’m feeling pretty clever that I managed to get the shot one-handed while I had my arm out like that – but again, I’m easily pleased), you will see that I’ve got an issue here. I don’t have my arm raised much at all and already the side of the muslin is starting to creep up. That means that if I raised them more or crossed them across my bust or had a handbag on my arm, that side would raise up also – another not good look. For experienced sewists, this is called ‘the too-low armscye issue”. If you are blessed with a big bust and are choosing a size to fit that, you will absolutely end up with this problem. It is the nature of the pattern model that is used and results from the fact that you need extra fabric in the front where the breasts are…but you don’t need it at what’s called the ‘high bust’ and arm pit areas. Now, in shirts, dresses, jackets, etc. you can sometimes insert a seam or a dart or even pleats if the fabric is light enough to take care of the extra fabric..but that doesn’t help the issue under the arm, where the sleeve underarm seam and the side seams come together. That area has been placed too low on the body and the arm therefore gets trapped at the shoulder so that you can’t raise your arms or you can’t raise your arms without the whole side of the item raising up.
We need to raise that place where the seams come together and the way we do that is with what’s called an armscye adjustment (for those folks who are experienced sewists, forgive me; not everyone who reads here has a lot of mileage at the sewing machine).
 In this sketch, the black line is the original pattern; the red line is the adjustment. See how it not only adds fabric up under what will be the armpit, curving up. Now, with a raglan sleeve, we are working with a different shape of sleeve and don’t have such a steep curve as you see in a set-in sleeve, but the theory is the same – we have to move the place where the sleeve meets the side seams up vertically so that this point comes closer to the armpit. This too will be achieved with a steeper curve at that area.
Now, what to do about the side front pattern pieces? Well I have two ideas that I will try out:
First, I can always slash the pattern piece and take it in, or
Second, I can always use the seam where the side front pattern piece meets the center front piece and take it in there. Considering that the pocket is inserted into the side front pieces, this might be the neater, tidier, and slicker method.
