
 When Aunt Toby and the DH first set up housekeeping in a real house (versus their first year of marriage as students, AKA “Annus Horribilus”), we lucked upon a landlord who not only allowed us to rip up a good bit of the lawn, but also encouraged us to do so. One of our ‘challenges” was a humungous maple tree which dominated the backyard and only allowed sun to hit the prime gardening spots for a limited number of hours during the day. And being beginning gardeners, we chose things that we thought would be easy to grow: green beans, broccoli, tomatoes and zucchini.
Unfortunately, the DH’s method of making sure that we would get some zucchini, even if the only space left for the seeds was at the deepest, darkest end of the garden, hovering right underneath the maple, was to plant – six hills of the stuff. So, needless to say, by the end of the summer, we were looking for more ways to enjoy it.
I know zucchini has become sort of this gardening joke punchline – ‘the vegetable that wouldn’t die’ and ‘the vegetable that took over the garden’ and ‘I woke up one morning and we had zucchini big enough to throw a saddle on and ride off..” Actually, zucchini is just the victim of its ability to mimic the Eveready Bunny ™ in the garden. The trick really is to keep ahead of it and go out every single day and pick it. Even if you end up throwing it on the compost heap for that day, you need to keep the plants producing and keep the squashes you get on the small side. That’s when the skin is tender, the flesh tastes at its best and you can do more things with it in terms of eating it fresh or cooking it. Once they become big enough for seeds to form, the skin gets tough, the flesh gets sort of spongy and they really are not worth eating. 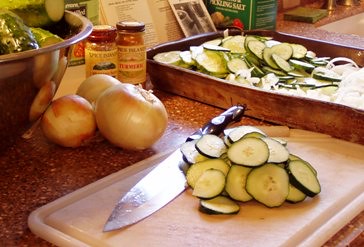
Here are three Chez Siberia Family Favorites that take advantage of zucchini’s flavors at this time of the year, when literally, if you go to the office bathroom down the hall, you will come back and find that some ‘garden produce fairy’ has gifted you with some. If you are lucky, the fairy has brought you little ones rather than ones you will have to build a barn for.
Chocolate Zucchini Cake (or bread – see end note)
This cake is a cousin to the Banana Bread/Carrot Cake family, whose reason for being is a) to use up something you don’t want to waste, b)to increase the amount of fiber your family is eating, and c)to introduce a sort of ‘wowee – I didn’t know you could do that’ aspect to your cooking. The function of the bananas, carrots and zucchini in these recipes is they take up space, add fiber, and add inherent moisture to the item. So, remember this when cooking or baking up other recipes – if the batter seems a little bit ‘stiff’, don’t reach for more milk, another egg, or anything like that; if you have a zucchini in the fridge that is lonely and languishing there, grate it up and throw it into the batter (half a cup at a time to see what the effect is).
½ c, butter (1 stick)
½ c, vegetable oil (we use the light olive oil for sautéing and baking)
1.5 c. sugar
2 large eggs
1 tsp vanilla
½ c. sour milk (if you don’t have sour milk sitting in your fridge – and who does these days – take ½ c. regular milk and add a tablespoon of vinegar OR, and this is frankly nicer, substitute ½ c. of plain or vanilla flavored yoghurt)
2.5 c. unsifted regular flour
½ c. cocoa
½ tsp baking powder
1 tsp baking soda
½ tsp cinnamon
¼ tsp nutmeg (if you don’t have this, don’t worry)
2 c. grated zucchini (this is not a hard and fast rule – I’ve made this work with up to 4 c. grated zucchini – a lot depends on how much moisture the actual zucchini has in it)
½ c. chocolate chips (if you don’t have any chips, you can leave them out or you can add ½ chopped walnuts or slivered almonds or something else – coconut, anyone?)
Cream butter and sugar.
Add eggs, vanilla, sour milk and oil
Mis all dry ingredients together and add to previous mixture.
Beat well with electric mixer.
Stir in the zucchini
Pour into a greased and floured 9x12x2 inch pan.
Sprinkle with chocolate chips
Bake at 350 degrees F for 40 min.
Baking Notes: I have doubled this and for some reason, when I do it seems to require a whole lot more than double the amount of zucchini. I have also used a combination of cake and bread flour and that works. If the ratio of cake to bread flour gets more toward the bread flour end of things, you get zucchini bread, which is very nice sliced and toasted, with cream cheese spread on it. If you double it, you will need a really big roasting pan for it. Mine is 17x12x2 inches.
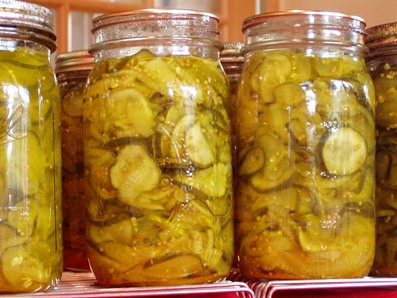 Zucchini Bread and Butter Pickles (modified from: The Complete Book of Home Preserving, Ann Seranne, Doubleday and Co., 1955)
These sweet-n-sour pickles traditionally are made from cucumbers(and frankly, the photographs of them here show B&Bs made from the 20-30 cucumbers I got gifted with this weekend) but zucchini offers one advantage over cucumbers – as long as you use young ones, the skin is tender enough that you can just wash and slice with no peeling.
Zucchinis and white onions: thinly slice up enough of both to fill a big roaster. It takes about 8-10 fist-sized cooking onions and 5-6, 12-15” zucchinis to fill just over the top of my 17x12x2 inch roaster. Mix up well – break apart the onion rings.
Salt: Salt is used in these pickles to get the veggies to release their water. For as much zucchini and onions that will fill just over the top of my roaster, I use ½ cup of salt. Sprinkle the salt all over the top and then, with your clean hands, turn the veggies over and over so that everything gets salted. Put the zucchinis, onions and salt mix into the fridge for 3 hours. While it’s wilting there in the fridge, mix up your pickling liquid.
Pickling liquid: Mix together the following:
5 cups of vinegar (cider or white will do as long as it is 5%)
4 cups of sugar (if you like your pickles sweeter, you can go up to 5 cups of sugar)
1.5 -2 tsp. Of turmeric (depend on how yellow-green you like your pickles)
2 tablespoons of mustard seeds
½ tsp. Of ground ginger
Just before the end of the wilting period (like, when everything has been in the fridge for about 2 hours, 45 min.), do the following:
1) Wash and rinse your canning jars and bands. Put jars into an oven set at 250 degrees F. Put the bands and the lids into a saucepan with water and bring to a simmer and turn off.
2) Take the biggest pot you have (I use my dutch oven and can do half at a time) and fill it half full of the pickling liquid and heat until it simmers. Turn down.
Take out the veggies from the fridge and pour into a colander and rinse with cold water until the water coming out of the colander no longer tastes at all salty.
Put as much of the veggies into the pot of pickling liquid as you can fit but leave about an inch at the top of the pot and turn the pot on high. Stir and heat until it starts to simmer. Turn off.
Using your jar tongs (or whatever other method works for you – those jars are HOT), take out a jar and put on a plate or other heatproof surface. Using a canning funnel and a clean heatproof cup, pour the veggies into the jars and using a clean spoon, make sure you have the veggies packed down tightly in the jar until you get to the neck of the jar. Fill the rest of the jar with the hot pickling liquid. Take your clean spoon and put it into the jar and jiggle it a little bit to release any air bubbles that might be trapped; press the veggies down again.
Wipe off the lip of the jar and using another set of tongs, take a lid out of the hot water and set that on the top of the jar and take out a band and screw that down. Put that sealed jar aside on a cake rack or something like that to cool.
Keep doing that until you run out of veggies, jars, bands and lids. If you still have veggies in the pot, then take whatever you use to store leftovers in the fridge and put the rest of the veggies and some of the liquid in there and refrigerate them and eat them right away.
These pickles are good as is, in sandwiches, or in a pinch, you can chop them all up and use them as relish on hamburgers, hotdogs, in tuna salad, tartar sauce for fish and so on. And remember – with turmeric and ginger in them as well as vinegar, these actually have some health benefits in them.
Kitchen Sink Summer Veggie Stuff
This is something we came up with when we did not have enough of any one item for a meal or to do a big canning. If you want to can this, you will need a pressure canner – follow directions for pressure canning items like green beans or peppers to make sure this is safe.
Combine the following, using whatever you have as long as the major ingredient is fresh tomatoes:
Fresh ripe tomatoes, washed and chunked up
Fresh sweet peppers, washed, seeded and chunked up
Fresh zucchini, not too big, washed and cut into chunks
Garlic – one clove for every 4 cups of zucchini you’ve got – again, just chunk it up
Herbs as you like – a good combination for this is basil and oregano; if you are going to a Mexican thing, use cilantro instead
Heat up and simmer. If you are not going to can this or serve right away, let it cool and refrigerate. If you are going to can, follow the directions for pressure canning. Great cold or hot, by itself or with pasta with a little grated cheese.
(squash blossom photo by Big Grey mare)
