
 The little den is coming together now, with some little bits and pieces to pull all the disparate colors together. The original color of the den, when Elder Daughter used it as a bedroom, was an aqua color and she got some cotton hopsacking tab top curtains to match. Pretty, a little girly perhaps but not bad. Well, of course, all that aqua paint went out the window (literally) when the DH and I wrecked out the walls to rehab the space. And when we painted the new walls, we painted them the same color as the rest of the downstairs (another hint in terms of saving money on redecorating: Find a color that you can stick with across an entire floor). So, we had ‘pecan’ walls (a nice warm beige), a futon that needed a new cover, and some aqua colored curtains that were still good and that I was loath to give or throw away.
 And that I was DEFINITELY loath to replace by going out and buying new curtains or even making a whole new set of curtains. I figured if I could find something that I could use to ‘freshen them up a bit’ it was a winner. I needed something I could pull everything together with and I found it in the fabric section of Ikea.
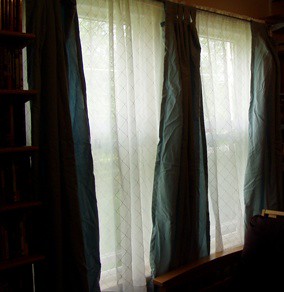
Now, Ikea is definitely not for ‘girly girly’ décor fabrics – the designs are very strong on bright colors and Scandinavian feel, but I found some striped fabric in the same weight as the curtains that had the same aqua in it and a good dark brown. Eureka!! I had my color scheme. I got a dark brown cover for the futon and as you can see from the photos, used the striped fabric as a border of the curtains. With the rest of the fabric, I’m going to make cushions for the futon.
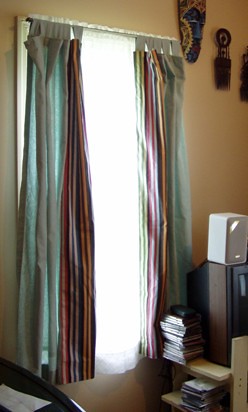 So, here is how I dealt with the curtains without taking them apart (The Lazy Aunty’s Method):
1) How to figure out how much you are going to need: Measure one of the curtains and estimate how wide a border you will want to put on and then add two inches on all sides for the fold over. Most home dec fabrics (except for the extra wide ones but this method works for them also) are 60 inches wide so make a sketch for yourself on a piece of paper and call the width 60”. Divide up that 60” by the amount of you borders. Let’s say, to make it easy, that the borders plus their fold overs are 20” wide and 60” long. So, on your sketch, break that up into three sections across the width – you’ll be able to get three of those border across. But you also need 60” long – that is 60/36” or 1 2/3 yards. Now, how many borders are you going to need? For anything over 3, you will need another ‘width’ – another piece that is 1 2/3 yards long. Out of two widths, you will get 6 borders – enough for three windows. So, you trot down to your local fabric store(and I do hope you have a local fabric store..there are so few of them left) and you buy 1 2/3 + 1 2/3 yards of this stuff – that’s a total of 3 1/3 yards. If you want tie backs or valances or anything extra like that, you’ll need more and we’ll discuss that at another time. If you are buying 100% cotton fabrics, buy some extra – like instead of 3 1/3 – get 3 ½ yards because they will shrink.
2) How to make the borders: First, wash the fabric in the hottest water you can get with a little bit of soap to get out any sizing and dry it. This will take any shrinkage out. Then iron. Take out your yardstick and measure across the width of the fabric and mark the borders and cut them out. If you have regularly woven fabric, you will be able to literally snip at the marks and rip them down to size, but if you don’t feel brave enough, mark with pins or a pencil and cut along the marks. Iron down the fold overs.
3) Lay out a pair of curtains on the floor or your dining room table or any large flat surface and decide if you want the borders on the inside or the outside. Lay the new borders on the curtains where you want them (hey, you might even want them smack in the middle – who knows?) and pin them right at the top below whatever header you have (tab tops are easy – if you have pleats at the top, you will need to take out the pleater hooks, etc.). Then, carefully smooth them down the length of the curtain, pinning the two together as you go, until you get to the bottom. If you get to the bottom and it’s a little bit short, then unfold the fold over you ironed down and pin it to match the bottom and re-iron that. If it’s too long, you can refold the bottom, pin and re-iron that. Sew along the edges of the borders and there you are.
4) Question: What do I do if I have lined curtains? Well, unless you want to sew through the linings (which I don’t recommend), then what you do is this – undo the stitches holding the lining at the bottom and on both long sides of the curtain and flip that up at the top before you pin on the border. You’ll need to be a little bit more careful when you run the curtain through the sewing machine to sew on the border so that you don’t catch the lining, but once you have the new border sewn on, you can then catch stitch the lining back onto the back side of the curtain and no one will ever know that your newly refurbished curtain did not always have the colorful border!
5) Question: What do I do if I get tired of the border? Ah – well one of the issues with curtains (unless you are using some of the Sunbrella fabrics or something like that, which is UV treated), is that even with a lining, you will get fading and if you are tired of the border but still want to use the curtains, if you take off the border (easy enough, just take out the stitches), you will find that the fabric that was underneath the border is now a different color. But Not To Worry!! If you are using cotton curtains, you can go down to your local store and buy some RIT dye in a color you like and using the washing machine method on the back of the box, you can take off the borders and dye the curtains a completely new color! Voila!
