
 I truly, madly deeply love the DH. But I am not delusional. All marriages have their flash points; for some people it’s money. For other people it is sex. For still others it’s politics. For us…it’s 30 odd years of unfinished DIY house projects.
I finally came to the conclusion that no matter how much the DH truly WANTED to do rehab in the house (which needed it desperately – actually more desperately than even WE appreciated), he had ‘fear of screwing up’. So, he was great at starting…and abysmal at…continuing. Finishing was about as within his grasp as performing cold fusion on the kitchen table. The amount of money wasted on started projects was really bad.
When ‘an estate situation’ (ahem) brought me a bit of money, I did not stop, did not hesitate, did not even argue myself out of it (because we’d already decided that we wanted to stay in the house). We sat down with a contractor and talked about the house. We already knew what we were really good at – and we knew we were horrific at almost anything else.
If you want to save money on DIY – watching shows like “This Old House” is really sort of useless unless you grew up in a family where your father was a contractor, one uncle was a plumber and the other one was an electrician and you also had a finish carpenter in the family tree someplace. Unless you have spent your youth actually learning skills, performing tasks and so on, doing DIY consists of a whole lot of frustration. So it behooves you to sit down with yourself and family members (if family members are making themselves available to you) and being honest with one another and yourself. What are you really good at? And what do you suck at?
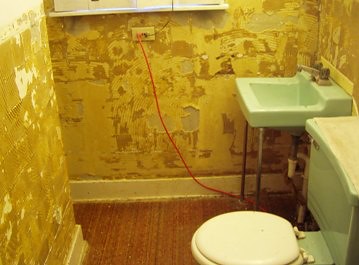
In our case, we are really good at: demolition, putting in insulation, painting and cleaning up. Even with living in the country (which in our case means that we could do electrical and plumbing if we wanted to and felt competent to), we find that it’s best to use the experts to do the really important stuff. This little video here is a visual tour of the very last room to be rehab’d at Chez Siberia. You see in it – the old leaky wood windows, the plaster work and the saw kerf made by our contractor to help us take out the plaster.
Important stuff includes: Things that will cause flood or fire, blow up the house, cause parts of the house to collapse or kill someone. Also, stuff that people actually SEE, like spackling and taping the seal on wallboard, the installation on the windows and all the trim work.
We’ve learned a couple of tricks from doing all the demolition work at Chez Siberia, which was built in 1939: the plaster work in the corners (see the video) of the walls and where the ceiling meets the walls was done on top of extruded metal lathing, which is really hell to try to pry off. We asked the contractor to run his Saws-all™ in the corners and the seams between the ceiling and the walls (see the video); at that point, we could use pry bars and a truly amazingly nasty tool that can make very short work (see the video). Believe it or not, we were able to take down all the walls in the room, get out all the nails and clean up in about an hour. Now, being that this was built in 1939, the plaster technology had already moved away from the multi-coat/wood lathe system to the first gypsum boards. These were about 18” wide (since buildings were being done with 2x4s 18” on center) and almost an inch thick, and as you can see from the video, once the DH had punched a hole in the wall and gotten his tool in, he could pretty much pull out the gypsum wall boards in rather large chunks. We threw all of that into wheel barrows outside the windows and put that next to the garage – we wanted to get everything done before we ordered the dumpster (a ‘tip’ for any UK readers; sometimes referred to as a ‘roll-off’ in other areas), which will be coming this week.
You’ll notice a couple of things in the videos – I showed the empty walls for a reason. As I mentioned, this house was built in 1939 – when we started this process two years ago, we had a lot of complaints about this house. It was cold; it was dark; it was unpleasant. There were people who did not understand why we did not just sell or use a bulldozer on it. The first room the DH and our son worked on was the kitchen, which was the coldest, darkest, most unpleasant room we had and almost immediately they discovered exactly WHY it was so chilly and unpleasant (the dark part had to do with the lack of windows and the fact that it faces the north side; the dark brown carpet and dark brown cabinets had nothing whatsoever to do with it – oh no, they did not..hehe). The entire rest of the house was built in exactly the same way and the video showing the walls after we got rid of the plaster board show it too: Right – there is nothing there. Zip. Zero. No insulation whatsoever. The entire house’s insulative quality consisted of dead air in the walls and wooden windows which a former owner had tried to improve with aluminum triple track storms and screens. Talk about your ‘triple threat’ in terms of energy savings: no insulation, old leaky windows and storms made with aluminum (which transmits the cold like nobody’s business). No wonder we could practically see our breath in the kitchen during the winter time. It WAS cold. The only thing that saved us was the fact that we had a closed in staircase between the kitchen and everything else in the house; otherwise the entire house would have been that temperature. As it was, the rest of the house was only marginally better; the livingroom on the south side, on sunny days, was a major improvement on every place else in the house.
So, the role for the DH and me, in terms of doing the DIY in this house – so that we really would save as much as we could while at the same time getting the quality appearance that we wanted, was our doing what we do best. We are not against people deciding to ‘learn by doing’ – but we felt that since we only had enough money to do it once, it’s better to invest the money in having people with the skills we did not have do the stuff that we are not competent to do. We’ve done spackling and taping – it never came out looking right. We can’t install windows properly. We didn’t try to do that. We can’t do trim work – a miter box may as well be a nuclear reactor as far as either one of us is concerned – the trim work that the contractor has done for us looks great and fits the rather strange walls that we have in several of the rooms. In an old house, sometimes you have to fiddle around with things a lot.
And that has paid off for us. This room is now ready for the trim work to be put in. It’s been insulated, wallboarded and spackled (and NO bumps or bubbles!!). We finished the painting this morning. It’s a great deal – worked well for us.
It’s great to work with someone who has a lot of experience in old houses. We had a contractor who discovered that the entire center section of the house was not supported the way it was supposed to be so that not only could we not put the ceramic tile on the kitchen floor without it cracking, but we were also in danger of losing said staircase as well (so, needless to say, some of that legacy money went into having an engineer look at the house, the basement, and Rx two beams, some cement slabs and four two-ton jacks for the basement). We also had someone who had the skills on his team to open up the staircase and move the thermostat so that the heating system in the house could be balanced — pretty much all the rooms on the first floor are extremely pleasant now. We also got someone who had the experience with old houses that he could crawl under our front porch and tell us what was absolutely necessary so that it did not fall down either.
But that doesn’t mean that you can’t work with your contractor. We saved money by doing the demolition and hauling ourselves. We saved money with painting (and by the way; the major way you can save money on painting is: buy the best quality interior latex you can get and choose…one color. We did and it saved us a boatload of money and we did not end up with cans of odd colors that don’t go with anything else. At the same time, we find that the color doesn’t look the same, depending on what side of the house the light is coming in and what time of the day it is – it’s as if we really did get four different colors of paint). Another way to save money with your contractor is to understand that they are in the business of selling you ideas and the more ideas they can sell you on, the more money they can make. So, it pays to know exactly what you want and unless the contractor can show you a much better technology or idea, you stick with it. Even with discovering all of those ‘problems’, it helps if your eyes don’t get too big for things like lighting, handles for cabinets, special systems inside cabinets, downdraft grills for islands built in the center of your kitchen and so on.
It also helps if you go into it with a budget in mind. Contractors really do understand when you tell them, “We only have xxxxx to work with; what can we get for that in terms of doing yyyyy? They will be able to tell you what they can do and what quality level they can do it at for a certain amount of money. But they do need to know if you have a firm idea of what you want to do. “A kitchen and 1.5 baths” is one thing; “work on the house” is just too amorphous to deal with. But especially if you live in a house built before 1965, however, you will have to expect to find problems, mistakes made by former owners, old technology, or totally missing technology, which may raise your budget considerably. So you might want to take the figure of the money you have, remove 1/3 in your mind and give your contractor THAT reduced figure so that when he comes to you and says, “We found a problem” you will have money set aside to deal with that.
At the same time, though, talk to your contractor about what you and your family can do. Most contractors will be more than happy to let you take care of demolition, hauling, painting, etc. – they can work up their estimate in detail and can, when you sit down with them and the detail, take items off as you divvy up the jobs.
And that way, you can get not only what you want, but also what you’ll be able to afford.

Actually, we’d call that a “roll off” here as well; other kinds of dumpsters are called “skips.” The tip is the landfill; it’s a place you go to. Or it’s just a messy space (eg. “This room is a complete tip.”).
I don’t think any of us will ever miss that green bathroom set.
I know; I was looking at all the pictures from the wrecking out stage on the downstairs bath and the kitchen and wheeeeoooo – were they UGLY. Sheesh.