 Nothing makes your dear Aunt Toby feel more old than finding out that the stuff the literally was brand new when she was a new mommy not only has changed completely but comes with a whole different set of directions, concerns and legislation now.
When the Little Siberians were brand new, car seats (and at that time, all that was available and considered necessary were infant level seats – I recall that once a child reached a certain height, we were allowed to use a booster seat and that was it AND infant seats at that time were allowed in the front seat, which is how your Aunty developed this rather annoying habit of throwing out her right arm when she had to brake suddenly) were, for the time, considered pretty safety-conscious affairs: An actual seat with a back, with not only a three-point harness inside the seat, but also a way to clip them into the seat-belt clips. We thought we were very spiffy and responsible parents indeed to have them since WE had not grown up with car seats. Babies had little bassinet sorts of things that sat on the back seat in the, ahem, 1950s – I think there were also little high chair affairs that had arms that hung over the back of the front seat. Babies were not exactly secured in moving vehicles; children, ditto. I remember my father getting a local manufacturer of airplane seat belts to sell him enough sets and hardware to get them installed in our old car in 1962 in anticipation of our first long car trip.
Anyhoodle, if you are an older person with adult kids who may be having babies in the future, let me tell you — you have not lived until you have seen the new car seats – these high tech wonders clip into a base which is left permanently installed in the back. So, be prepared, if you are going to be doing stuff with the kiddos, that you will have to get one of those bases also. Another thing about these seats is that they recommend that kids NOT be put into them with winter coats on. The harnesses have to be snug against them, so no coats.
So, what do you do if you live in a place where there is this thing called ‘cold weather’ and you just might have to transport the kiddos in a cold car?
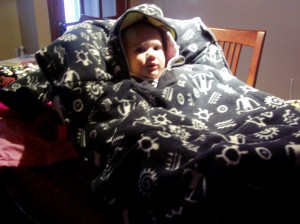
Necessity being the mother (and grandmother) of invention, please see the photo at the top — ‘the car seat poncho’.
Your dear old aunty did not invent this – and as a matter of fact, there are as many versions out there as probably there are DIY sites, and you can also just buy them. But if you have fleece around that is looking for a home, and a kiddo that needs to be kept warm in a car seat, here is how this gets done. I added a feature to mine that the others don’t seem to have, which is a knit ribbing turtleneck band, but the basics are pretty much the same.
You will need:
A measuring tape
The actual car seat
A sandwich or salad-sized plate – not a dinner plate.
A couple of half yard remnants of polyester fleece or some other very warm fabrics (for this, I do recommend fleece since … things happen in cars and you want to be able to wash this).
A piece of stretch ribbing that is about 12″ long and 6″ wide
A coat that fits the child with a hood (attached or detachable does not matter)
Piece of paper to make a pattern of a hood — a sheet of newspaper will do the trick
Step One: Measuring the car seat
While you are doing this, please remember that although this is a poncho for the car seat, there is going to be a little person sitting in the car seat, so you’ll want to add some slack to make sure there is enough to not only cover the seat, but also take into account a body, arms, legs and so on.
Take the car seat and look at it. Car seats, generally speaking, have a front edge, a seat area, a more vertical area which is the back and a back edge. If the car seat has a canopy that flips back and forth, you can ignore this and ignore the carrying handle as well. Take your tape measure and put it at the front edge. Run it to where the seat and the back come together and stop. Write that measurement down. Then take your tape measure and staring at that same point, run it to the top back edge and write that down. Add those two figures together – that is your vertical measurement and to that, ADD 12 INCHES. This will take care of feet, shoes, knees and so on. Look at the car seat from the front; usually car seats are the same measurement across, but this one might not, so, look for the widest point, which might actually be toward the top, where the child’s shoulders might be. Measure across that piece of the car seat, write that down and add 12 inches to that. That is your horizontal measurement.
Step Two: Making the pattern for the hood
Now, if you have a paper pattern for a hood already in the child’s size, use that; otherwise, this will work. Lay down the piece of newspaper or other paper on a flat surface. If the child’s coat has a detachable hood, take that hood off and fold it in half, from the top front to the bottom back, and lay that on the paper. Trace around that and you have a hood pattern. If the hood is not detachable, fold the entire coat in half, with the zipper or button band on one side – the hood will automatically fold in half the way you want it. Put this on the flat surface, put the paper under the hood and trace around that. You will not have a bottom edge to your pattern though — just draw a line from one edge to the other. Cut out the paper along the line and set aside.
Step Three: Cutting out
Take your measurements and cut two pieces of fleece to those measurements. Mine was 26″ across by 41″ long, but as they say, your mileage may vary. Take your hood pattern, fold your fleece and cut out once, then change to the other fleece and do the same. Pin the big pieces of fleece together all the way around and sew around the edge. If you won’t be binding this with anything, I’d advise using a zigzag stitch.
Step Four: Making the hole for the head
Take the now double layer piece of fleece that you just sewed and fold it in half; then fold it in half again. Take your scissors and snip at the corner you just created. That is the exact center of the piece. Take your sandwich or salad plate and place the center of that over the snip point and either draw around it with a pen or mark the edge with pins. Remove the plate and cut through both layers to make the hold for the child’s head. Pin around the edge and zigzag stitch around that to keep the edges together.
Step Five: Making the hood
Take one set of hood pieces that you cut out. Pin then along the tip edge, front to back and sew. Then take out the other set of hood pieces and pin and sew those. You now have an inside hood and an outside hood. If you are going to bind the front edge with something, you can just now put them together, with the seam allowances facing one another, zigzag around the front edge, put binding on and you’re ready to go. If you are NOT, then put them right side to right side, matching the seam, pin along the front, sew that seam and flip one inside the other. In other case, once you are at this point, then pin the bottom edges together and zigzag so that they stay together.
Step Six: Putting on the hood
Take your big piece of fleeces that you sewed up and fold them vertically in half and put a pin on the hole at one fold edge and one at the other – you’ve now declared a center front and a center back. Take your hood and match the center back seam of the hood to the pin at the center back on the hole. Then, pinning as you go, bring the sides of the hood toward the front center pin. You might or might not have an edge of the hood that will get all the way there. That is ok. If the fleece is stretchy, then you can probably stretch it enough to get it pretty closely to the center front pin. Do both sides and sew. I like to do this sort of thing by starting at the center and going in one direction, and then going back to the center and going in the other direction; this prevents shifting.
If you are not going to put in a rib knit turtleneck, then you are basically done at this point. If there is any open neck bits (that is, the hood did not go all the way around to the center front pin), then fold down that big in the front and sew that down and you are finished).
 Installing a rib turtleneck – this will keep the baby warmer
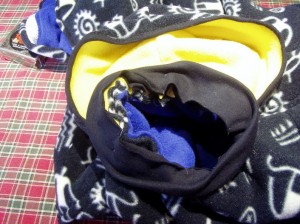
OK. Take your poncho and lay on a flat surface.Flip the hood out of the way. Take your strip of ribbing and pin one short end down on the edge of the hole (where does not make any difference – we are just measuring at this point). Gently – don’t stretch the ribbing – pin the long edge of the ribbing along the hole. When you get back to the beginning, mark that on your piece of ribbing with a pin and take the whole thing off and lay it flat and measure it. let’s say it is 12″ long. Subtract 3″ from that – 9″ – and cut the piece so that it is 9″ long and 6″ wide. Sew that piece, short side to short side. You now have a circle of ribbing that is 6 inches wide.
Fold this in half – you now have a double circle of ribbing that is 3″ wide. Take that and fold it in half and put pins in to show the halves. Then fold it the opposite way to find the quarters and put pins there.
 Take the fleece – you already have a front center pin and a back center pin with the hood back seam on it. Match those up and mark the other quarters at the ‘shoulders’. Take the ribbing circle and match up the pins on the ribbing with the pins on the fleece. You will have to stretch it a bit to do this but this is OK. Pin around and sew down. At this point, you have, in certain areas, 4-6 layers of fleece, so frankly, the best stitch I found to use to do this was the biggest straight stitch I have on my machine. Take out your pins, flip all the seams to the inside and you can now declare yourself to be done.
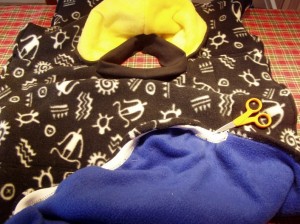
Now, if you look at the photo just above, you will see that I added a couple of items to the finishing that I think make this nicer and perhaps make it work better for the baby:
1. I bound the edges of the hood in ribbing. If I were going to do this again, I’d put in elastic to hold it closer to the baby’s head.
2. I rounded off the corners of the fleece and put in elastic there. This tends to keep the corners from flipping around.
And if you go back to the top and see the poncho installed, you’ll see how it works.
