 For folks who have arrived, hoping that this is actually ‘The Further Adventures of a Zip-out Lining,” my apologies. Other things have gotten in the way, so you get this, a humble review of how to save tomato seeds.
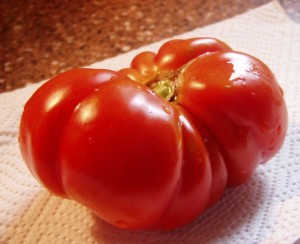
Now, the picture up at the top is of a tomato, a very lovely tomato which originates from Russia. Do NOT ask me the name of this tomato because the rest of the seeds which I originally bought have been dispersed amongst other adventurous gardeners in the US (because Aunt Toby is like that) and one of those people got the actual original package. I know. Moronic, right?
Well, not to worry — this tomato will now, forever more, at Chez Siberia, be called, “The big flat wrinkly Russian SAUCE tomato,’ because that is what it IS and that is what it is good for. Oh..my..goodness… talk about amazing thick sauce. Not watery, not requiring stirring, cooking down, and so on. Chop this baby up, put it in the pan and it just cooks into the most velvety sauce (excuse me while I wipe off the keyboard…there).
Now, when you have, in your garden, a tomato such as this one, and it ripens early (which at Chez Siberia is any time before September frankly, and this one ripened at the beginning of August, which makes it super early), then you want to keep right on growing it. Why re-invent the halupki and all that? But how to we keep this around? How do we keep it and actually increase the number of plants we have available next year?
We (cue the triumphal marching music) save the seeds! Of THAT tomato!
mmm, you might be asking – why not just EAT that tomato – it’s just the first one and there will be others which will take its place and you can remember to pick one of those and save the seeds.
You are right – and there have actually been plenty of others. But they did not ripen at the same time as this one. They ripened a couple of weeks after this one, which in tomato-growing-land is practically eons and makes a huge difference. With a season as short as we have here in Inner Mongolia on the Susquehanna, choosing the earliest, biggest, best is the way to go, so this one, like some sort of Aztec POW, has been sacrificed for the greater good of the garden. To do this, you’ll need the following
— Your selected tomato
— A small bowl with some sort of lid
— A small fine mesh sieve
And here is how you do this once you’ve selected your tomato:
1) Wash it carefully – we’re trying to keep this operation as clean as possible.
2) Slice it into quarters and squeeze out the gel from the cavities where the seeds are. If you are nervous about squeezing a tomato, then just take out a teaspoon and dig them out and take off as much ‘stuff that is not seeds’ as you can.
3) Put all that stuff into a small bowl (I used one of those Pyrex tm bowls that come with snap on lids), cover everything with water. There should be at least a quarter of an inch of water covering the seeds, etc. Snap on a lid or put plastic wrap on it or whatever but you want to seal it.
4) Leave out on the counter for 3 (three) days.
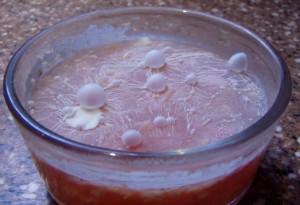
 When you take off the lid, the surface of the water should look like this. Is that mold? Oh yes, it IS and that is the signal that enough fermentation/digestion of ‘anything that is not seeds’ has taken place, which makes the whole process work a lot better. That is something that is required in order to make the seed saving work better. Pretty gross, right?
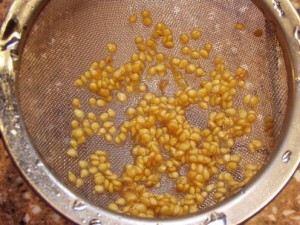
Oh, you want to look closer? Well, sure – here you go.  Isn’t that amazing? I love that shot. At this point, you need to take a spoon or a popsicle(tm) stick or something else and get that gunk off the surface of the liquid. So, you do that. And then you pour the whole bowlful of stuff into the mesh sieve. Carefully, with a spoon or a toothpick, if there are any chunks of ‘anything that is not seeds’ still in all of this, take those out. Then, with a not-terribly-forceful stream of cold water, rinse off the seeds in the sieve.
 When you are done, they should look like this, which, interestingly enough, looks exactly like how tomato seeds look when they come out of the packet that you buy. Crazy how that works, right?
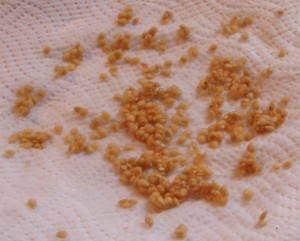
Now, tomato seeds can withstand a lot of abuse. There are numerous stories about people who have spread heat-treated composted sewage on their lawns, only to get huge numbers of volunteer tomato plants the next spring. If a seed can withstand that, you’d think you could do anything to them, but molds will kill them, so what you want to do at this point is dry them. The way you do that is, once you’ve finished rinsing them in the sieve, you take a folded paper towel, put it on a plate or the kitchen counter and dump the seeds onto the paper towel. They’ll look like this at this point.  Fold the rest of the paper towel over the seeds and blot to absorb moisture and leave out on the counter to dry (which should take a day or so).
Once they are dry, take another paper towel, lay it down on a plate or the counter, and put the seeds onto that. You’ll see clumps of tomato seeds. Just take a spoon or a toothpick and separate them and let them air dry for a bit. Now you have tomato seeds for next year.
To store them, fold up the paper towel (or transfer to a paper envelop, some folded waxed paper) and then put THAT into a ziplock(tm) bag which you have labeled so that early next spring (or late in the winter – I have to start my tomato seeds early), you can pull them out and start your plants and you will know what you are planting. Put that plastic bag into a designated spot in your fridge (some people take a canning jar and put all the little plastic bags of seeds into that and screw down the lid) so that you’ll be able to find them when you want them. Great stuff.

Thank you for the tutorial – am posting on my facebook page.