 For those of us who have ever had babies and toddlers in the home (or the “soon to be” or ‘brand new” moms and dads), the whole world of ‘kid safe’ or ‘baby proofing’ a home is a whole lot different than it was for parents from the 1950s and early 60s. Between ‘plug stoppers’, ‘drawer locks’ and ‘door locks’, you would think that you are pretty well covered as long as you take anything breakable off any tables or shelves that are within the reach of someone who is able to pull up and walk the furniture.
At least until they are old enough to know that ‘crash’ is not a good sound.
But sometimes there are other items that we never think about that can be dangerous just standing there.
The DH and I had always wanted a small table (sometimes referred to as a gallery table; in some homes this is referred to as ‘the table we throw the mail on’) under a mirror in the hallway at the bottom of the stairs at Chez Siberia. With the addition to the Greater Chez Siberia Household of a grandchild a year ago, we ditched that idea for a small chest of drawers for TG (‘the grandchild’) and his ever growing collection of clothing, toys and little bits and pieces. We found a lovely one made in Pennsylvania out of oak and put it under the mirror to great effect.
Except for a couple of things. First, the floor there (like the floor in several other places in the house at Chez Siberia) is not exactly horizontal. And second, there is this huge floor grate for the forced air furnace, which further complicates the whole ‘where do the feet on this chest of drawers go?’ issue. So, even under the best of circumstances, the chest was, shall we say, not exactly firmly placed on the ground. Finally, as TG started pulling himself up on furniture, we had horrific images of his pulling this chest of drawers over and on top of himself. Not safe. not safe at all.
Now, there are a couple of options with something like this – we could have tried to even up the floor, which would have reduced the ‘tippiness’ issue, but still would not have eliminated the issue of TG using it to pull himself up. So, we decided to eliminate the ‘pulling it over on himself’ issue entirely by fixing the chest of drawers onto the wall itself.
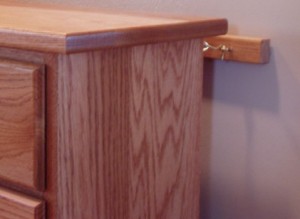
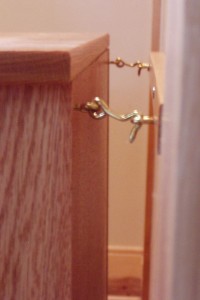
The DH found a piece of oak trim from the rest of the work done on the house that was about the size of the top of the chest of drawers. Now, we debated on whether we should put a piece of oak that would go completely across the wall there, like a chair rail, but since we could not find a piece that long, the decision was made for us. But for someone else, that would be an option. In our case, the decision was made to screw the piece of wood directly into the studs in the wall (which is very old fashioned plaster, with lathe, metal mesh, and a sand finish), put screw eyes into that in appropriate places and match the places just under the top of the chest of drawers and put in the actual screw hooks so that the chest of drawers, for the moment, can be afixed to the screw eyes. We figure that with the wood actually screwed into the studs, the chances of TG being able to pull the chest of drawers over on himself by pulling himself up on it are pretty small. And when he is older and wiser, we will remove the screw hooks off the back of the chest, and unscrew the piece of wood out of the studs, patch the holes in the plaster, do a bit of camouflage painting and no one will ever be the wiser.
And the TG will NOT have one of those horrible stories to tell his children 30 years from now about how he lost his teeth when he pulled a chest of drawers over on top of himself.
Here are the tools and materials the DH used on this job.
Piece of oak trim – this is 1″ wide by about 3/4″ deep and is frankly a scrap left over from work done on the house; I think the carpenter ripped this himself.
Stud Finder
Wood Screws: 2, 3″
Screw eyes: 2
Screw hooks: 2, 1.5″ brass
Drill with appropriate bits.
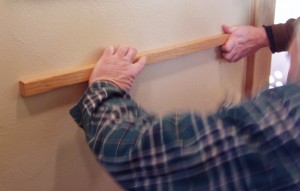
 Step One: Putting the wood in the right place. First, using his stud finder, the DH found two studs in the wall and marked them. Then he put the chest of drawers would be and put the wood just underneath the top of the chest of drawers on the wall and made marks so that he’d know where the wood was going to go.
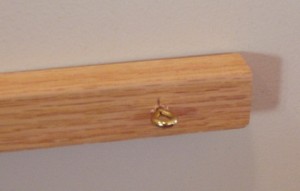
 Step Two: The DH measured in from the outside edges of the top of the chest of drawers to the corners, which is the strongest place and where all the internal reinforcement would be. He then measured in from the edges of the piece of wood and marked them THERE – those are the spots for the hooks and the hoot eyes as appropriate.
Step Three: Taking a drill and a pilot bit and with a helper holding the piece of wood trip in the appropriate place, the DH drilled through the wood and into the studs on the wall. He then started the wood screws in the holes and screwed the piece of wood in the appropriate place on the wall.
 Step Four: Put the screw eyes into the spots marked on the wood and the screw hooks in the corresponding places on the back of the chest of drawers. Hooked the chest of drawers to the screw eyes installed on the piece of wood.
No toddler is going to move that thing.
