
 Over the years, your old Aunty has tried many times to root rose cuttings. I have what I’d call a ‘nostalgia rose’ bush at Chez Siberia. When the DH and I got married and rented our first house, my mom went out to the garden with a spade, whacked off a chunk of the old rose bush growing there (it was probably put in when the house was built in 1917 – a very old rose). No one knew what rose it was – it’s has flattish blossoms with a gillion little petals on it, once a year, in June. The fragrance is definitely ‘knock your socks off’. It throws off long canes with huge thorns. But they reminded me of home. When we move to Chez Siberia, we dug the thing up and took it with us and put it next to the deck. It’s not in a very good spot – it’s very exposed, so many times, if we have a bad winter, I end up having to prune it almost to the ground to get off all the dead stuff, but it comes back.
Over the years, I’ve tried to root cuttings many times. With rooting hormone, without rooting hormone. Under a jar in the garden, in pots inside plastic bags. I’ve always ended up with moldy dead cuttings which I threw over the tip.
Earlier in the fall, I saw a video on youtube on rooting cuttings using a very interesting technique. this supposedly is basically how roses used to be propagated a long time ago, but the grower in the video added the booster of using rooting hormone. I figured I did not have anything to lose, so I tried it. To do this, you need:
Cuttings of roses (not softwood – I did this in September; you can probably do it with dormant cuttings too), 6-8″ long.
Wet newspapers. Wet them well and then squeeze most of the water out.
Dry rooting hormone powder. You can get this at any home and garden center.
Three plastic bags, like the sort you get from stores.
Paring knife.
Sticky tape.
First – using the paring knife, shave off the bottom inch of outer surface of the cuttings.
Second – dip the bottoms in rooting hormone – make sure you get some on the shaved surface.
Third – bundle up the cuttings and wrap in a layer of damp news print. Fold it over both of the ends.
Fourth – Take 2-3 sheets of damp news print and lay out flat and roll the bundle up like a burrito, folding in the ends of the news paper. Put that in the first plastic bag and roll the entire thing up.
Fifth – Put THAT bundle into the next plastic bag and roll that up.
Sixth – Put THAT bundle into the final plastic bag. Roll that up rightly and secure the bag on the outside with a piece of tape.
Put the bundle someplace that stays cool (summer or winter) and leave it for 4-6 weeks. If you check after 4 weeks and it’s not done – roll everything back up and leave it again. I started mine on 9-18 and checked it today (10-21) and Voila!
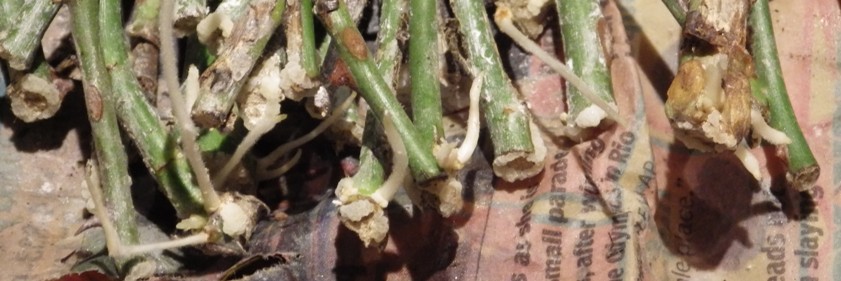 There are two things to look for here – first, the obvious thing is that some of them have roots, which is what we want.
Another thing to look for is this: 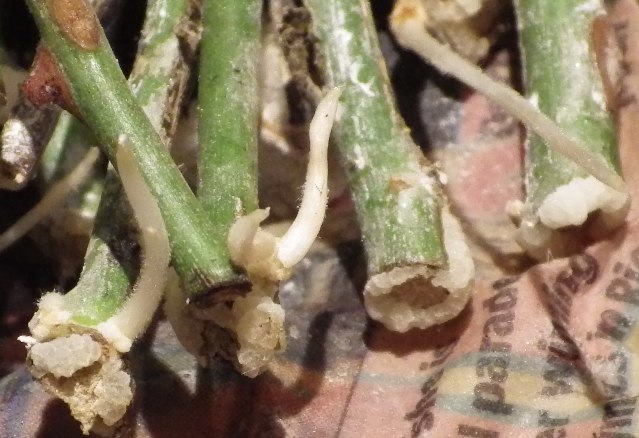 See those white knobbly growths around the bottom? Even where there might not be roots? That is called ‘callous’ and the roots will emerge from that. If the cutting does not ‘callous’, it won’t develop roots. I’ve never seen this before but this is great stuff.
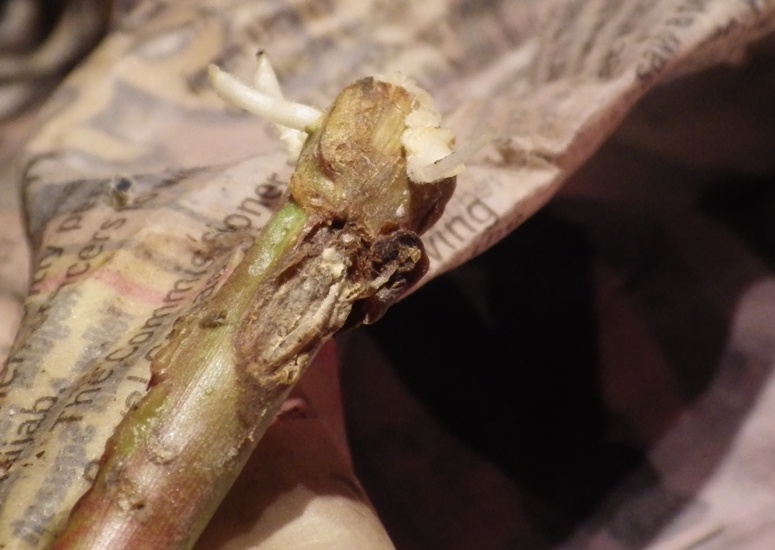 And, we have roots as well. This is so exciting.
The best part of this – is NO MOLD. I didn’t do anything weird or strange or different here. Yes, I took off all the leaves, but I usually do that when I’ve failed as well. But this method produces results and no mold killing the cuttings.
