
 Once you get past THE HOLIDAYS (I think I might want to try to trademark that), it’s easy to just frankly fall apart.
The weather, generally, is dreadful – we’ve had everything from 60 degrees to minus 1F with rain, sleet, snow, and ice. This makes it very difficult to get into the swing of things, weather-wise; it’s difficult to even be able to figure out what to wear on a daily basis. Yesterday, it went from 4 degrees F (heavy slacks and tights/wool socks, turtleneck and wool sweater, heavy winter coat/hat/gloves/boots) to almost 40 in the afternoon (shedding layers, shedding layers). Totally crazy. Today, we were supposed to have sleet and freezing rain – so we planned for indoor activities, which January is a mighty good month for, as long as your activity area is heated or you can do your work all bundled up (see list above).
In our case, we have a bunch of projects that the DH and I are going to launch this spring, either here at Chez Siberia or at a piece of property that we’ve been hauling out of a state of complete chaos over the past year (think mowing and grubbing out wild honeysuckle bushes 12 feet tall and multiflora rose with stems an inch across and thorns the size of your thumb. If you’ve ever wondered what the thorny bushes were that surrounded the Sleeping Beauty’s castle, I think I can make an educated guess that it was multiflora rose). Some things we can just order the plants or bushes over the internet or the mail and forget about them until they arrive. Others, we’ll have to do excavations for so that when they arrive, they’ll have a place to get put. And then there are some that we need to do building for and that is the topic for today.
Bees. The DH loves keeping bees; when we first moved to Chez Siberia in the early 80s, he took a class (something I definitely advocate – find your local beekeepers society and give them a call), we ended up with a swarm hanging off a tree next to our porch. He ran out to get a hive body/bottom board/ and cover to put them into and we were off and running. One note about capturing swarms of bees: In general, they are all full of honey if they haven’t been hanging there for more than a day, so they can’t bend their bodies around to give you a sting; you are generally safe from that. But you must work quickly and confidently. In the DH’s case, he climbed up the ladder with a cardboard box, used a hacksaw to saw off the end of the branch that the swarm was on, slipped the open box under them and put the branch in, sealed up the box and climbed down. He was also wearing protective gear. Who was holding up the ladder (which had one leg broken off at the bottom) and keeping it steady? Moi. So, lesson – make sure all ladders you have are in good repair.
We haven’t had bees for a while – between bee diseases like Nosema and parasite infestations such as varroa and a black bear that just could not resist knocking over the hives and making off with the honey, we lost our hives and haven’t gotten back to it since. But we are rather keen to keep bees and so the DH went off to the local equipment distributor and got two ‘set ups’ plus extra hive bodies and frames for the insides which is where the bees will store their developing babies and the honey. Now this is a diagram of what has become the standard bee hive equipment, the Langstroth hive. Going from the bottom to the top are the following:
Hive support
Bottom board with that little notched stick in the front which is called an entrance reducer. This is basically the landing strip for the worker bees.
Deep hive body – this is where the queen and the workers do their work in terms of laying and raising the next generations of baby bees. In this diagram, there is only one deep hive body; the DH always uses two, to give the queen plenty of room to lay eggs and for the increased numbers of worker bees. This reduces stress in the spring and helps to prevent the workers from getting anxious, raising a second queen of their own, swarming and flying away, leaving a weakened hive.
Queen Excluder – beekeepers put those on to keep the queen from going up into the smaller drawer-like structures that you see above. Those are where the workers will start to store honey; you don’t want the queen up there laying eggs in the honey.
Honey ‘supers’ – these hold much smaller frames which the workers ‘draw out’ with beeswax, fill with nectar, and seal so that it ages, evaporates a bit and turns into honey. In the diagram, they have two regular supers and then one above with what looks like round things in them – these are specialty frames for making cut-comb honey which is a specialty product (we don’t do it here but a lot of people really love it).
Cover Board – just what you think it is.
Weather-proof cover – this is a wood cover that is slightly larger all the way around of all the supers and has a cover of metal flashing that is nailed on top.
Now, to get ready, the DH and I put the hive bodies, the bottom board and the cover together and I painted them today. You only paint the wood surfaces which face the weather – not the insides where the bees are going to be doing their work. Painting is not done merely for cosmetic purposes; although some beekeepers use whatever paint they can get their hands on (except yellow; bees for some reason find that color a bit too ‘exciting’ for them), we use white – it helps to keep the hives cool in the summer. The paint also does protect the wood – hive bodies and supers are all made out of pine, which is not the most durable of woods under outdoor weather conditions. But a good coat of paint will do wonders to protect them from the elements.
One of the issues with painting things that are going to be outdoors is that there are parts of items such as this which are actually the ‘failure points’.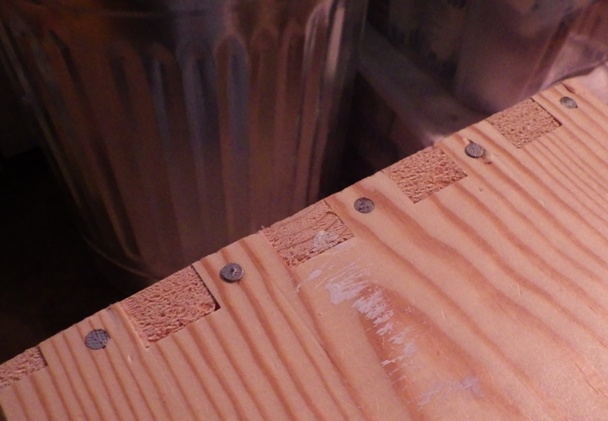 These joints are how the boxes are put together and as you can see, there are rough cut edges at every other joint (where the ‘fingers’ of the joints come together, at both sides). These rough edges are tremendously porous and before I even paint anything else on the hive bodies, I put a couple of good coats of paint on those joints. Frankly, they soak up the paint like a sponge so no matter how many coats of paint I put on the body itself, I always put a couple of additional coats of paint on those joints to seal them up.
Now, how much painting is enough, really? Given that I’m working in a basement where it’s taken three electric heaters to bring the temperature up to 55 degrees (one of the major disadvantages to painting in the winter, since latex paint won’t dry and cure below 55 degrees F), I’m taking the strategy that three thin coats are going to do the job of two thick coats and will be able to fully dry over 24 hours. Again, one of the operating points of latex is that is will give you a dry-looking surface in a couple of hours (the whole ‘you can move back into the room in two hours!’ advertising tag line), but it cures from the inside out so it may not be completely dry (depending on temperature and humidity conditions) for a couple of days. Using thin coats of paint and allowing them to dry thoroughly will get us a solid and weather-proof surface on the boxes and covers.
So, my part of this particular project is done. The DH will be ordering bees and a queen for both hives for when things warm up in the spring.
So, what is the DH doing while I’m whaling away with a paint brush in the basement? He’s out in the garage creating a solar-powered wax melter. Honey is not the only product that beekeepers get from hives. To extract the honey, you have to ‘uncap’ the cells holding it. All of that wax is valuable to candle-makers, people who make their own cosmetics, people who sew and want to strengthen thread and even people who make furniture polish or refinish wood with beeswax. But when you uncap the cells, it’s not a nice clean tidy product – and you want to strain off any odd bits of stuff that you don’t want in the wax and for that you need to melt it down. A solar wax melter is great – and this is a project that the DH has been wanting to do for a long time. So, once that is done, we’ll have more details on that. In the meantime, if you are interested, here is a link. Solar Wax Melter
