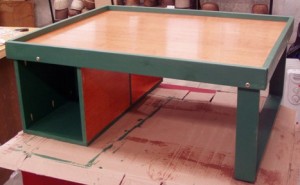
 Our grandson is getting some trains for his gift this year, and there was a request put in for a train table. Now, the item suggested is made out of MDF, which I’m not really fond of, in terms of the whole ‘off-gassing’ problem, considering that he’ll be on his knees with his nose literally on top of this, so I offered to make him something and found a very nifty plan here. low activity table Everything works quite well except for one item in the cut list:
4 – 1×3 @ 28 1/2″ (Top and Bottom of the Leg and Sides of Trim for Table Top)
This should read:
2 – 1×3 @ 28 1/2″ for the top and bottom of the leg
and
2 – 1×3 @ 30″ for the short side trim for the table top.
Other than that, the cut list is fine. Instead of MDF, I used a terrific product PureBond Plywood, which is sold through HomeDepot. I used maple-faced, but there are several different sorts and frankly both sides are really excellent. I chose PureBond because the adhesives used in the plywood are not formadehyde-based, which makes them especially nice for making things that are inside the home and that babies and children will be in close contact with.
For the legs, I used pine 1×3″ boards. I got all of the wood cut up by the guys at the Home Depot – they were very good about following the cut list and getting the most out of the plywood; I have several big pieces left that I plan to use for a toy cart for the same young man who is getting this table.
Although the directions did not call for it, I used my pocket holes and screws, putting my Kreg Jig( KregTool)to very good use. I can’t recommend this sort of system enough – once you have the holes drilled and the wood clamped down, putting the pieces of wood together is simplicity itself. In terms of other tools, because I had all the wood cut at the store, I didn’t need a saw, but I did need an electric drill, my Kreg Jig and the driver bits for my drill, a regular screw driver, and materials for finishing. I’m pretty much a beginner in terms of woodworking, and I consider this project well within the skills of anyone. The only thing is that the table top is pretty heavy; you’ll need a certain level of upper body strength to lift it up and down to work on it.
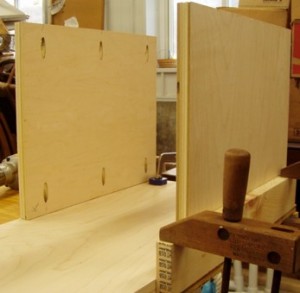
 I don’t have a real workbench out in the garage (next project, I think), so I rigged up a piece of wood with a couple of wood screws (what you are seeing holding it on) and then braced the cubby pieces to that to get the various pieces of the cubby screwed together.
The order that I took for this project are as follows:
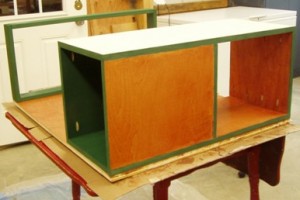
Prepare the individual units first and then put them together. The units are the tabletop, the trim for the tabletop, the leg unit, and the cubby.
Legs: drilled the holes, screwed the pieces together, filled the pocket holes with wood filler, sanded, and painted them with low VOC paints.
Cubby: drilled the holes, screwed the pieces together, used wood filler on the plywood edges, touch sanded, stained and painted the appropriate parts, and used polyurethane on the stained parts, sanding between coats.
Table Trim: sanded each piece, painted with two coats of low VOC paint.
Table Top: touch sanded both sides, stained both sides, put three coats of polyurethane on the top, sanding between each layer, and one coat on the underside.
 To put this together, put the table top with the underside facing you, and arrange the cubby and the legs on the outer edges. Drill holes and screw down. Remember – the top is 3/4″ thick and the top of the cubby is 3/4″ thick, so you need screws that are going to be slightly less than 1.5″ long.
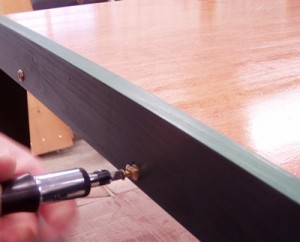
 Flip the table over onto the feet and the bottom of the cubby and arrange the trim on the edges of the tabletop, leaving an inch of trim above the table top. The easiest way to do this is to mark one inch down from the top edge of each piece of trim on the inside facing of the trim. Then mark spots to put screws in below that mark because you want the screws to go into the wood below the level of the tabletop. You may need a buddy to hold the pieces of wood for you or you can also use clamps to put the pieces of wood on while you put the screws into the holes. Now, if you look at the picture here, you’ll see that these are not just screws – we took an old bed apart that the DH had built many years ago and are recycling the decorative washers to dress up the edges a bit. These are referred to as ‘cup washers’ and can be found in your local hardware store or Lee Valley Hardware. Make sure as you go around the tabletop, you match the edges vertically and horizontally on the trim.
The only thing I might do differently, and this would require a much higher level of skills and experience than I possess plus some specialized equipment, is that I’d face the cubby plywood edges with some half-round 3/4″ moldings. I think that would look much nicer than the painted wood filler, but again, making corner cuts that come together neatly and look good is a real skill stretcher.
Oh – just a note – for anyone asking themselves, “OK, so from a cost standpoint, how does making this rank with buying the item”? Well, the total cost for the lumber, plywood and the finishing products came to less than $75.00; the item which was pointed out to me cost $150.00 plus shipping plus we’d have to put it together when it arrived in any case. I think making this was a far better deal. In addition, once the young man loses interest in trains, we can take the cubby and the legs off, take the trim off, and build him a desk out of the top. Seems like a deal to me.

This is wonderful gift! Very clever. Wish we had thought of this when our son was small.