
 So, you’ve got your coat that needs a new lining and you have some pins, a needle, some lining fabric and thread to match and a pair of scissors. What now?
Well, now we take some measurements and make some decisions.
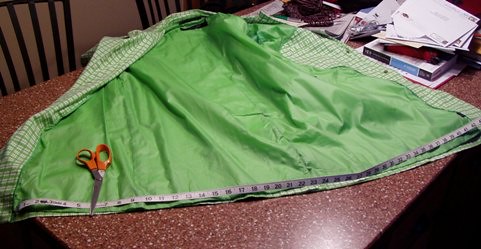
See the coat above with the measuring tape on it – you need to measure the width of the lining of the coat you are working with as it is now. As you see from the photo above, you will only be measuring the lining itself, not the facings, which is the green and white printed fabric between the lining and the outer edge. In this case, the lining width is 43”.
Here is the way you figure out how to deal with your fabric:
Lining width: 43”
Turn-over at each edge: 1” ea. Edge = 2”
Pleat in the center of the back of the lining = 2”
Total = 47”
What this means is that if you got 45” wide lining fabric, you will not have enough fabric to go across the whole body of the coat unless you hit a seam someplace. Some people seam in the center, under the pleat. I do this a little bit more ‘commando’ style and start at one side seam and go as far as I can so that I don’t end up with a lot of waste.
The next decision you want to make is this: Is there anything about this coat and its lining that has annoyed you in the past? For example, would you like a pocket or pockets in the lining? If you travel a lot with this coat, you might want to put a zippered pocket into the lining that is big enough to put your passport and your credit card into rather than carrying them around in your wallet or other carryon. If you want to make a pocket and put it on, now is the time to decide that.
To make a passport pocket, you will also need, in addition to the lining fabric and thread, a small package of either self-stick Velcro ™ dots or strips. You can get these at fabric stores, but also they can be found at drug and grocery stores in the housewares section. This is a pretty simple pocket(and this will not be one with a zipper, since we are going completely commando here and assume you don’t have a sewing machine, don’t have access to one, and don’t know how to use one even if you did have access. It’s you, your fabric, pins, needles and thread):
1) Cut a strip of fabric 6”x16” from one corner of your lining fabric with the 8” side along the long, selvage side (the selvage side will look a little bit different because these are the edges where the threads are all woven together – it will be tighter and it’s finished; it won’t fray).
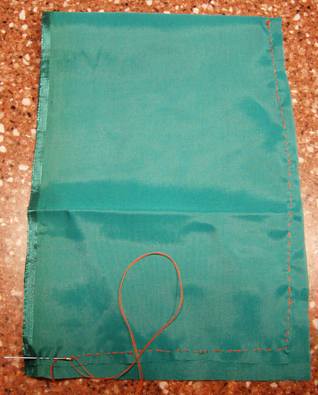
2) Fold in half (it will now be 6″ x 8″) and pin along the two shorts sides and the one unfinished 8” side.
3) Thread your needle and make a knot with both thread ends together. This is called ‘doubling the thread”. And, like in the picture, sew along those three sides. Don’t sew through the selvage side.
4) Admire your work. You have actually sewn something – Yay!
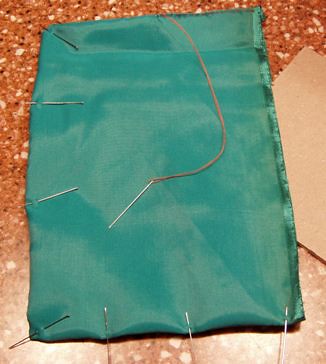
5) Put your hand into the selvage side and turn this little bag inside out. Pull out the corners to make it as square as you can. Pin around the edges and sew around the three edges again. Do not sew the selvage edges together.
6) Following the directions in the Velcro ™ package, put dots or strips on the inside edges of the selvages so that you can close the pocket. Hey – you made a pocket. Take a moment to feel proud.
This is the end of Part 2. In Part 3, we will put in the lining and we will also sew in the pocket where you want it IN the lining. At the end of Part 3, you will have relined your coat and put a pocket in the lining too.
