 Welcome back Ottoman Peoples!!! We are literally at the 11th hour on this project, so fasten your seat belts, put your tray tables in their upright positions, and prepare yourselves for the rather accelerated zoom to the finish line on this project. This part is took literally about an hour and part of that was just finding the wire cutters.
Seriously.
Tools you will need at this point:
Wire cutters
4 ‘Cover your own’ button forms – the ones I’m using here are the biggest I could find, which were about 1.75″ across. I think there may be sources over the internet which have larger ones
Fabric to cover the button forms.
Wire – I’m using, frankly, wire for electrical fences, but you are looking for something that is rather stiff. A thin wire coat hanger from the cleaners might work, or something a little bit smaller in diameter but you want something stiff. Not picture hanging wire.
Staple gun
So, we have several jobs we need to do at this point to finish this up:
1) Neatly secure the bottom hem of the upholstery fabric over the bottom edge.
2) Cover the button forms
3) Secure the covered buttons through the holes that we drilled in the wood side pieces of the ottoman before we started padding and upholstering.
4) Put on the feet.
First, I’d like to wander down the ‘designer’s lane’ here with a short discussion about the buttons. Why did I make the buttons in a contrasting fabric? Actually, it has nothing to do with the fact that I made the cording on the top contrasting – that decision was actually made AFTER I made the decision about the buttons. Tufting with buttons works visually a couple of ways: first, if you are using a plain colored fabric with no figures or texture, then it is very architectural and neat. If you have a figured material and you match the figured material, then the button will tend to totally disappear into the upholstery fabric and the whole point of tufting will be lost. This is the reason why I decided from the get-go to make the buttons from a plain, but contrasting fabric, since I was using plaid upholstery fabric.
Second, I’m NOT going to go through the whole ‘how to cover your own buttons’ exercise here. There are plenty of good demos on the internet and seriously, with button forms this large, covering them is a breeze.
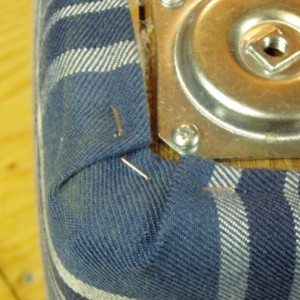
So, back to our list of tasks: Securing the bottom hem over the bottom edge of the frame with your staple gun. I’ll refer you to the photo at the top. As you can see, the edge is folded – you are not securing a raw fabric edge here. You’ll need to flip the ottoman over on its top to work over the bottom edge easily. Starting at the center of a side (any side at all), grip the edge of the fabric and pull it tightly up to the bottom edge (remember, we want all of this upholstery ‘tight as a drum’ and since we’ve already sewn and secured the top edge, it’s safe to pull the fabric tightly). As you pull it over the bottom edge, fold the raw edge over so that the fold just meets the inside edge of the wood and secure that with a staple. Then, move about 3″ to the right and do the same there; then move to the left of the center and do the same thing there. Repeat this, right then left securing until you get to the corners, and repeat what you did with the top: Fold over the hem and pull tightly right across the pointed edge of the corner and secure – then secure the fabric to its right and to it’s left to make a neat corner.
Repeat this process for the other three sides.
 Tufting:
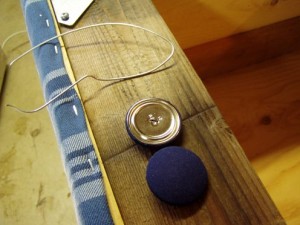
As you can see from the photo, the ‘cover your own buttons’ form, when it’s done, has a wire loop on the underside. This is what is going to enable us to get this secured. Also in the picture, you see a piece of wire that is about 6-7″ long. Here is how I got this done:
1) Take the wire, which has sharp ends, and FROM THE INSIDE OF THE BOX, poke one end through the hole we drilled to the outside, through the padding and the upholstery fabric. If the padding and the fabric are not cooperative, or the hole seems a little bit not clear, take a wood screw and screw it, from the inside, to the outside to make the hole bigger. Once you poke the wire to the outside through that hole, you will have a little hole with a little piece of the padding poking out. This is more than OK – this is your mark for getting the button back in.
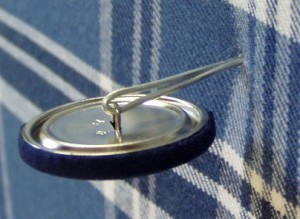 Pull out your piece of wire and fold it, more or less in the middle. String the wire through the wire loop on the back (see the photo here?), and then, with your wire cutters, use the jaws to squeeze the wires together close to the button. This will make the two sharp ends of the wire come together. Put those two ends through the little hole you made before (the one with the little piece of padding sticking out at your) and carefully push and finagle them through the hole you drilled to the inside. This should be relatively easy but if it is NOT, then pull out the wire and using that wood screw again, screw THAT into the hole from the outside, through the upholstery, to make the hole bigger on the side closest to you. Trust me, this does work – I had to do it on two of the sides.
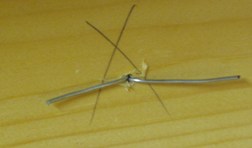 Once you get the wires to the inside (see photo), pull them through – pushing the button from the outside of the upholstery fabric as hard as you can. Then, twist the wire ends (the ones on the inside of the wood) around one another (use the jaws on your wire cutters), cut the ends off shorter – like about an inch apiece – and then hammer the ends flat against the back side of the wood. This, believe it or not, will hold them against the wood and will keep the button secured on the outside, even under the pressure that you put on it.
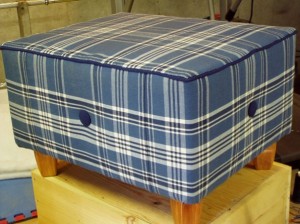 /Finally, screw the feet into the triangular plates at the corners, flip the ottoman over and you … are…done!!!
How exciting is THAT? Very.
