 Around here, there are ‘nice’ blue jeans and ‘work pants’, which actually many times started out as ‘nice’ but through ‘life as it is lived’ here, achieve ‘work pants’ status. Once they’ve ‘arrived’ as work pants, it’s every man for himself, pants-wise (for my readers from the UK, I realize that ‘pants’ in your world refer to what we consider underwear, but just go with me here), and they accumulate stains, paint, worn spots and rips. As every mother of 7 year old boys knows, rips can appear in brand new jeans (especially if you live where there are fences, barbed wire, ends of nails and staples sticking out of walls, etc. ) but most of the time, they get worn in certain places (and actually in places that you’d never expect, too) and then it’s only a matter of time before the weak places separate and rip and there you are.
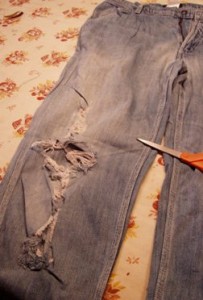
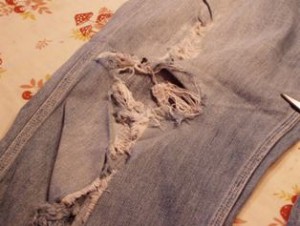
The DH has been collecting some of the most sorry examples of his work pants for a while, in the hopes that Aunt Toby would take pity on him and rebuild a couple of pairs. Rebuild? Yes, rebuild because by the time I get them, it’s a question of picking out the least worst pair and then using the worst worst pair as the resource for the patches. In my house, the fronts of the pants are usually the worst spots, as you can see from the photo at the top of the post. So, the backs of the legs are usually in the best condition and that’s where I go on the ‘worst worst’ to find pieces large enough to cover rips such as these. As you can see from the top, this rip goes pretty much from about 4″ above the knee down through the shin.

These jeans are actually in pretty decent condition with not only this major repair in the front, but also two worn spots just at the bottom of the rear end on both sides which need attention as well. Otherwise, they are good heavy weight pants that the DH could get a lot of work wear from in the future. These are not going to be something he’s going to wear out to the library or to go shopping, so my goal is to save the pants for him.
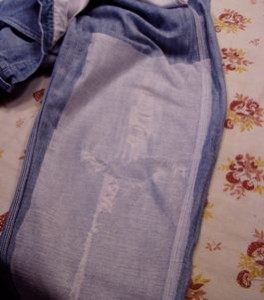
The first thing with something like this is to stabilize the area where that big repair will be and I do that from the back. First, I trim off all the odd fibers around the rip and turn the pants leg inside out and iron it down. Then I use a lightweight iron-on fusible interfacing all across the leg in that area. A little strip across the rip is not going to do the job for this. Since the edges of the rip don’t meet, I put a piece of muslin underneath so that when I iron on the interfacing, it doesn’t stick to the other side of the pants.
Everyone who does patches has their own way of doing things. I’ve tried many different ways – hemming the edges, not hemming the edges, interfacing the patches, and so on. With heavy blue jeans, I find what works is this:
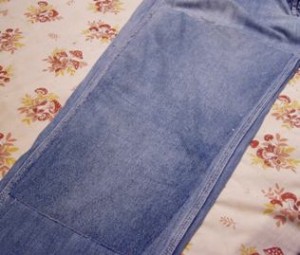
First, unless this is a little rip of just a couple of inches, I make a patch that goes across the entire side seam to side seam. I can’t count the number of times I have done a little patch and then a couple of months later, two inches away, another area fails and I have to start again. So, to avoid the entire deal, I cover everything.
Second, I do not hem the patch. I’ve broken too many needles trying to get through all those layers on the pants and the patch.
Third, unless the rip goes across a seam, I avoid that completely since you’ve already got multiple layers there; a patch on top of that is another sure ‘needle-breaker’.
Fourth, I use a close zigzag (like stitching a buttonhole)all around the patch.
Fifth, I don’t use thread that is totally polyester or nylon – it shreds under this sort of stitching. I use combo-polyester and cotton or cotton only and a machine needle made for heavyweight fabrics.
Now, I’m pretty lucky. The DH likes his blue jeans loose in the legs, boot cut. I would not try this with tapered leg jeans because I would get myself into too tight a spot down toward the bottom of the leg of the jeans, but with a pant leg this loose, I can keep stitching across, down, across the bottom and back up to the top of the patch, rolling and unrolling the leg as I go. It makes a really good solid patch that usually outlives the rest of the blue jeans and my husband gets a lot of good wear out of them before they go beyond my ability to save them.

Nice Save, Toby ! Great ideas, thanks !
Wow . . . a most impressive repair job! Thanks for the good information . . . will save it for future use!
Good to know I’m not the only one who does this! My Hubby is a welder, who can kill a pair of jeans in a mere month, if he doesn’t wear his chaps. The whole of the repair pile is his jeans, and before they finally end their lives shredded into the compost-because, of course, cotton can be composted-they are little more than hardware(which I scavange for re-use) being held together by my threads.
How do you repair the crotches on them? That’s what always goes for me. I’ve got a box of old jeans with the crotches blown out on them 🙁
Brad – a lot depends on which direction of the failure is going: down from the bottom of the zipper and into the rearend or between the legs. I’ll do a crotch repair post soon, ok?