 Summertime is very busy for everyone, but here are a few thoughts.
1. This is a sawhorse. One of the things on my ‘to do’ list (which is becoming more urgent as time goes on, as I get older) is getting more involved in woodworking. On an odd chance, I searched on ‘wood working classes’ in my area and found a terrific place which frankly caters to women. Hammerstone School of Carpentry for Women They have lots of courses, but the basic carpentry one attracted me the most. I can tell you that after two full days of swinging hammers and using everything from power saws to hand saws in the company of women just like me (well, not JUST like me; I was the granny of us all), (more…)
Food
Thoughts on a Sunday night
Catching up: the garden
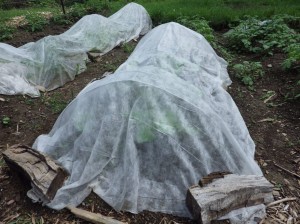 This is not a very exciting photo but it does give a pretty good indication of what, to the casual observer, is our garden this year. We got started late, got invaded by rabbits, got very little rain in late May and early June. So, to thwart the rabbits, at least until things like corn and the sunflowers are big enough to be able to withstand nibbling, I covered everything up with row cover. Row covers come in all sorts of weights, from ‘blankets’ which you can use early in the spring and late in the fall to withstand several degrees of frost to stuff that is basically see-through and which you use to thwart insects. What I’m using is sort of a midrange item; it does cut back on how much sunlight can come through but on the other hand, the rabbits can’t see through it to get any nasty ideas. (more…)
When do I transplant seedlings?
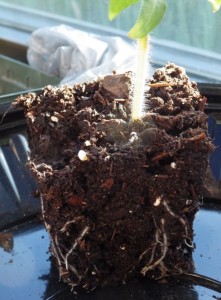 If you are just starting out growing plants from seeds on your own, you might have some questions about how quickly or soon to transplant to the next size pot.
The secret here, to be blunt, is to concentrate on what’s going on AT THE BOTTOM; not what is happening at the top. As long as the roots are kept properly hydrated, they will keep the top growing. On the other hand, if the plant is stuck in water all the time, there will not be the proper exchange of oxygen in the soil and the roots will rot and the plants will die.
Roots are everything, truly.
So. The trick is to frankly pick up the pot or six-pack or whatever you are growing in and as soon as you see little white roots starting to stick out of the drainage holes in the bottom (you do have drainage holes in the bottoms of your pots, right?), it is time to transplant to a size up. If you have a lot of time between when you transplant and when you will be transplanting the plant out into the garden or out into its final growing place such as a large planter, a ‘grow-bag’ or whatever, you might even consider moving the plant into a container a couple of sizes larger than what it is in right now.
For example: The tomato plant in the photo at the top was in a four-pack (I’m not really a fan of ‘six packs’ – I feel I get more time and a better root system with a larger original growing container). Four-packs have a seedling space that is a cube of 2.25″x2.25″x2.25″. I have taken all of my seedlings that are four-packs (or single seedling pots of the same dimensions) and moved them into 4″ pots. This will give them enough space that if the rest of the spring continues for us here at Chez Siberia in the same way it has so far this spring (read that: cold and rainy), I will be giving myself some extra space and time so that the plants will not end up with roots all tangle around one another at the bottom of the pots, or running around the outside edge, which is not good for the plants in terms of when you plant them in the ground.
If you have seedlings or plants that have been in the pots too long and have become ‘root-bound’ like that, the thing to do (and I know it’s a little bit scary but it’s necessary) is to take a knife (or your hands) and either slice the rootball at the bottom in several places, spreading it out in the hole and then covering it with dirt, or tearing it apart with your hands and doing the same thing. To be quite blunt, yes, you ARE damaging the root system. The plant will respond by growing my roots from the ‘hurt’ spots and the plant will end up stronger and healthier as a result. If you just take the root-bound plant out of the pot and chucking it in the hole, the tangled and intertwined roots will never untangle themselves and the plant will not be able to achieve it’s growth destiny as a result.
So, if you pick up your seedlings and start to see roots, transplant them into something slightly (or more than just slightly) larger, give it a good drink and keep it going. Don’t just leave it in the pot to become root-bound. If you feel you will not have enough pots, then use household items such as milk cartons, yoghurt or cottage cheese containers (with holes punched in them) and so on. They will hold up nicely in the meantime and get your plants the space that they need until the weather is more conducive to putting them into the ground.
Weekend thoughts on the garden
Since it is literally in the low 40s outside, and raining, and generally miserable (we don’t call this place Che Siberia for nuthin’ folks), your Aunt Toby is forced to working inside today to get whatever can get done, done, so that when the weather improves, which it will eventually, we are ready to go.
This week has not exactly been a barn-burner in terms of good weather either, so even with plastic on the garden bed, it has not gotten above 49 degrees F. That means I can’t put in my seeds for the early spring crops like kale, lettuce, broccoli, cauliflower, chard and beets. Boo, hiss. Super annoying. If we could just catch a break and get a couple of warm, sunny days, that garden bed would warm up. Just..one…more…degree..of…warmth…in the soil will do it. Hope, as they say, springs eternal.
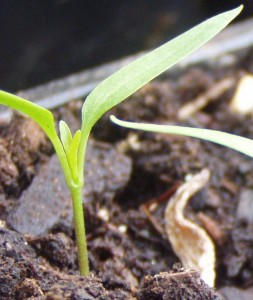 In the greenhouse, even though it is a bit chilly, things are moving along pretty well. I continue to be impressed by heritage pepper ‘King of the North’, given that these seedlings are in an unheated (and rather chilly this past week) greenhouse. They continue to grow and do not seem to be effected by the rather negative growing conditions. Tough guys for sure. The plum tomatoes soldier on as well. In the mail this week, I received the potatoes and onion plants that I ordered from Territorial Seeds. The potatoes are one we have grown in the past which have dealt with our rather iffy conditions and negligent care rather well — German Butterball and the onion plants are a mixed bunch chosen for northern areas (always important when dealing with day length and night time temperature issues).
And, from the ‘never say never’ school of thinking: I was out in the greenhouse with our 16 month old grand-progeny for a little gardening fun (that kid will water anything that appears to be in a pot), and put out a salad tub with potting soil in it so that we could plant a few basil seeds. I handed her an old packet, thinking a) there were not many in it and b) they were OLD so no matter how many she scattered in the tub, I figured that germination would not be all that bad and we’d end up with a few.
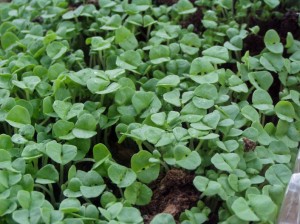 This is what happens when you have a 16 month old child whose idea of ‘planting a few seeds’ consists of flinging her arm out and dumping the entire packet (which turned out to have a LOT of seeds in it)in the tub. Anyone need basil seedlings? I think I might have enough for..everyone.
What do I grow? For those folks who feel a bit overwhelmed by choices (and goodness knows there are a huge buffet of choices out there) in their gardens, let me suggest one guideline that might narrow things a bit: The Environmental Working Group’s list of ‘the dirty dozen.” This list of fruits and veggies consist of their results of testing standard fruits and vegetables bought in standard US grocery stores to find which ones have the highest levels of pesticide residues on them. Now, the issue is that standard US kitchen sink washing methods do not do a very good job of removing pesticide residues, so their suggestion is that if you have a limited food budget, that you make sure that these items are the ones you spend your ‘organic food dollars’ on. Here’s the list:
Apples
Celery
Cherry Tomatoes
Cucumbers
Grapes
Sweet and hot peppers
Imported Nectarines
Peaches
Potatoes
Spinach
Strawberries
Kale and collard greens
Summer Squashes
EWG Dirty Dozen Plus
Now, ok, if we are not going to go to the trouble of putting in trees and vines to grow apples, grapes, peaches and nectarines organically (growing strawberries at home is something that is worth getting into, along with asparagus and rhubarb), we can grow the other things and actually quite easily (and that includes celery, which is wonderful straight out of the garden). So, if you want to get a twofer out of your garden – make sure you grow the stuff on this list organically. A lot of these can be grown EASILY with organic methods – and if you are super lazy the way we are here, that includes ROW COVERS (which basically prevent bugs from getting to your veggies to eat them or lay their eggs). You can go full-on with hoops over the beds, but it’s just as effective to just lay the spun polyester (or old sheer curtains if you have them or can get them) over the plants and tuck them into the soil at the edge of the row. This is something you can find at any home and garden center or big-box store in their garden department.
Getting started with gardening
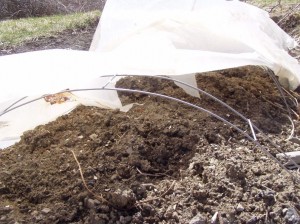 I hear more and more from people who want to get into gardening, feel overwhelmed, don’t know where to start and so on.
For the ‘I want to garden’ part, I say, “Hurray!! Another convert!”
For the ‘overwhelmed, don’t know where to start part,’ I say, “Ok, pour yourself a cup of coffee or tea and let’s sit down and talk about this a little bit.”
I don’t really care about why you want to garden (I’m a ‘find a hole and fill it’ sort of gardener myself and earned my stripes entering weasley looking carrots and droopy lettuce in a junior garden club show run by the local Men’s garden club when I was in the sixth grade. Somewhere, someplace, that white ‘honorable mention’ ribbon is at the bottom of a box in memory). I don’t care if the only thing you ever grew is a houseplant on a windowsill..or if you never grew anything at all but want to now. I don’t care if your interest is a whole bed of sweet corn, a year’s worth of broccoli or a tomato plant in a pot.
What I do care about is that you ENJOY it. A very short story to illustrate: Once, many years ago, the DH got super ambitious and decided that we needed a MUCH larger garden. Like, huge. And he decided to rip up a spot on the hill next to the barn that was probably 1/4 acre.
With a pick and a shovel. Not even a lawn tractor with a tiller on it. By hand. And he spent his entire vacation with this, hour after hour…day after day. The amount of sweat he put into that was amazing. And by the end of it, we had row upon row of tomato plants and pepper plants and potatoes and carrots and onions, all nicely planted, with the seeds just waiting to come up. And he decided to do just one..more…bit…of..a..dig.
And we ended up at the doctor’s with the DH, me pregnant with child number two, the 2 year old (who was grumpy at the time because we had interrupted her nap), and a completely useless arm. He’d ripped several tendons with all the digging you see. He spend the rest of the summer in a brace on his arm.
So, there we were with garden as far as the eye could see. I could only keep up with a rather small amount of all of that, so rather sooner than later, the garden disappeared under a jungle of weeds, squashes running rampant and goodness knows what else. We did not garden again for a very long time after that. When we did, we analyzed what had gone so horribly wrong.
First, location. The damn thing was so far away from the house that even just going up there was a chore. When we had first started gardening, at a different house, the garden was about 10 steps from the back door. We had a lovely time after dinner most nights just going out and taking a look at what was going on, pulling the odd weed, harvesting the odd bean or tomato. On weekends, we would put in a bit more work in terms of weeding, hacking back the spaghetti squashes with a lawn mower, that sort of thing. But the lesson here is this: Locate where you are going to grow stuff to eat close to where you are going to be, whether it’s on the deck in a planter box, next to the back door, next to the driveway where you are going to see it, a LOT. That makes it convenient and it also puts it where critters are not necessarily going to be able to get to it without being close to you (which they really don’t like).
Next, size. What the DH did was a case of ‘eyes bigger than stomach’ issue which put the garden into the range of requiring a team of people with gas-powered equipment to keep in shape. With him out of action and only one of me, we were defeated before we even started. Lesson from this: Keep the size of the thing, especially if you are just getting started, in the range of something you can get your arms around. This might be a couple of pots with tomatoes on the deck, or a flower box with collard greens and lettuce next to the back door, or some herbs. Or planting Rainbow Chard in the flower patch next to the back door (the stems are almost ‘glow in the dark’ so they are pretty splashy with the flowers). If you want to start with one bed, then make it something like 3 feet wide by 10 feet long. You can get a lot of production out of a space that big and as long as you keep an eye on it and pull the occasional weed, you can keep it under control and harvest things as you see them ripen. But, for the love of all things gardening, do NOT start with something 30 feet by 30 feet – after a month, you won’t be able to find a thing, trust me.
Other gardening thoughts for beginners:
What do you want to grow? What do you already like to eat and eat a LOT of? When you first start, it is completely easy to have things get out of hand. Like tomatoes? Then start with one, maybe two plants and make them two different things – like a cherry tomato and a plum tomato for sauce. You’ll get more cherry tomatoes than you can possibly dream of ever having, and you’ll have enough plum tomatoes to make fresh tomato sauce (which is heaven) and to freeze for winter sauce making and eating (take them out a little bit before you make a salad so that they are defrosting and you will have something that will beat any tomato you can find in the store, trust me). Like peppers? Buy a six-pack of sweet pepper plants and plant those. Take my advice and don’t buy a six-pack of hot pepper plants – you will end up with more hot peppers than you can ever use. Do you eat a lot of Italian (or Greek or Spanish) food? Then get plants for basil, oregano, cilantro and grow those (either in pots on the deck or in the garden). You can never have too much in the way of fresh herbs and eating a fresh tomato from your garden with fresh basil and olive oil is (well, I’m going to start there so I don’t start to swoon). What you don’t want to do it this: Grow a lot of stuff that you don’t already eat. Get your gardening legs under you so that you feel confident about growing the stuff you DO like to eat and then branch out from there. What you don’t want to do is finish the garden season with the thought that you threw out a lot of stuff that you couldn’t get your family to eat.
Something else: Don’t think that you are somehow some sort of weeny if you don’t grow things like tomatoes, peppers and so on from seed under lights inside your house. There is absolutely nothing wrong (or weak or silly or evil) about going to your local home and garden center and buying your plants there. Find someone truly local (not the big box national chains) to buy your plants – they will be growing things that they know will grow and grow well for you in your climate. You’ll be able to get a tomato plant in a big pot for the deck, for example – it might even already have flowers on it (woohoo!!). Much more enjoyable for someone just starting out.
Getting things started in the garden
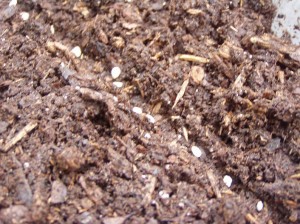 Well, spring really sneaked up on us here at Chez Siberia (and probably a lot of other places as well). One moment, we have six inches of snow with freezing temperatures and the next… 50 degrees and sunshine.
Nothing like that to wake up the ‘we’d better start the tomatoes’ feelings.
Now, all long-range weather forecasts are telling your old Aunty that this summer is going to be not very warm (of course, all things are relative) – they are calling for temperatures in July and August to be 5-10 degrees cooler than normal. Which means that I needed to choose tomatoes that have a note on them saying something like, ‘cold tolerant’ or ‘will set fruit even in cooler temperatures’, because tomatoes are one of those tricky beasts. Most of them require warm night-time temperatures to set fruit. If temperatures are going to be iffy, then this is the way I hedge my bets.
Starting tomato seeds is really pretty simple. You need all the usual things – seed starting mnix, something to put it in, some warmish water, the seeds and a source of bottom heat. I use a heating mat, but I also got a metal grill to put on top of it to hold the box above the wwarmth a little bit. If I put the box of soil right on the mat, the soil mix gets to a temperature of over 80 degrees. Yes, I want warm soil but that will cook the seedlings, so I hold it away. If I didn’t have a metal grill to raise the box, I’d put an old towel on top of the mat to do the same thing. I also am a keen re-user of those plastic boxes that you can get salad mix in at the grocery store. They are relatively sturdy and have a lid that snaps on tightly to hold in the warmth and the moisture for the early stages of growing the seedlings until I need to transplant them out into bigger pots.
Now, this really is something you can do on the window sill at home as long as you have a sunny window, though you do need to keep watch to turn the seedlings so that they don’t grow all in one direction. I have an unheated greenhouse (and right now the temperature in that is 36 degrees – once the sun comes around the corner of the house, it will go up nicely into the 70+ range), but between the warming mat and my covering up the box with a big clear plastic bag, the soil is warm enough to keep the seedlings going.
Something that I am doing new this year (and I realize this sounds a bit daft at this point in the game) is that I am not putting any sort of seed identification markers IN the box. I’ve actually ended up numerous times with mold and other issues inside the box with the wood tags that I’ve used, so I’m doing something different this year. The humble piece of masking tape on the outside of the box.
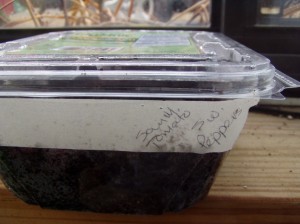 I figure I can just write on the tape and won’t have as many issues inside the box until it is time to transplant.
Speaking of temperatures (digression), this year’s long winter and very cold temperatures have set me way back. Usually I can get out, put clear plastic or glass over one of the beds and get the soil up to 50 degrees so that I can put in cabbage, broccoli, cauliflower, Chinese cabbages, beets, chard and lettuces. Not this year. I went out this week and took the soil temperature and it was still under 40 degrees F. Not warm enough for me to encourage it with a piece of glass or plastic, I’m afraid. I’ll try taking the temperature again today since we’re supposed to have a nice warm sunny day (again, all relative; it’s supposed to be 50 degrees F). Perhaps I’ll have better luck today.
In other areas of the garden, we’re starting to see the leaves from some of the many bulbs I planted in the fall. The crocuses are up, bless ’em, but nothing else so far. It will be very interesting to see how the bulb patch looks once it’s in full flower mode. The patch, frankly, is a supremely ugly spot under which is our new septic system. So, of course, in the digging, installing, and filling in, we lost all of the top soil (despite our begging the contractor to set it aside on a tarp that we oh-so-thoughtfully put out for him) and have nothing there but horrific weeds which we have been assiduously yanking out and replacing with hardy perennials, in the hope that they will beat the nasty guys back (I know, wishful thinking). In the fall, I planted several hundred bulbs of various sorts and we shall see if that gives us a little bit of pleasure in the next couple of months.
Hope your spring gardening is coming along! Anything new and exciting in your garden?
One a penny, two a penny..hot cross buns
 This is the time of the year when you can find all sorts of seasonal/holiday treats in your local grocery store or bakery (if you have one). My seasonal guilty pleasure are hot cross buns. I have not had them in years but my brain certainly remembers the taste and so..I picked up a package along with the rest of the grocerias. When I got home, I settled myself down with a cup of tea and one of these shiny buns with the sugar cross on the top.
Tasted … just…like…paper towels. For a second, I was wondering if it was me, somehow. I have had a nasty cold for a while, so I tried out one of them on the DH. Ditto. So, I checked the ingredients.
No eggs. No milk. No butter. No wonder…. (more…)
Think Irish? Think Lamb!
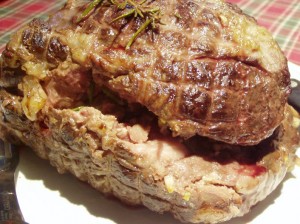 Yes, yes, I know, St. Patrick’s Day is coming up fast and the usual thing is corned beef and cabbage. But, let me make the case for something else: lamb.
First, let’s look at this historically.
Anyone in Ireland who ate beef was probably a) rich and b) not Irish. Raising beef takes a lot of land. For the amount of land you need to raise a beef cow, you can raise a small herd of sheep. Which is why lamb and mutton has always been far more available and popular in Ireland than beef because even if you were a crofter and had only a small patch of land to work with, you could raise a bunch of sheep and have not only meat but also wool. So, if you want to be ‘Irish-Irish’, eating lamb is just more Irish than eating beef of any sort to celebrate St. Patrick’s Day.
Second, let’s look at this nutritionally.
Courtesy of our friends at nutrtional data, for a 3-ounce portion (and I think we can all accept that no one actually eats JUST a 3-ounce portion, but at least we are comparing ounce for ounce here.
Cooked Corned Beef…………………………….Roast Leg of Lamb
Calories: 210……………………………….220
Fat: 15 grams……………………………….15 grams
Protein: 15 grams……………………………..22 grams
Sodium: 960 mg……………………………….55 mg.
These last two are the bell-ringers here. Lamb, ounce for ounce, has more protein than beef does, though it does have the same amount of fat, so in terms of ‘protein bang for the buck’, lamb wins here. Secondly, and I think from a health perspective, even MORE importantly, corned beef is a just a huge sodium hit and I realize for a lot of people, that is the entire point of eating meats like corned beef and pastrami: they love the salt. Well, the salt does NOT love us or our hearts or blood pressure. That 3 ounces of corned beef (and again, who eats just a 3-ounce portion – that’s the size of a pack of cards) is way too much and let’s not even discuss anything else that will be eaten with the meal, like potatoes (going to salt those, too, right?). So, roast lamb wins out here too. Just 55 mg. of sodium. That’s one of those ‘pat myself on the back’ meals right there.
So. For those folks out there who have ‘Fear of Lamb’, here is Aunt Toby’s handy dandy so-simple it hurts roast leg of lamb.
You’ll need:
Meat thermometer or probe
Boneless leg of lamb roast – 3-5 pounds, fresh or defrosted, at room temperature
5 cloves of garlic, chopped fine.
Several sprigs of fresh rosemary with the leaves removed; save one for the top of the roast.
Small baking pan
One medium sized onion, sliced up
This is going to take a couple of hours, so don’t plan for this being something you can throw into the oven when you get home from work on Monday night, ok?
Pre-heat your oven to 350 degrees F.
Take your lamb roast. It is probably either trussed up with string or it’s in one of those elastic nets. Take off the net.
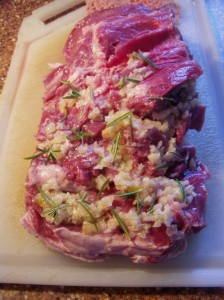 Flip it open or unroll it depending on how the butcher did the deed. Take all the garlic and spread it onto the cut surface of the meat. Then sprinkle all the rosemary leaves on top. You should have the same amount of coverage as you see in the photograph here. Then take your black pepper grinder and grind a couple of good strong grinds of pepper on the surface. Then re-roll the roast or flip back the outside on top.
Now, how are you going to make this thing hold together while it’s roasting. If it was trussed with string, use the string you took off to unroll it and wind it around again after you’ve rerolled it. If your meat came with one of those elastic nets on it, here is the way you get it back on again without the whole thing flipping out and ending in a wreck on the kitchen floor.
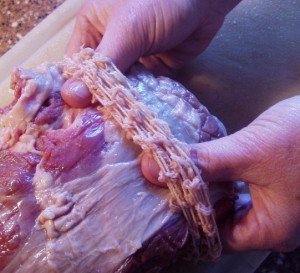 Put the net over the ends of your hands, as in the photograph and put your hands over the closed end of the roast. Move your hands forward until you have the netting about half-way up the roast. Then take your hands out of the net. Use your fingers to pull the ends of the net over the front and back ends of the roast. Voila!
Take your baking pan and put your sliced onions into the bottom in the center. Put the roast on top of that; this will prevent the roast from sticking to the bottom of the pan.
Put the pan into the 350 degree F. oven for 30 minutes. At the end of 30 minutes, turn the oven down to 170 degrees F or the lowest setting your oven has. Yes, I know this is sort of scary — but lamb does not take well to high heat. If you have horrific smell memories of Sunday lamb roasts, this is the reason why – the fat was burning in the high heat. Lamb does super well in ‘low and slow’ cooking. Leave your lamb at this low temperature for an hour and stick in the probe or meat thermometer to test the center for temperature. You are looking for 160 degrees F at the center. If it has already gotten to 140+ but you are looking to speed this up, you can raise the oven to 250 degrees F and the roast will not suffer – the outside will get a bit crunchy-er which some people like.
Once you have reached 160 degrees F at the center of the roast, take the pan out, wrap the meat in the foil tent and prepare the other side dishes (I am pushing Brussels Sprouts this week, but to each his own), and serve.
NO MINT JELLY.
Bon appetit!!
Searching the seed catalogs
For all I love the internet and seed sites (I have a very long history with seed companies..we won’t even go into that), there is something totally different about reading a catalog. I find I get so much more out of what’s on offer and this year, because the long range weather forecast is so weird (cool but dry), I have to scan more carefully than ever for magic words such as: ‘tolerant’ and ‘cold tolerant’.
I also like to get right to what is new. I think every gardener is like that. Yes, we all love our Danvers Half-long Carrots and San Marzano Tomatoes, but it’s always interesting to see what stars the seed companies have hitched their wagons to this year. Here are some interesting things that I’m looking into.
Kosmic Kale (Territorial Seed): PERENNIAL Kale. Perennial is one of those words I look for also, as I’d rather plant something once and then…move on. This is something you have to buy (right now – if it’s like other new introductions, seed will be available down the road) as a plant, but if you eat kale (and who should not?), then this is something you might want to consider.
Wasabi ‘Daruma’ (Territorial): OK, so Wasabi is not new, but it IS something, like ginger, which is getting more attention in terms of people’s trying to grow it here (esp in the Pacific Northwest). Again, this is something for people who love a challenge (for most of us, tomatoes and peppers are challenging enough).
Grafted Vegetable Plants (tomatoes, Peppers, et al.) Now, Territorial seemed to be the seed house that introduced this a couple of years ago. I have to admit that I saw this as a totally cosmetic and ridiculous offering until a friend of mine got some grafted tomatoes to try last year. His success rate with them vastly beat his seed-grown plants. Territory also offers grafting rootstock seeds and clips, so for those folks who want the benefits of grafting (disease resistance) but don’t want to pay the heavy freight, that might be the way to go.
Rapper Basil(Territorial): The magic words here are ‘slow-flowering’ — one of my biggest annoyances with growing basil is bolting, so this is something to look at. It also has huge 4-6 inch leaves, which not only plays into my urge to throw basil into sandwiches but also my need for lots and lots of basil for drying.
Spring Beet Blend (Territorial): OK, so you’ve had it with kale and are still not ready to take on Brussels Sprouts. It’s time to do some beets. OK, so you don’t like the fact that they bleed. This blend has orange and white beets which don’t bleed. Plant a whole row out as thickly as you can — pull up the small leaves, thinning the plants as you go so that you leave(heh) a couple of inches between to grow the rest of the beet below ground. Beet greens are nutritional powerhouses so this is a plant where you get a two-fer out of it.
Merida Carrots (Territorial): For those of us who just can’t seem to get out into the garden in the fall to harvest, this is YOUR carrot. 240 days, people — this is an overwintering carrot. I’m not sure this will work up here (probably better suited to more southern areas), but I’m certainly willing to give it a try. Plant in September and harvest… the next May. How cool is that?
Celery: Now, if you had to ask 1000 gardeners to list their top 5 vegetables that they absolutely grow, celery is not one of them which is too bad. Celery is also one of the ‘Dirty Dozen’ in terms of the sheer amounts of chemical residues found on them in produce bought at the grocery store — in commercial production, they are sprayed like fury. And I can tell you from my experience that celery is actually … quite easy to grow. As a matter of fact, one year, I grew it and then dug up a plant for the greenhouse for wintering over and eating and it was tender and quite delightful. Territorial has an organic and stunningly colored one called ‘RedVenture’. Just don’t plant it next to your rhubarb chard.

