
 This year’s ‘to do’ item for fundraising is the masked ball. I don’t know who sent out the memo but there it is. And for those of us who use ‘visual aids’ but who do not wear contact lenses, this is sort of a problem. We could always go with the ‘mask on a stick’ thing which is very popular but since your dear Auntie goes to these sorts of events equipped with a clutch bag filled with everything from a cell phone to a small ziplock(tm) bag of antibiotic ointment, plastic adhesive bandages, a chemical ice pack and an athletic bandage (don’t ask; someday I will tell you the story which includes an icy parking lot, stilettos and a long gown), this will not work. Aunt Toby needs a hand free for the drink or the plate of coy little munchables, whichever comes first.
All of which means that since the DH and I will be going to an event such as this next weekend, I need to come up with something the would be suitably ‘fantasia’ for the event. Thank goodness, this is not what used to be referred to as a ‘fancy dress party’ (which refers to costume dress rather than formal dress, which is fancy enough, goodness knows), so that part of the rig is all taken care of. For those of my readers who have faced such a difficult situation, I offer this exercise in how I dealt with the issue.
For you to do the same, you will need:
For the mask and structure: plaster medical bandages (you can get these at any medical supply house or over the internet) and a small dish of water.
To secure the mask at the back (a la chem lab goggles), you’ll need some elastic – I used 1/4″ braided elastic.
To decorate the mask, you’ll at the very least need some sand paper and acrylic paints. I also used a hot glue gun and feathers (ordered from over the internet; I got mine at Sav-on Crafts)
First, I took a good look in the mirror at myself with the specs on and came to the conclusion that the big issue here is that spectacles have 90-degree angles where the bows (the parts which hold the glasses up on one’s ears) attach to the fronts. So, whatever solution I came up with had to conform to that architecture. I decided to go with the solution of adding a structure to a standard self-made mask. For readers who wish to do this for themselves, there is a lovely video from the always-amusing and clever folks over at Threadbangers (my link is not working; search on ‘Threatbangers masquerade mask’). You will have to imagine that your Aunty did the same exact thing and allowed the face mask to dry. Now for the Frank Lloyd Wright treatment:
Now, I knew that one of the issues involved was basic strength. I couldn’t just slap a piece of card stock on the side, apply some plaster bandages and call it a day. I had to attach the mask front to it AND it had to include a 90-degree angle.
Enter: The Corrogated Cardboard Box (cue the scary music)>
 Find a cardboard box. Look at the box and you will see – amazingly enough — 90-degree angles all over the place. Open it out flat and taking the mask, put one side edge next to one of those 90-degree angle corners and mark where the eyehole is that is closest to the edge of the box you are working with (see photo – I’ve marked ‘eye hole’). Take the mask off and, like in the photo, draw an ‘armature’ around the area where the eyehole is and then draw whatever version of a side you want (this will be the parts where you will attach the elastic). In my case, I am going as a snowy owl (I kid you not – they are tres hot this year) so I made mine wing-like because I was planning to cover the whole deal with feathers. This also gives me the double advantage of covering the entire deal on my glasses. Clever girl.
 Cut out two of these (use the first one as the pattern for the second one; you’ll have to flip it to make sure you get the 90-degree bend on the cardboard going in the right direction). And install on the inside of your mask. I secured them with a staple gun from the outside and then, as the Threadbanger video suggests, added more wet plaster bandages to it and allowed to dry.
 Now, before it is fully dry, hold it up against your face while you are wearing your specs and bend the wings closer to your head and allow to fully dry.
Then, I prepped the feathers. These are plain old domestic goose feathers. Now, snowy owls have feathers with black tips on their heads and shoulders and wings and are white every place else. So I took a little brush and tipped a bunch of the feathers for the top and sides of the mask; I would fill in the rest with plain white feathers later. When I got the bundle of feathers, they were about 4-6 inches long, much too long for my use, so once the black paint dried, I cut the feathers to about 1.5″ with black tips. I also ended up having to cut some 1″ feathers to fill in.
 So, now we have a mask with sides. Before I did anything else, I put two holes toward the ends of the wings at the back, using a nail. Then I threaded a piece of elastic through the holes and made a knot at each end and tried it on. I didn’t find it tight enough across the back of my head, so I made the elastic shorter. And then I stuck down the knot and the end of the elastic with some hot glue. I was going to hide the knot with feathers anyway, so the knot is to the outside. For those who want to put the knot on the inside, just thread the elastic in the way so that you tie the knots on the inside and then paint over the place where the elastic goes in to match the rest of the mask.
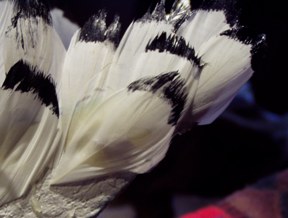 In this photo, you see how I hid the knot with a feather.
So I have a mask with elastic secured, a pile of plain white feathers and black-tipped feathers. Now, if waht you want to do is to paint your mask, you can stop here, use some sand paper to smooth out the mask and the sides of the mask and paint it any way you wish. For people who want to know how I did the feathers on the mask, read on.
Beak and Eyeholes: On a snowy owl, the beak is black, so before I did any feather work, I painted the beak black and the eyeholes black and allowed to dry.
 Applying feathers: For doing something like this, think “shingles on a house” except in this case, you have to move not only from the outside edges IN, you also have to take into consideration the area around the beak and the eyeholes. As you can see from the photo, I’ve worked the outer edges of the mask and the side pieces first and have then started applying (with hot glue; work about an inch at a time) the next layer of feathers, moving toward the center of the mask and wings. With the wings, you have to work the upper edges with feathers first, angling them out toward the ends and then, starting at the very ends, working your way in, superimposing the feathers and hiding the elastic knots are you go, and then angling the bottom layer of feathers out toward the bottom. completely fill in the wings, using some smaller feathers at the point where the front of the mask joins.
 The tricky part of this is the front of the mask. Feathers on birds’ faces grow in several different directions. from the beak up to the forehead, they are vertical; they are also vertical over the eyes. At the sides of the eyes, the feathers grow directly out toward the sides of the head and then grown increasingly down around the face, so I had to angle then down as I went. On the side of the face, next to the beak, the feathers grow away from the beak and down the face, so I had to angle them down there. This is where I really needed a lot of smaller feathers and occasionally I had to trim them even farther down.
So, the order of working the front of the mask was:
1. Over the eyeholes and out to where the wings attached.
2. The outsides of the eyeholes to where the wings attached.
3. The bottom edges of the front of the mask, with the outside layer of feathers and then the inside layer, moving in toward the eyeholes as I applied the feathers.
4. The little feathers around the eyeholes.
5. The little feathers in the beak area. First, from the top of the beak toward the forehead. Second, from the top of the beak along the sides, blending in with the feathers on the ‘cheeks’ of the mask.
Finally, I examined the mask all the way around and any areas where I missed or the feather ‘moved’ etc., I filled in with small plain white feathers.


Hats off, if this is your first try on a masquerade mask with feathers. How long did it take you to make this mask?
Columbina — to make the original face part of the mask probably took about a half hour (and most of that was just the waiting for the plaster bandages to set up so that I could take it off my face). Doing the wings took longer because I was designing the whole thing as I went; I didn’t have a pattern to go by and I had to deal with the architecture of it to fit over my glasses. So, that process probably took an hour or so and that includes putting the wings on, applying the plaster bandages and setting it up so that it would dry. The part with the featheres took probably about an hour and a bit because I had to paint and trim some of the feathers and trim other feathers, which turned out to be too long, so I had to stop and trim those smaller. And I ran into issues with the hot glue gun as well. Now, having said that, I really think that because I had an image in my mind (I had looked up a lot of pictures of snowy owls), I had a pretty firm idea of what I was going to do with the tipped feathers and so on, so that actually saved me some time.
How wonderful. One has to want to do this! There is a Dollar Store near me stocked with the most well-designed lavish pheasant-feather masks, for $1. I think it is far too cheap, and cannot imagine how they can be priced so low. But $1 diverts me to other arenas of creativity. Have fun at your fete!