
 It has come to Aunt Toby’s attention that she has neglected the totality of the garden learning experience of some of her little friends. Far be it from me to avoid getting into the, ahem, nitty gritty, of gardening, that is to say “How do I know when I sow seeds, when something comes up — is it what I sowed or if it is a weed?”
Ah….”I’ll know..when my love comes along….”
No, actually, many times you won’t. Certain things, like any member of the cabbage family (cabbage, broccoli, cauliflower, Chinese cabbages, bok choy, etc. etc.) actually all emerge looking exactly the same, with two heart shaped leaves coming off the top of the stem. Once the second set of leaves emerges, THEN they start looking different. But for you folks who have not put seed to ground before, trust me on this: two leaves with the pointed end of the heart attached to the stem, the indented part of the heart at the free end of the leaves.
Another family that all looks the same is the onion family(onions, garlic, shallots, leeks, chives): All of their seeds come up looking, unfortunately, like grass, which makes distinguishing them from actual grass difficult except that actual grass in your garden comes up much ranker – onion seedlings are very delicate grass.
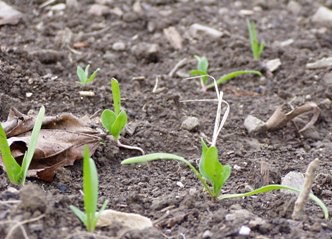
Something that LOOKS like grass but doesn’t STAY looking like grass is spinach (see the photo at the top). They emerge looking just like grass, with two thick leaves, but very quickly form little rounded spinach leaves (looks just like what you get in the store, only a LOT teenier). Another family that comes up looking like grass but doesn’t stay that way is anything from the lettuce family.
But it certainly would be a very nice thing, indeed, to have a reference that would show you pictures, right? Well, Aunt Toby is all about ‘doing it all for you’ – so here you go:
For ornamental plants, this site has 700 photographs of seedlings, categorized on God help us, the scientific basis. For this, you have to know one thing: is it a monocot or a dicot? Monocots come up as one leaf, like grass. Dicots come up with one stem but have two leaves on it. Onions are a monocot. The Seed Site
For vegetable plants, this site is fantastic because you can find the vegetable by common name as well as the Latin name. Vegetable ID Web Site
Some things will come up looking nothing like what you planted. My best example of that is potatoes. The way you plant potatoes is this: 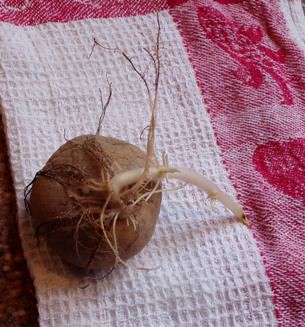
1) If you have a potato that looks like this one, dig a hole in the ground (or scoop out a hole at the base of your compost heap, or in a really big pot or in a bag of compost) about 6-8 inches down, and stick it in, roots down. Ah, but you say, “Aunt Toby, there are two different things coming out of the same spot; which ones of these white thingies coming out of the potato are the roots?” Good question. The thick white thing going off to the right is….the sprout. That is what will turn into stems and leaves and grow above the ground. The flimsy whitish things going off in all directions are…the roots. As long as you plant this piece of potato with the filmy things DOWN, no matter what direction the sprout is going in, it will find its way to the surface and you will get a ‘hill’ of potatoes. But what if you don’t have a potato that has already sprouted, like..you went to your local feed or garden center or sent away and what you got are ‘seed potatoes’ that have not sprouted. Then, see number 2:
2) Take one of your seed potatoes and wash it off. Ordinarily, I would not advise this as many times seed potatoes have been dusted with an antifungal substance, but doing this to one potato will not hurt and you will become more familiar with potato anatomy. This gets very sexy – trust me.
You’ve washed it off – put a good light on so that you can see what is going on here with this potato. Chances are, you will see all sorts of little indentations on the surface of the potato. Some of these are..just indentations from uneven growth, a rock in the soil next to the potato and so on. These are NOT what you are looking for. You will also see, usually crowded in a group at either end and a few around the middle, much smaller indentations that are more like pits – and usually don’t go straight down into the potato, but more at an angle. Cut your seed potato into pieces with at least two of these pits in each piece. These are what are referred to as ‘eyes’ – and these are the sites where the roots and the sprouts come out. In the old days, the rule for planting potatoes was to make sure that you plant the piece of potato with the ‘eyes’ DOWN – so that the potato cannot ‘see’ to jump out of the ground. (ok, I think it’s ridiculous also, but helps to remember it). There will be enough ‘meat’ in the piece of potato to keep it going while the roots and sprouts emerge(which actually takes quite a while – you should not expect to see first leaves coming out of the ground for at least a couple of weeks).
What you are doing, which is totally different than planting a seed is this:
Seeds are created through ‘plant sex’ – stamens and pistols doing their pollen and egg thingies and creating something totally new – seeds that end up being planted in the ground. Genetic mixing. You plant the seed and what you are going to get, even when it runs ‘true’ to the parents, will be slightly different than the parents at the cellular level. This photo is what has emerged from the soil from a piece of a seed potato that I planted several weeks ago. 
Cutting up a potato and sticking it into the ground is the same thing as taking cuttings from your mom’s coleus or impatiens plants, sticking them in water to root and then putting them in a pot of soil to grow. It’s ‘vegetative propagation” (say that three times fast) – there is no genetic mixing going on. The ‘children’ of the plant(in this case, the potatoes that will end up growing at the ends of the roots under the ground) will be exactly the same as the piece of potato you planted in the ground, with all the inherent strengths and weaknesses of the parent plant in terms of insect and disease resistance, etc. This is the same process that is used in the Dutch bulb industry to propagate tulips, daffodils, etc., ditto for splitting up onions for sets, irises, dahlia bulbs, and cannas.
One more detail on growing potatoes: Do you need to grow them in a trench?
Trench growing is actually an ancient form of gardening and many vegetables used to be (and in many places like Europe still are) grown that way: asparagus, celery, leeks, potatoes and various plants that were deemed to be more ‘tasty’ if they were blanched by growing this way. Here is how trench growing goes:
1) Dig a long trench 1-2 feet deep and put compost in the bottom.
2) Plant whatever you are going to plant in it and cover with a couple of inches of soil and/or compost
3) As the plants and leaves emerge, throw in (or as some people refer to it, ‘hill up’) soil/compost over the plants.
4) As leaves and stems keep emerging over the growing season, keep hilling them up until late in the season, when you stop and allow the leaves, etc. at the top to mature.
5) Carefully dig away the soil and harvest your potatoes or your blanched celery etc.
Here at Chez Siberia, we are not so delicate that we mind crunching into celery or digging down for potatoes, so we do not use the hill method. People over the years have tried various methods of growing potatoes with more or less success: growing them in piles of leaves; growing them in compost bins filled with dirt; growing them in black plastic bags filled with compost; growing them in bales of straw, etc. I can tell you a couple of things that work:
1) Dig up the patch really well. Get out any rocks bigger than your fist.
2) Dig in plenty of compost. Don’t put in a lot of manure – that will get you a whole lot of leafy tops and not many potatoes.
3) Put your pieces of potato down as far as you can reach into the ground – that should be someplace between your wrist and your elbow. If you don’t plant them deeply enough, you will end up with potatoes forming too close to the surface and they will have green skins and taste very strong. They are NOT poisonous, though.
4) Make sure your potato patch gets plenty of water (goes the same for onions and garlic too, actually). If you are having a dry summer, you will have to water really well to get any decent sized potatoes. The best potatoes we ever had was in 2006, when we had flooding locally – potatoes are mostly water, so if you want a good crop of good sized potatoes, you will need to keep an eye on the water and make sure you get at least an inch of rain a week. If you don’t water and it is dry, you will still get potatoes..but there will be fewer of them and what you get will be small.
