 Unlike other sewing posts here on KCE, I’m not doing this coat in chronological order — we’ve all got our ‘big sewist panties’ on and I don’t think we need that. What this series is all about is the very specific items or skills which make working with something like a raincoat or water resistant fabrics different or new. It will all come together at the end, I promise.
There are, as I’ve discussed before, several different ways to seal the seams on raincoats or other outerwear made with waterproof or water resistent fabrics:
Seam sealer which is squeezed out of a tube and painted on the seams with a brush (with which, to be honest, I don’t have any experience);
Seam sealing tapes, which is the point of discussion here.
There are seam sealing tapes which come in colors, but which seem to limited to white, grey and black. These have an advantage that you can easily tell which side is the side which is placed down on the inside seam.
And then there is what I use, which looks like frosted plastic (which is frankly what it is). One side is shinier than the other and although this is not necessarily the easiest to use, I think it produces superior results. The trick is to make sure you have a really excellent light source (such as a small desk lamp) to light your ironing area so that you can see the shiny side versus ‘slightly less shiny side’. The differences are not dramatic but you need to be able to see them. The ‘slightly less shiny side’ is the side which goes face-to-face with the inside seam. As I have noted, I get this from Rochelle Harper at her site here:Cascade Layers At the same time, you will want to get a Teflon(tm) ironing shield.
Now, even before you start a project such as this, there are ways to make it easier to do this task than if you do not. First, pattern selection can make a huge difference because applying seam sealing tape to curved seams such as those on set-in sleeves can get a bit tricky. Not impossible by any means but the tighter the curve, the trickier it is. So, for example, picking a jacket or raincoat with a raglan sleeve or a dropped shoulder will eliminate that issue. However, you will still have the curved seam between a collar or hood and the body of the coat or jacket. Second, you can eliminate other seams – for example, if the coat or jacket has a seam in the center back, you can cut it on a fold of the DWR fabric (making sure to take into account that you need to take out the extra in the center) and get rid of that seam. But in the end, you will still have seams that you need to waterproof which are vital to maintaining the protection – the seam between the hood/body or collar/body and the shoulder seams for sure. The side seams are not as much of an issue but those are nice flat seams and so those are not really difficult.
In this example, I’m doing the hood on this raincoat for my grandson. Because it is for a small child, the curve is pretty dramatic, so I need to get something underneath it other than the end of the ironing board for that center seam. If I had a pressing mitt or a pressing ham with a small end, I could use one of those. I don’t (believe it or not); so I used a tightly rolled up towel and at one point, several thicknesses of towel over my hand underneath the seam on the hood. You will be using a temperature on your iron somewhere in the range of silk to synthetic and I could not feel any heat more than the perception of ‘yeah, that’s a little bit warm’ on my hand, so this is doable.
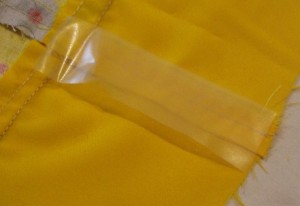
The first seam I did is a flat seam, where the two pieces of the hood facing come together in the front to demonstrate how to apply the seam sealing tape.
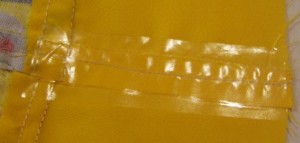
In the photo above, you see the tape, ‘shiny’ side up. All you need to do is finger-press the seams down (I double sewed them down), put the tape down, ‘shiny’ side up, making sure that it covers the seam. Then put down the Teflon(tm) pressing sheet on top of that and press down your iron (again, the setting needs to be in the range of silk to synthetic — the first couple of times you do a seam, you probably will have to fiddle with the setting) for a could of 10 (as in ‘one-Mississippi…two-Mississippi”). Remember: Just press down – don’t run it back and forth as if you are ironing a shirt. Carefully lift up the pressing sheet and the place where you pressed should look like this photo. Are there places where there is not full adherence all the way to the edges of the tape? Then put the Teflon(tm) sheet back in place and press again for another count of ten. You want to get the entire width of the tape melted/adhered to the seam area to make sure that you have no gaps in your waterproofing.
It really is as simple as that.

I’m on my second raincoat (as yet unblogged) and have used seam tape. I don’t have a Teflon sheet (nor did I want to buy one) and have successfully ironed on the tape using baking parchment paper. Also, my seam tape is sticky on the shiny side; matte side up. Thank you for the series; there isn’t enough “practical” sewing on the internet, imo!
Uta – ooooo, baking parchment paper!!! What a GREAT idea.