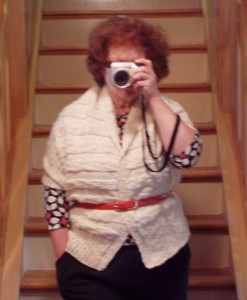
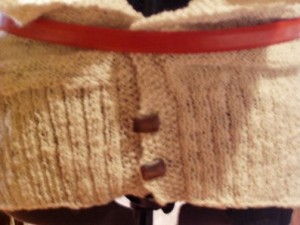
 First, the apology – these photos are hovering at the “how much have you been drinking?” level. I think my camera (which has been doing yeoman service since 2002) is basically going toes up here, but I think the shots will do the job.
OK – one of Aunt Toby’s ‘things’ is that I dearly love clever things that are designed to do more than one thing. Several months ago, we got a foot stool so that our grandson could put himself at the window to watch the birds at the bird feeders. This stool, if you flip up the foot part of it, turns into a little chair that he will be able to sit down on (or climb up on ) at some time in the future. At the same furniture shop, we also saw a very very nifty high chair which turned into a rocking horse for a little person who no longer needs a high chair. I’ve also seen, over the years, baby’s cribs that turn into settees and stairs with drawers built into the risers as space saving storage.
I love this sort of thing. Clever as all get out.
With clothing, the closest we can usually get to a twofer is one of those jackets with the sleeves that unzip or slacks that unzip the bottoms and turn into shorts. Which is sort of cheating. But I recently saw a pattern for what I’m wearing above and thought it was clever on a couple of different levels.
First, it’s a simple thing. The stitches used were not simple — filled with cables and a bunch of other stuff which I decided not to do since I was using ‘thick and thin’ yarn which can’t take advantage of any of that sort of thing. This really is simple, which means that a beginning knitter (or crocheter for that matter) could do the same thing and end up with something that is a) more interesting than a scarf and b) more useful than a scarf. On a basic level, what we have here is an oblong which is 20″ wide by 60″ long that happens to have a couple of buttonholes in one edge at the bottom.
Second, it’s a twofer! You can wear it with the buttons at the front like a big scarf around your neck and around your shoulders. Or, as in the picture at the top, you can put the buttons at the back and either pin it closed at the front or wear a belt or something like that and it becomes a pretty clever vest/shrug sort of thing (in the old days, I think this sort of arrangement was referred to as a ‘hug me tight’ but I might be wrong about that). If I do this again (and I do think I will), I’m going to put three or four buttons at the ends, which I think will close it up better.
So, here’s how to do this.
Yarn – The yarn I used is the equivalent of a light worsted — I had two huge skeins of it so I’m going to estimate that we are talking 400-500 yards. Frankly, I think this would be a great way to stash bust – make it colorful!
Needle — I used a 4.5mm
Size/gauge — you are going to want to cast on enough stitches to have a piece of knitting that is about 20″ wide. So, whatever weight of yarn and needles you use, work up a gauge swatch 4″ by 4″ and then multiply the stitch county by 5 and cast on that.
Design — The only thing that you have to remember is that you will end up with one edge that will curl over (as in my picture) like a shawl collar so you are going to want to make sure that the edges are done in something that is reversible. There are tons of stitches that are reversible (just do a search on ‘reversible knitting stitches’ on the internet and you’ll have more than enough to choose from. I used a very simple moss stitch at both ends of the row for six stitches.
Moss Stitch:
Row 1: K, P, K, P, K, P
Row 2: P, K, P, K, P, K
Directions:
Cast on enough stitches to get you a 20″ wide piece of knitting. How many is that? Subtract the 12 stitches (the six reversible edge stitches at the beginning and end of the row) from that figure and make sure that whatever ribbing you want to use for the first four inches and the last four inches will evenly fit into those stiches. If you need to add a stitch, do that now.
First 4 inches of work: 6 reversible edge stitches, followed by whatever ribbing you like best (I like K, K P, but that is just me), followed by 6 reversible stitches.
Next 52 inches of work (yes, I did say 52 inches): 6 reversible edge stitches, followed by whatever body stitch you want to use, ending in the last 6 reversible edge stitches. You can do the entire thing in moss stitch or any reversible stitch, or anything you want that will fit into the number of stitches you’ve got. Want something easy and mindless? Do the whole thing in garter stitch. For the in between parts, I just did stockinette for ten rows and then when I turned the garment, I just repeated the last row (which was purl). This produced a ten row section of right side stockinette followed by a ten row section of wrong side stockinette. Reversible.
Last 4 inches of work: This is the tricky part because this is where you put in the buttonholes.
First row (right side): In the first six reversible edge stitches do the following: Do the first two stitches. Yarn forward and knit two together. Do the last two stitches and rib the rest of the row and do the six reversible stitches.
Second row (wrong side): Do the six reversible stitches, do the wrong side of the ribbing, do the first three of the reversible edge stitches, and knit (or purl depending on your stitch pattern) the yarn over yarn that is on your needle and do the last two edge stitches.
Third row (right side): do the six edge reversible stitches, do the right side of the ribbing and then do the six edge reversible stitches.
Fourth row (wrong side): do the six edge reversible stitches, do the wrong side of the ribbing and then do the six edge reversible stitches.
Repeat row three and four until you have 1″ of ribbing. Then do rows one and two to make another buttonhole.
Then do rows three and four until you have 2″ of ribbing. Then do rows one and two make buttonhole number three.
Repeat row three and four until you have 3″ of ribbing. Then do rows one and two to make buttonhole number four.
Repeat row three and four until you have 4″ of ribbing. Then bind off loosely, keeping to the stitch patterns.
 Lay out the piece of knitting on the floor as if it were a scarf going around someone’s neck. Make sure the edge with the buttonholes is on the inside edge. Match up the other end of that same edge and sew buttons in the corresponding place on the edge so that the bottom ribbed edges line up (see photo). Sew in any odd yarn ends and voila – you are done!
