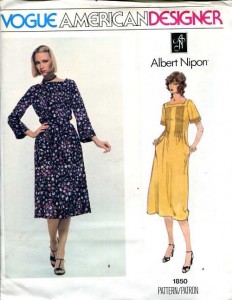
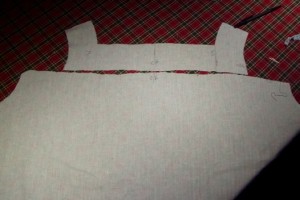
 As we discussed here Vintage Sewing: Literal and Figurative, one of the design features which attracted my eye to this Nipon dress pattern from the 1970s is the square neck, which in this case, is achieved through the use of a yoke. Now, yokes come in all shapes and sizes but their primary feature/function is that they enable you to get the garment to fit in the region of the body (usually the distance between the shoulders and the top of the chest wall where the breasts ‘attach’, but yokes can be used between the waist and the hips on skirts as well) where a garment hangs and at the same time, enables you to attach to it a much larger piece of fabric (see photo below. The dress part is much larger than the yoke muslin piece..
Why do we want to do this?
Well, from a historic point of view, chopping up large lengths of fabric (which were literally bought with the sweat of numerous people’s brows) into much smaller shaped pieces of fabric was actually wasteful. People wanted to be able to use the length pretty much the way it came off the loom. The Japanese devised the kimono to be literally rectangular panels just the way they came off the loom. No cutting. No waste. Western designed clothing has more ‘innies and outies’ in terms of shaped sleeves and so on but even traditional Western clothing (such as the smocks worn by agricultural workers and so on) basically were just big rectangular pieces of cloth that were shaped to fit where they needed to fit, such as the shoulder area. Now, with the traditional agricultural smock worn in places such as rural England up through the end of the 19th century, the method usually used to make the stuff at the top smaller (that’s the technical term – bear with me, folks), was smocking. From a procedural standpoint, what you do with smocking is you pleat the fabric in the shoulder area with zillions of tiny pleats (usually by shirring it together with multiple threads passed through the cloth through regular intervals and then tying it off so that the pleats stay together in one big mass). The embroidery found on smocked garments is basically just a ‘safety-belt’ to make sure that all those little pleats stay tied together. Now, what smocking did for those smocks was that when the person wanted to pass the smock on or turn it to the less worn side or whatever, the whole business could be undone, the now big huge piece of fabric washed, repairs done, the fabric turned inside out and the whole thing done again. Very useful and thrifty.
Now, let’s just for a moment say that what you want to do is get the benefit of having extra fabric (especially in the front because you have a full bust, or are pregnant and have a big belly), but you don’t want all that extra fabric in the shoulder area. What to do? The yoke. A yoke actually is a rather thrifty device, doesn’t use much fabric itself, which fits in the shoulder area, but allows you to attach the much larger piece of fabric to it. Now, I think we are all familiar with blouse or shirt waist dress patterns which have a yoke in the front and the rest of the blouse is gathered into the yoke. This was a very popular device for giving (ahem) mature ladies more bust and tummy room. In the 1980s and early 1990s, yokes were also used with entire front bodices pleated into them, which didn’t do much for those of us who ordinarily need a ‘full bust adjustment’ (the dreaded FBA), but still was a way to put a lot more fabric in a smaller area.
 In this Nipon dress example, let’s look at what the designer was looking to achieve here:
1. If you look back up to the pattern photo at the top, you will see that Those pin tucks are going all the way from the yoke attachment to the waist region. He’s obviously NOT looking to put extra fabric in the bust area. As a matter of fact, this gives the front of the dress an almost corset-like feature. It is, therefore, a smoothing device which leads the eye to see a smaller waist.
2. Once you get to the waist, the pin tucks stop, releasing the fabric to flare out over the hips, leading to a fairly graceful version of an hour glass.
So, in actuality, what Nipon has done here is that he has created a sort of ‘yoke extension’ with those pin tucks in the front – the release point is at the waist. The other point to note here is that I’m only discussing the front of the dress. In the back, there are pin tucks that are about 6″ long and which go from the hips up past the waist, again to pull the fabric in in that region at the back, but at the same time, leave room in the shoulder blade area for movement.
And speaking of shoulders (I have to get to this because this is actually a really important thing to remember about yokes, especially one such as this which is actually quite narrow), if you want to make this dress or something built like it (that is, with a narrow square necked yoke on it), you will want to do a muslin or two to make sure you get the fit exactly right. There are two crucial areas of fit with this sort of yoke:
1. Where the pivot point on your arm and shoulder are should be where the seam is. If you have a large bust and are fitting for that, you will notice that the yoke will basically end up falling off your shoulders.
2) The inside measurement of the yoke (the part that gives you the square neckline). Because I’m short and I have a big bust, that inside measurement was too large – great swaths of my bra were exposed. So make up a mockup, sew the shoulder and side seams together, put it on and see where that inside corner hits on YOU. I found I had to pull that inside corner in about a half inch on both sides, which meant that I also had to extend the outside edges of the yoke (at the underarm seams) OUT a half inch on both sides as well.
Next episode: I hate pin tucks.

That dress in yellow is lovely. I have such good memories of sewing my school clothes (with some help from my mother).