 At this point, I’m sure that there are a few readers who are saying, “Oooooo-kay…. so what happened to the Gary Cooper shirt for the DH? By this time, he’s given up, right?”
Well, here’s the story (you knew there would have to be a story, right?). There are times, and I think other sewers have these too (at least I hope I’m not the only person who’s done this), where you’re going along — perhaps you’ve made this particular item before — and you are on auto-pilot and you get distracted and it becomes like that time you locked the car door with the keys in the ignition and the engine is running and you just put in a full tank of gas. Crud.
Can we say, ‘wretched’ (knew you could)? OMG. I could not have ruined these sleeves more if I had tried. Plackets in backwards and on the wrong sides of the sleeves. Whoa Nelly. And there I was with just the odd bits of fabric left on the dining room table (sorry, folks; Aunt Toby, after 50 years of sewing STILL does not have a dedicated sewing space). Now, I know that a lot of people throw in the wadder at this point, but the DH truly wants this shirt and I definitely want to finish it for him. And for a long while, I debated strongly about pitching it, apologizing to the DH and moving on. But the whole thing just nagged at me. So I extracted my “How could I have been so stupid” panic out of this and looked at the sleeves and looked at what I had on the table and asked myself, “How can I make this work” (thanks, Tim Gunn)?
Well, I definitely did NOT have enough fabric to cut out whole new sleeves. That was for certain. But I did have a section of fabric left that was sort of triangular in shape, along one selvege, that, if I only needed to replace part of the sleeve, that I could do it. So, here is what I did:
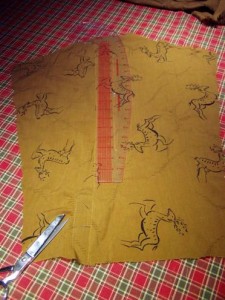
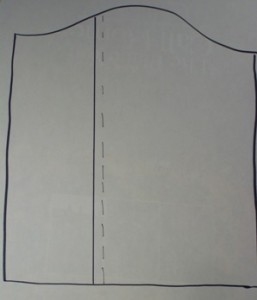
 First: I examined the sleeves for how much I could still work with, which was about 2/3s, and I marked that on the sleeves. Then I took out the sleeve pattern and made a copy of it in waxed paper (my tracing paper of choice because I can always find it and I always have a supply of it). I pinned that to the sleeves and marked on the waxed paper pattern where I’d marked on the sleeve to cut away the ruined part. I’ve done this on a white piece of paper here so that it’s easier for you to see. I also marked the grain line, and I saw that it would line right up with my cut line.
Second: See the dashed line on the photo above? For once, I remembered that if I was going to piece this sleeve, that I was going to be taking up seam allowances on both sides of the seam, which would make the sleeve smaller all the way across. So I added 1″ seam allowance so that I’d end up with a new fixed sleeve that would be just as wide as the OLD sleeve was.
Third: I also decided that if I was going to be Franken-sewing this sleeve as it was, I might as well change the placket as well and decided to just go with a plain oblong placket rather than one with a triangular top. This challis is really soft and even with interfacing, that triangular top on the placket just was ‘blech’. Square corners would be easier to maintain with a plain oblong. So I found another scrap of fabric with the right grainline that I could cut two 4″ by 3″ oblongs out of them. I interfaced them, folded each one in half lengthwise, pressed them and sewed each one, folded in half right side to right side, along the cut edges. Then I unfolded them, poked out the corners and pressed them again.
 So, here is the order of what I did after I’d cut the sleeves, cut the new pattern pieces and new remainder of sleeves and made the new plackets:
1. Pinned and sewed the plackets to the appropriate place at the bottom of the original sleeves right side to right side so that when I flipped it at the seamline, the placket would then go over the new attached remainder of the sleeve.
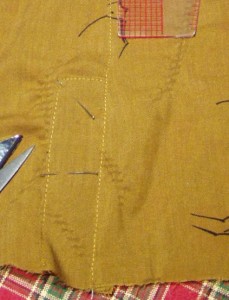
2. Pinned the new remainder of the sleeve to the cut line of the original sleeve, right side to right side. Sewed from where the top of the new placket is attached to the original sleeve to the sleeve head. Flipped the seam allowance on the inside so that it faced the original part of the sleeve and pressed it. This flips the placket to the side which is the new remainder of the sleeve (only the part of that new bit which is to the other side of the placket is not sewn). Then I overstitched the seam allowances to the original part of the sleeve – see photo above.
3. Found another bit of fabric with selvege in it that was long enough to bind the free edge of the side opposite the placket on the new remainder of the sleeve, put a strip of interfacing on that and then used the selvege edge to bind that bit.
Saved the sleeves. Now I can go back and finish the shirt. Whew.

Great save. Was a short-sleeve shirt not a possibility?
Peter — if this had been a regular cotton shirting or even linen shirt, meant to be worn in the spring, summer or fall, I would have done that and laughed all the way to the bank (so to speak). But this is wool challis and was meant to be worn in the late fall/winter/really early spring, so it really requires a long sleeve. besides, I have a strong streak of beating my head on the wall and wasn’t going to let this beat me…
David Page Coffin, in his books on shirts and trousers, observes that even in high-end garments made a century ago there are areas where fabric was pieced – and quite artfully.