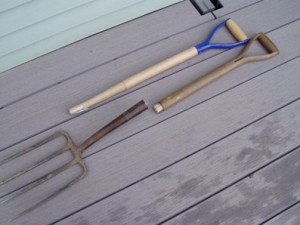
 It’s spring (except if you are in the Southern Hemisphere, in which case, it’s fall, but this will probably be useful for you folks too). And you want to work in the garden and go to wherever you store your garden tools (Well, let’s hope they got stored and not left to be covered with snow over the winter – don’t laugh; I just heard a tale from a coworker last week who relayed that she’d somehow left a garden rake out in the lawn over the winter and did not remember until her husband ran the mower over it). And what you find is that you’d put away a tool, thinking at the time, “I’ve GOT to fix this,” and you forgot and now you need it.
Such is the tale at Chez Siberia. Earlier this spring, I hauled out the garden fork, the shovel and the hoe, only to find that only one of them was in one piece. Since the hoe is put together differently, I’m doing this post on the garden fork and will handle the hoe as a separate issue. Basically, the garden fork itself (that is, the metal tines, the collar, etc.) is in great shape, so it is worth putting a new handle on it.
First task (and the one that actually took the longest) was finding a handle that would actually fit this garden fork, which the DH and I bought from Smith and Hawken sometime in their early days, in the early 80s, when they were concentrating on garden tools and had not yet gotten into the ‘we sell lifestyle’ thing. The old S&H actually no longer exists; the brand is now licensed to Target (and I think readers can figure out what that means in terms of where things are going to manufactured). But at this time, S&H had their garden tools manufactured in the UK by the worthily famous Bulldog Tools. Solid forged steel, with a solid wood D-handle, as you can see from the broken off bit in the photo above. I tried everywhere I could think of to find the same sort of handle in the right size; no luck. I finally found a D-handle replacement at our local feed store. It is not a perfect fit, as you can see from the process photos, but it was a good deal cheaper than replacing the entire garden fork with an equivalent quality (if I were able to find it in the US) and puts the tool back to work again.
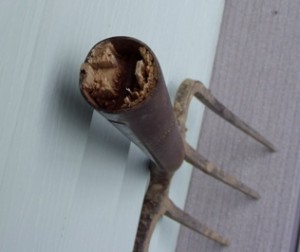 As you can see from this photo, the original wooden handle was held on with a rivet, which for those of us who are not familiar, is a nail-shaped piece of metal with a mushroom shaped top at one end and a slightly hollowed out end at the other. The way riveting works in general is that you put the the rivet through a hole holding two things together, flip the business over onto a hard surface and give the hollow end a couple of good hard smacks with a hammer. The hollow end will flatten out over the hole and hole the rivet into the two pieces. Voila!
To take care of this garden fork, we will need:
1) The DH – I don’t have a workbench with a bench-vice to hold things in place while I work with them, so this is a two person job.
2) A big nail and a hammer.
3) A drill of some sort with a bit that matches the hole in the metal part of the fork that the original rivet was in.
4) A handle that comes with another rivet.
5) A stone (not a wood) chisel.
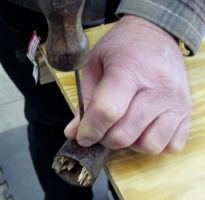 Step one: Get the old rivet and the rest of the old handle out of the business end of the garden fork.
Brace the metal part on a work surface where you will be able to get the area with the rivet out into the open.
Step two: Taking the nail, put that over the non-mushroom-y end of the rivet and keep hammering it until it comes out the other side. It will probably be rusty; there will undoubtedly be left over wood handle in there. if you’ve got a bit of oil (3-in-1, olive, old auto lubricants, whatever), put a bit of that around the rivet and that will help it come out.
Step three: Turn the metal part of fork over until you see the seam in the collar which attached the handle to the pointy bits of the fork. It will be partially opened by the original handle. Taking your chisel and hammer (make sure the fork is secured with a bench vice or another person), put the chisel into the seam and give it a couple of good ‘clouts’ (as my mom used to say) with the hammer; this will loosen the rest of the handle and you can shake or pull it out.
Step four: Putting the new handle in. Take off the rivet which will probably be attached with tape or a little plastic bag to the handle. Look at the shape of the collar (it will be either straight or have a slight curve). Look at your handle and the bottom of the handle should have the same sort of curve as the collar. Slide the handle into the collar. Holding the two things together, slam the metal part of the fork on top of the collar – do it on something soft like grass, an old towel, etc.
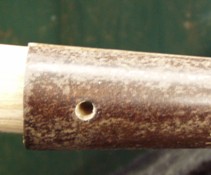 Step five: Taking your electric drill with a bit ‘chucked in’ that matches the size of the hole in the collar, secure the fork and drill through the hole in the collar and the wood handle to the other side.
Step six: Take the rivet and put it in. Flip it over on a hard surface, making sure that the mushroom-y part of the rivet is flat against that. Take your hammer and pound down on the slightly hollowed out end of the rivet which should be facing you. 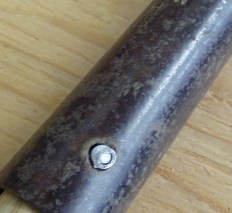
Done.
